
1. Buying, measuring, cutting, and assembling wood (10hr): This week, I spent a lot of time trying to make the box that will go around the gantry system. This involved going to Home Depot to buy the wood, measuring out the exact dimensions necessary for our box, looking for options to cut the wood, and then assembling it after the cut. Unfortunately, TechSpark’s wood shop was closed this week, which led me to 4 different places until I finally found someone to help us cut. The sides were put together and the bottom was attached. There is empty space on the right and left for our circuitry to be placed. The top will be placed on later as we still plan to adjust elements of the gantry when needed. 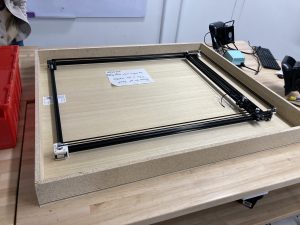 2. Basic Magnet Testing (4hr): Due to the external delays for cutting the wood, we had to wait to fully test some of the electromagnet functionality. However, in the meantime, we did some basic tests by propping up a piece of wood above the electromagnet at the same height as the box lid. We placed a magnet on top of the wood and turned the magnet on, then moved the gantry using the step motors. We found that the magnet moved smoothly in each direction. I also used some chess pieces that Tarek 3D printed, placed them on top of the magnet, and tested again to determine that we could move these chess pieces around the wood with the electromagnet. That was exciting to see!
3. Gantry Odds and Ends (2hr): I spent some time adjusting parts of the gantry that were slightly off, including making sure the corners were square. I adjusted the 3D-printed corner brace to ensure the corners would stay in this correct angle. I also spent some time cleaning up the wiring and creating a circuit for the electromagnet. The new plan is to use an NMOS to help power the electromagnet since the Arduino does not have a 5V configurable output pin. All of these changes should help to complete the overall design of the gantry.
4. Mandatory Lab Sessions (4hr): During our class sessions this week, I had an opportunity to work closely with Tarek to talk about some of the details about the Arduino-gantry interface. We also had some great conversations about the gaze detection, along with some risk mitigation plans in these final weeks. Most importantly, we got to meet with Professor Kim and Alex, who pushed us to continue working hard toward the final demo and prioritize the gaze detection.
Progress
I feel that the gantry is almost entirely done, minus a few small details. My progress was definitely stunted by the difficulty finding a wood shop to help us cut the wood. However, I plan to go in tomorrow to place the top on the box and test out movement on a larger space using the 3D-printed chess pieces. This will give a great indication of the functionality of our piece movement. I feel that I am still on schedule, although this time of the semester feels more rushed.
Next Week Tasks & Goals
- Test movement on a full board with all chess pieces included.
- Show knight piece moving between two other pieces.
- Get chessboard design engraved in top of box.
- Finish circuitry for small components and make a clean wiring design for all electronics involved.
Gantry Verification
Here is an overview of the plan and completed tasks for the gantry verification:
- Dimension iteration: One of the first elements of “testing” was an iteration of the height and thickness of the board that we would use as our chessboard. We ran various tests to see what material we could use and how far above the electromagnet it could go. We settled on a 5mm thick plywood piece that sits approximately 1/8″ above the electromagnet.
- Basic testing: This week, we carried out some basic testing to ensure that the electromagnet could move a chess piece through a wooden slab as the stepper motors controlled the movement. This is crucial given that all chess movements will be controlled by the Arduino, step motors, pulley system, and electromagnet. We saw consistent, smooth movements, regardless of the direction.
- Chess Movement Testing: With each type of piece, we will test all possible types of moves. Vertical, horizontal, and L-shaped moves will be tested to ensure that we can accurately move a piece for short or long distances. We are looking for consistent accuracy, with 70% of the chess piece base placed in the intended square.
- Knight Movement Testing: One of the most difficult movements to mimic is early-game knight behavior, as it often jumps over a row of pawns. Our solution will instead move the pawn between the pieces in front of it, which could lead to magnetic interference on the adjacent pieces. To ensure that this interference is minimized, we will test various movements between two other pieces. This worst-case scenario will confirm that these moves are possible. We want to ensure that all pieces more than 0.75″ away are not picked up.
- Full-Game Scenario Testing: After all of the “unit testing” is finished, it will allow us to test continuous moves that would be seen in a real chess game. We will set up all pieces in a normal start state, then test basic moves based on real chess games that we find online. Each move should grab the correct piece and move it to the intended position without disrupting nearby pieces.