
Personal Accomplishments
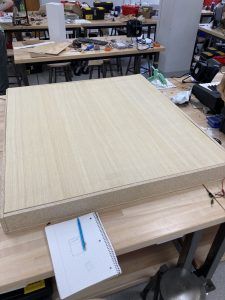
1. Gantry Piece Movement and Lid (12 hr): Since I was finally able to build the box last week, I spent a lot of time this week measuring the top and testing piece movement. There were some slight issues with the top, as the thin piece of plywood (5mm) tends to bow due to the lack of support in the middle. I believe I came up with a solution as we will use a small “table” design inside the box that supports the top and can be lifted out for maintenance. A picture of the top will be placed below. This also allowed us to test the magnet and piece movement. I found that the magnet was able to move the pieces in both the x- and y-direction. A video will be linked below. This was really cool to see, and great to see with the full box assembled. The next step will be fine tuning the movement and testing with a full gameboard.
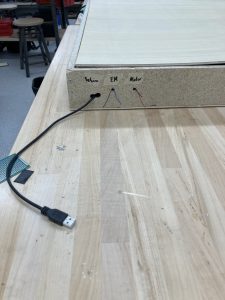
2. Small Box Adjustments (2hr): I also made some slight adjustments to the box to make the design easier to use. First, all the electronics are inside the box (which hides them from view and cuts down on distractions). I also made the wiring cleaner, rather than the old tangle of wires we had before. Another such improvement was drilling holes in the side of the box to access the wires and power devices. Each hole was also labeled. This will make it even easier to test in the future without having to remove the whole top each time!
3. Mandatory Lab Sessions (4hr): During our class sessions this week, we once again had uninterrupted time to discuss the final details of our project and how we wanted to approach the upcoming deadlines. The weekly meeting with Professor Kim and Alex showed us that we needed to stay motivated and continue working to make sure we have a good demo for the final week.
4. Work on Final Presentation (3hr): The last thing I worked on this week was the final presentation. I put effort into building the slides and making sure they met the requirements. I will also be presenting these slides, so I took some time to practice certain details as I wrote them.
Progress
Once again, I feel that the gantry is basically done. I have to iron out a few details with some spacing and measurements, but the core functionality is all there. I plan to continue to solve these small issues throughout the week to finish out my part of the project!
Next Week Tasks & Goals
- Test movement on a full board with all chess pieces included.
- Show knight piece moving between two other pieces.
- Get chessboard design engraved in top of box.
- Give a good presentation!
New Tools & Knowledge
Looking back on the details of my portion of capstone, I realize that many details were mechanical in nature. The entire gantry is a very physical design composed of precise measuring, woodworking, assembly with various tools, and an eye for structural issues. I worked with electronics every now and then, but my part involved lots of tinkering to design a physical system. As such, I felt that I needed to gain the following skills:
- Woodworking: Although building a box doesn’t sound overly difficult, there were certain issues I had to deal with as I planned and assembled it. First, the absolute size of our box (roughly 43″ x 48″ x 3″) amplified the entire process. I relearned how to use a table saw and belt sanders. I would continuously visit wood shops around campus to get help and hear ideas from the staff there. The thinness of the top board also proposed some issues as the wood would bow easily, so I had to learn how to fix and support a bowing piece of wood to keep things straight. This was actually a very fun part of the project and I hope to do more woodworking in the future.
- Basic tinkering/making: Because our project has so many intricate details, I found myself having to be very creative when looking for solutions to our issues. I would often look at YouTube videos and maker forums by people who made projects with similar features. These would serve as inspiration for how to improve certain details that I did not know how to approach. I would also go to TechSpark and ask the staff if they had any ideas, as I learned they were very knowledgeful in these mechanical systems.
- Various tools: Most of the assembly involved tools like power drills, sanders, saws, and wrenches. While I didn’t have to learn how to use many of these things, I did have to change my understanding of how to use them effectively. I found myself becoming very hands-on for most of this project and using tools in ways I never had before.
- CAD tools: I had to design some 3D-printed parts for our project, which allowed me to become more familiar with some of the programs available for CAD. I had to read many online guides and forums to learn how to use these tools well.
- Embedded Design and Component Selection: Although Tarek did the Arduino code, I had to select the components that we used for this design (including the step motors, drivers, roller switches, etc.). I also had to gain an understanding of how my physical system would interface with some sort of logic controller (i.e. our Arduino). This led to some research into step motor control and pulley system design to optimize our control and motion. Thankfully, there are many guides and home projects online which walk through these processes.