Team Status Report for 4/26/25

General update
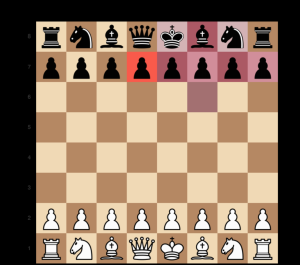
  1. In order to ensure we have a complete demo-able system, we have switched the gaze tracking from the physical 3D plane to a 2D screen. Liam implemented and added a calibration to this to increase accuracy. He is working in parallel on testing and validating this implementation, and a hail-mary effort to get 3D gaze tracking to the required accuracy.
  2. In testing, Trey was finally able to get consistent magnet movement of the pieces by lowering the lid on the enclosure. He also made the discovery that sanding down the base of the pieces to make them smoother leads to better magnet movement.
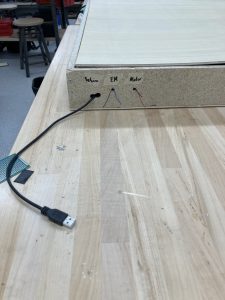
  3. Tarek continued verifying and validating the many parts of the embedded controller subsystem. He also used a new high-power NMOS to ensure the Arduino can turn the electromagnet on and off.
  4. Tarek and Liam have individually written the communication scripts to integrate their subsystems, and only testing remains.
Potential risks and risk management
  1. While Trey made great attempts and progress on getting consistent magnetic piece movement, the king and queen are still prone to failure due to their increased weight. Integration and user testing will reveal wether this meets our benchmark.
  2. 3D gaze tracking is unlikely at this point, but the identified and implemented alternative is working and suitable given the specifications.
Overall design changes
  1. 3D gaze tracking to 2D eye-gaze-tracking.
Schedule

We are on track to finish everything by the deliverable dates.

TESTING DONE
  1. Tarek has written scripts for every stand-alone component in the embedded controller and used them to validate the components, which all performed according to the specs.
  2. Trey tested magnetic piece movement to ensure  consistent piece pickup by the magnet, in doing so he found that lowering the height of the lid on the enclosure and sanding down the base of the pieces better results could be achieved.
  3. Liam performed manual tests on the new gaze-tracking UI to ensure it conforms according to the specs. He is currently working on quantitatively measuring this, but so far, the system seems to meet the desired accuracy.

Tarek’s Status Report for 4/26

What did you personally accomplish this week on the project? Give files or photos that demonstrate your progress. Prove to the reader that you put sufficient effort into the project over the course of the week (12+ hours).

This week I continued unit testing all my individual components for validation and verification of the subsystem. I also wrote a new library to communicate with the machine running the gaze-tracking script over UART.

I acquired a new MOSFET that is rated for the voltage and current, and got it to work being controlled by the Arduino by adding some additional components like pull-down resistors and a flyback diode.

I also spent time working on our final presentation slide deck.

Finally, I lent Trey a hand drawing the board on the lid. We were originally going to laser engrave this but it ended up not being possible due to relief being an issue for moving pieces on the top of the board.

Is your progress on schedule or behind? If you are behind, what actions will be taken to catch up to the project schedule?

I am right on schedule except for user testing, which will be done over the next days right up until the final demo and report are due.

What deliverables do you hope to complete in the next week?

Finalize unit testing and validation (UART and keypad left) and user testing.

Liam’s Status Report 4/26/25

Personal Accomplishments:

This week, I focused on getting the screen implementation working so I wouldn’t impede progress. Once I have this calibrated and working decently well, I might spend a bit of time with the stereo camera. I also created the UART Python code on the laptop side to interface with the Arduino. Using the screen 

Testing: Manual testing has been conducted to optimize the screen eye-tracking accuracy. While quantitative accuracy testing is not yet implemented, it is scheduled for completion within the next week. The next critical integration phase involves connecting the laptop/Jetson to the Arduino via UART communication, as outlined in the design report. This integration will utilize predefined character strings to establish reliable data transfer protocols.


Progress:

I am on track so that the team can deliver a finished product. Hopefully, I can flesh this out on Sunday properly.

Future Deliverables:

Clean up and polish screen code

Work potentially on stereo camera one.

Trey Wagner’s Status Report for 4/26/25

Personal Accomplishments

1. More Gantry Fine-Tuning and Troubleshooting (13hr): During this week, we noticed a phenomenon where the pieces began to move more inconsistently. This led to a lot of troubleshooting where I tried to change the height of the top board, alter the angle of the board, and think critically about why this might be occurring. In the end, I determined that the sharp edges of the 3D-printed pieces would hit the wooden board during movement, which added enough friction to prevent movement altogether. I fixed this by going through and sanding down all of the edges of the pieces, as well as sanding the surface of the board. At this point, officially, all piece types are moving as expected again.

2. Testing Movement and Specific Circuit Components (4hr): After fine-tuning the details above, I tested movements in different directions with the chess pieces. I also wanted to go through the process of verifying the functionality of our circuitry. Therefore, I went through and looked at the roller switches and electromagnet. One thing that I noticed (which we will have to note during demo) is that the electromagnet does not work as effectively if it becomes overheated. To avoid this, we will need to ensure the electromagnet does not stay on for long periods of time. This should be straightforward, as the magnet should only be on for the short period of time during a move.

3. Mandatory Lab Sessions (4hr): During our class sessions this week, we had the opportunity to share our final presentations. It was my turn to present, so I explained our project’s progress so far and the steps we still have to complete. It was great to see everyone else’s project as well, and I took some time to fill out peer reviews for all of the other presentations.

4. Prepare for Final Presentation (2hr): In order to give a good presentation, I spent some time beforehand to prepare what I wanted to say. This time seemed to help a lot, as I felt that our presentation went very smoothly with no major issues.

Progress

The small movement issues were solved this week, but that, unfortunately, prevented me from making much forward progress as I was instead focused on getting back to the functional spot we were before. The purely mechanical nature of the gantry can cause these issues to occur, so I want to iron out as many as possible before our demo this Thursday. I will need to put in some time early this week to finish my portion and get the project to match my initial vision, but I have no doubt we can get it done fully.

Next Week Tasks & Goals
  1. Give a good demo and show the class what we’ve been up to!
  2. Finish all final project documentation requirements

Team Status Report for 4/19/25

General update
  1. The gantry enclosure is now virtually finished. Trey is working on a way to get the top board to be less bowed when laid on the enclosure so all pieces sit more or less flat on the surface. With that, and a few tweaks for calibration, that subsystem will be complete.
  2. The LED array circuit works in a 4×4 layout. Tarek finished the code for all the peripherals associated with the Embedded Controller subsystem. All that is left now is to integrate it with the gaze tracking mechanism and wire up an 8×8 LED array. Beyond that, this subsystem needs to be tested and validated.
  3. Liam is still hard at work on the gaze tracking subsystem. He identified an error in his position estimation calculations, and found a new model which will give us better accuracy and is easily integrated into the existing setup. He also worked on calibrating the webcam
Potential risks and risk management
  1. The difficulties with getting gaze estimation to work have set us back behind schedule slightly. In order to ensure we have enough time to test a whole system before the demo rolls around, we have set a hard deadline that if gaze tracking is not working satisfactorily by Tuesday night, we will pivot to voice or screen gaze-tracking, which is much easier (and in the case of voice tracking, is already done). This should leave us with enough time to test the whole system end-to-end.
Overall design changes
  1. No major design changes this week aside from a change in the gaze estimation model.
Schedule

While gaze tracking is behind schedule, the rest of the project is right on schedule and close to being ready for full testing. As previously mentioned, this risk is being mitigated so that a whole end-to-end system can be tested by the time the demo rolls around.

Tarek’s Status Report for 4/19

What did you personally accomplish this week on the project? Give files or photos that demonstrate your progress. Prove to the reader that you put sufficient effort into the project over the course of the week (12+ hours).

This week, I finished writing the code for the final components of my subsystem I had left, the LED array and the keypad. Now that all of the components of the Embedded Controller are there, I have written an Arduino sketch that plays out a whole game with everything except gaze tracking input, using serial input instead. Code here.

I built a 4×4 LED array to test my code and it worked. See video. Expanding this circuit to 8×8 will require a lot of wiring, but the logic is no different, so it should work in theory.

I also designed the final three chess pieces in Fusion to 3D print them at IDeATe. With this, we can now print an entire set of chess pieces. We did run into an issue where some of the pieces were too heavy for the electromagnet to move, so we are attempting to print them in “vase mode”, where the pieces are virtually hollow, and therefore a lot lighter.

Finally, I started by validating certain components of my subsystem, such as the magnet, motor calibration, limit switches, keypad, and LED array (4×4, will validate 8×8 once built..

Is your progress on schedule or behind? If you are behind, what actions will be taken to catch up to the project schedule?

I am right on schedule.

What deliverables do you hope to complete in the next week?

Aside from expanding the LED circuit from 4×4 to 8×8, all I have left to do is thoroughly test and validate my subsystem and the project, and write a short UART parser to integrate with the  gaze-tracking.

As you’ve designed, implemented and debugged your project, what new tools or new knowledge did you find it necessary to learn to be able to accomplish these tasks? What learning strategies did you use to acquire this new knowledge?

I hadn’t worked with Arduino in a long time, so I had to familiarize myself with the toolchain (working with additional files to the main script is fairly different than in C/C++). I had also never written code for certain components like magnets or stepper motors (except for a small part of a lab in 18-349). I had to look at some Arduino tutorial blog posts to pick up on how to this, although it wasn’t overly complex.

For the rest of the parts of the project, I pulled on what I learned over the last 4 years in ECE at CMU: to write clean, modular, self-documenting code for a wide variety of embedded devices. Implementing certain parts of the project was challenging, and figuring out how to do something from scratch would have been inefficient, so one learning strategy I used thoroughly is adapting something new to something I’ve done before. I may not have implemented certain parts of the project using the absolute best practices or methods, but I did implement them in a clean and efficient enough way that works and is familiar to me. This enabled me to understand and write code faster, as well as have an easier time debugging it.

Liam’s Status Report 4/19/25

Personal Accomplishments

This week I enhanced our gaze estimation accuracy by identifying a 3cm off-center error in our calculations. This discrepancy stems from the stereo camera setup – since we’re using the rectified image from the left camera, we can’t assume the image originated from between both cameras. I also began developing a screen implementation to facilitate integration testing. Additionally, I installed Parsec on my home computer in Missouri to conduct ML training, as I couldn’t find a suitable pre-trained model online. This particular model delivers superior accuracy for screen-based gaze tracking compared to alternatives, making it a low-risk decision that allowed meo to simultaneously progress on other aspects of the project.

If you are interested in how calibration works opencv has a good tutorial:

Here is a picture of me calibrating my webcam:


Progress:

I am still working on the gaze estimation onto the chessboard at the same time as doing the screen so I do not impede progress on my team


Future Deliverables

Switch to ETHx-Gaze dataset (still)

Switch over to Jetson (still)

Get Screen Estimation working for now

Trey Wagner’s Status Report for 4/19/25

Personal Accomplishments

1. Gantry Piece Movement and Lid (12 hr): Since I was finally able to build the box last week, I spent a lot of time this week measuring the top and testing piece movement. There were some slight issues with the top, as the thin piece of plywood (5mm) tends to bow due to the lack of support in the middle. I believe I came up with a solution as we will use a small “table” design inside the box that supports the top and can be lifted out for maintenance. A picture of the top will be placed below. This also allowed us to test the magnet and piece movement. I found that the magnet was able to move the pieces in both the x- and y-direction. A video will be linked below. This was really cool to see, and great to see with the full box assembled. The next step will be fine tuning the movement and testing with a full gameboard.

Chess Movement Video

2. Small Box Adjustments (2hr): I also made some slight adjustments to the box to make the design easier to use. First, all the electronics are inside the box (which hides them from view and cuts down on distractions). I also made the wiring cleaner, rather than the old tangle of wires we had before. Another such improvement was drilling holes in the side of the box to access the wires and power devices. Each hole was also labeled. This will make it even easier to test in the future without having to remove the whole top each time!

3. Mandatory Lab Sessions (4hr): During our class sessions this week, we once again had uninterrupted time to discuss the final details of our project and how we wanted to approach the upcoming deadlines. The weekly meeting with Professor Kim and Alex showed us that we needed to stay motivated and continue working to make sure we have a good demo for the final week.

4. Work on Final Presentation (3hr): The last thing I worked on this week was the final presentation. I put effort into building the slides and making sure they met the requirements. I will also be presenting these slides, so I took some time to practice certain details as I wrote them.

Progress

Once again, I feel that the gantry is basically done. I have to iron out a few details with some spacing and measurements, but the core functionality is all there. I plan to continue to solve these small issues throughout the week to finish out my part of the project!

Next Week Tasks & Goals
  1. Test movement on a full board with all chess pieces included.
  2. Show knight piece moving between two other pieces.
  3. Get chessboard design engraved in top of box.
  4. Give a good presentation!
New Tools & Knowledge

Looking back on the details of my portion of capstone, I realize that many details were mechanical in nature. The entire gantry is a very physical design composed of precise measuring, woodworking, assembly with various tools, and an eye for structural issues. I worked with electronics every now and then, but my part involved lots of tinkering to design a physical system. As such, I felt that I needed to gain the following skills:

  1. Woodworking: Although building a box doesn’t sound overly difficult, there were certain issues I had to deal with as I planned and assembled it. First, the absolute size of our box (roughly 43″ x 48″ x 3″) amplified the entire process. I relearned how to use a table saw and belt sanders. I would continuously visit wood shops around campus to get help and hear ideas from the staff there. The thinness of the top board also proposed some issues as the wood would bow easily, so I had to learn how to fix and support a bowing piece of wood to keep things straight. This was actually a very fun part of the project and I hope to do more woodworking in the future.
  2. Basic tinkering/making: Because our project has so many intricate details, I found myself having to be very creative when looking for solutions to our issues. I would often look at YouTube videos and maker forums by people who made projects with similar features. These would serve as inspiration for how to improve certain details that I did not know how to approach. I would also go to TechSpark and ask the staff if they had any ideas, as I learned they were very knowledgeful in these mechanical systems.
  3. Various tools: Most of the assembly involved tools like power drills, sanders, saws, and wrenches. While I didn’t have to learn how to use many of these things, I did have to change my understanding of how to use them effectively. I found myself becoming very hands-on for most of this project and using tools in ways I never had before.
  4. CAD tools: I had to design some 3D-printed parts for our project, which allowed me to become more familiar with some of the programs available for CAD. I had to read many online guides and forums to learn how to use these tools well.
  5. Embedded Design and Component Selection: Although Tarek did the Arduino code, I had to select the components that we used for this design (including the step motors, drivers, roller switches, etc.). I also had to gain an understanding of how my physical system would interface with some sort of logic controller (i.e. our Arduino). This led to some research into step motor control and pulley system design to optimize our control and motion. Thankfully, there are many guides and home projects online which walk through these processes.

Team Status Report for 4/12/25

General update
  1. Gantry progress has been good, although it was slightly delayed by issues with wood shops on campus. We have the box assembled and will be doing more testing over the coming days to verify proper movement of the chess pieces. We believe this part of the project is almost done! Just putting the finishing touches on the design now.
  2. Liam has been making good progress with the gaze detection, and he now has a better way to test the results as a person sits in front of the camera. He will continue to make this better over the coming days as he carries out more testing. This will also allow him to calibrate the model for better results overall.
Potential risks and risk management
  1. No new risks this week. We created a speech-to-text model that would act as a backup to the gaze estimation, although we are still confident in our ability to finish the gaze detection as expected. We believe the speech element would still meet our use case requirements as it does not require any physical motion by the user. This model has proven to be quite accurate as we speak into a computer microphone.
Overall design changes
  1. The one new design change is a small one. We will be using an NMOS in a small circuit to handle powering on the electromagnet. This is because the Arduino does not have a 5V output pin that can switch from high to low. We will use one of the 3.3V output pins to power the gate of an NMOS, which will act as a type of switch (although imperfect) to power on the electromagnet with the necessary 5V.
Schedule
  1. Our schedule does not have any major changes. We are ready to buckle down and do whatever work is necessary to finish this project and have a great presentation and demo at the end of the semester!

Validation

There are a few ways that we, as a team, plan to validate our design. This will look a lot at whether our project is still meeting the user needs.

  1. Revisit Initial Use Case Requirements: This will be talked about throughout the following points, but we want to go back and ensure we are hitting the use case we originally thought about. The idea was most clear at the beginning, and we want to be sure we did not stray from that concept.
  2. Accessibility of Gaze Model: We plan to bring in some of our friends and classmates to get a wide audience of people to test our camera model on. This will allow us to test all sorts of eye sizes and shapes to build a design that is accessible to as many people as possible. After all, our design sets out to make chess accessible to as many people as possible.
  3. Non-Physical Gameplay: As we carry out our testing, we want to make sure that every aspect of the gameplay is non-physical. This is to make sure that our system can be played by people who are not able to physically move certain aspects themselves, which is our entire use case. This means that the camera should not have to be adjusted, the pieces should be placed properly, and the electronics should work without physical interaction.
  4. Hidden Devices: One of the important needs that we set forward was an unobtrusive design. As we continue to assemble the system and test, we will be sure that all computational circuitry (and gantry components) are hidden away so that they do not detract from the game. This will continue to guide our decisions during assembly and placement.
  5. Speed of System: One major user need that we recognize is the speed of our system. We do not want moves to take too long for users to become uninterested and discouraged. Therefore, we plan to iterate during testing to improve any unneeded latency and make the game flow continuously as much as possible.
  6. Accuracy: Although this is mostly testing in verification, accuracy is the most crucial part of our user needs. If our system is not accurate, it will not be used. Therefore, as we go through testing, we will be sure that accuracy is at the forefront of our validation and make changes when necessary to prioritize this metric.
  7. Remapping our Stakeholders: As we look toward a completed design, we think it may be interesting to look back at the ethics assignment for this class. Are we considering the stakeholders properly? Are we keeping bias and our own pride out of our design? We want to be sure that we are still aligned with the people most affected by our system.

Trey Wagner’s Status Report for 4/12/25

1. Buying, measuring, cutting, and assembling wood (10hr): This week, I spent a lot of time trying to make the box that will go around the gantry system. This involved going to Home Depot to buy the wood, measuring out the exact dimensions necessary for our box, looking for options to cut the wood, and then assembling it after the cut. Unfortunately, TechSpark’s wood shop was closed this week, which led me to 4 different places until I finally found someone to help us cut. The sides were put together and the bottom was attached. There is empty space on the right and left for our circuitry to be placed.  The top will be placed on later as we still plan to adjust elements of the gantry when needed.                                                                                                                                 
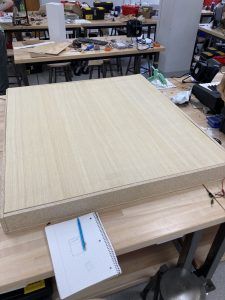
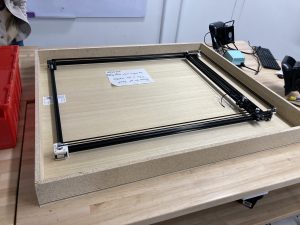
2. Basic Magnet Testing (4hr): Due to the external delays for cutting the wood, we had to wait to fully test some of the electromagnet functionality. However, in the meantime, we did some basic tests by propping up a piece of wood above the electromagnet at the same height as the box lid. We placed a magnet on top of the wood and turned the magnet on, then moved the gantry using the step motors. We found that the magnet moved smoothly in each direction. I also used some chess pieces that Tarek 3D printed, placed them on top of the magnet, and tested again to determine that we could move these chess pieces around the wood with the electromagnet. That was exciting to see!

3. Gantry Odds and Ends (2hr): I spent some time adjusting parts of the gantry that were slightly off, including making sure the corners were square. I adjusted the 3D-printed corner brace to ensure the corners would stay in this correct angle. I also spent some time cleaning up the wiring and creating a circuit for the electromagnet. The new plan is to use an NMOS to help power the electromagnet since the Arduino does not have a 5V configurable output pin. All of these changes should help to complete the overall design of the gantry.

4. Mandatory Lab Sessions (4hr): During our class sessions this week, I had an opportunity to work closely with Tarek to talk about some of the details about the Arduino-gantry interface. We also had some great conversations about the gaze detection, along with some risk mitigation plans in these final weeks. Most importantly, we got to meet with Professor Kim and Alex, who pushed us to continue working hard toward the final demo and prioritize the gaze detection.

Progress

I feel that the gantry is almost entirely done, minus a few small details. My progress was definitely stunted by the difficulty finding a wood shop to help us cut the wood. However, I plan to go in tomorrow to place the top on the box and test out movement on a larger space using the 3D-printed chess pieces. This will give a great indication of the functionality of our piece movement. I feel that I am still on schedule, although this time of the semester feels more rushed.

Next Week Tasks & Goals
  1. Test movement on a full board with all chess pieces included.
  2. Show knight piece moving between two other pieces.
  3. Get chessboard design engraved in top of box.
  4. Finish circuitry for small components and make a clean wiring design for all electronics involved.
Gantry Verification

Here is an overview of the plan and completed tasks for the gantry verification:

  1. Dimension iteration: One of the first elements of “testing” was an iteration of the height and thickness of the board that we would use as our chessboard. We ran various tests to see what material we could use and how far above the electromagnet it could go. We settled on a 5mm thick plywood piece that sits approximately 1/8″ above the electromagnet.
  2. Basic testing: This week, we carried out some basic testing to ensure that the electromagnet could move a chess piece through a wooden slab as the stepper motors controlled the movement. This is crucial given that all chess movements will be controlled by the Arduino, step motors, pulley system, and electromagnet. We saw consistent, smooth movements, regardless of the direction.
  3. Chess Movement Testing: With each type of piece, we will test all possible types of moves. Vertical, horizontal, and L-shaped moves will be tested to ensure that we can accurately move a piece for short or long distances. We are looking for consistent accuracy, with 70% of the chess piece base placed in the intended square.
  4. Knight Movement Testing: One of the most difficult movements to mimic is early-game knight behavior, as it often jumps over a row of pawns. Our solution will instead move the pawn between the pieces in front of it, which could lead to magnetic interference on the adjacent pieces. To ensure that this interference is minimized, we will test various movements between two other pieces. This worst-case scenario will confirm that these moves are possible. We want to ensure that all pieces more than 0.75″ away are not picked up.
  5. Full-Game Scenario Testing: After all of the “unit testing” is finished, it will allow us to test continuous moves that would be seen in a real chess game. We will set up all pieces in a normal start state, then test basic moves based on real chess games that we find online. Each move should grab the correct piece and move it to the intended position without disrupting nearby pieces.