Liam’s Status Report 2/22

Personal Accomplishments

I helped Trey this week with testing the electromagnets. The new cable also came in, and I was able to properly test it now. I will now be working on creating the POC for gaze estimation. Once we get the gaze working, I will have to 3D print a stand for the camera. The Jetson should be fully configured at this point we just need to write code for the estimation.

Progress

If I don’t finish the proof of concept this weekend I will be worried about staying on track. Besides that I am on track.

Future Deliverables

  • Proof of Concept
  • Stand for camera

Tarek’s Status Report for 2/22

What did you personally accomplish this week on the project? Give files or photos that demonstrate your progress. Prove to the reader that you put sufficient effort into the project over the course of the week (12+ hours).

This week was key for my subsystem of the project: the embedded controller. I received the Arduino Mega 2560 and installed the required Arduino IDE to be able to develop on the board. I also spent some time reading up on the TB6600 stepper motor driver, and how to use it in combination with the Arduino to drive the stepper motors that will move the gantry. After some work figuring out how to properly wire the motor and motor driver, Trey and I were able to make the motor spin using a basic Arduino sketch. See video.

The rest of my time was spent adding calculations to the Arduino program such that given a microstep resolution, belt pitch, and pulley teeth count, we can drive the gantry to a specific position along the belt (in one dimension). See code.

Is your progress on schedule or behind? If you are behind, what actions will be taken to catch up to the project schedule?

My progress is on schedule. My goal for this week was to figure out how to control the motors using the Arduino and I accomplished that.

What deliverables do you hope to complete in the next week?

I will add additional logic to control the gantry in two dimensions. Once Trey assembles the gantry this week, we will thoroughly test this. That being said, we expect to be able to accomplish less work on the project in the next week as the design report will take up the bulk of our time.

Team Status Report for 2/22/25

General update

This week, the team spent most of our time assembling, bringing up software and devices, and doing initial proof of concept tests. Liam has been working with the Jetson and the stereo camera. He is evaluating the output of the camera and determining how to interface with the Jetson and our included models. Trey tested out the electromagnet functionality and began working on the gantry system assembly. Some CAD designs seem necessary, so Trey will also be designing and printing these components to support the ordered components. He also worked with Tarek to get the step motors spinning. Tarek is working in more detail on the Arduino program that will give precise control to our pulley system in the gantry.

Potential risks and risk management

No new risks have been identified this week. The same two (3D Gaze Estimation and the Electromagnet) will be prevalent until further testing is done. A proof of concept for gaze detection will ease worries about that subsystem. Liam is working studiously on that.

Overall design changes

No large design changes this week. Preliminary testing identified that an external DC power supply may be needed for the motor drivers. However, the overall design has not changed in any way. Further testing will be used to verify entire subsystems and the interface between them.

Schedule

Our schedule remains unchanged and we are on track.

Trey Wagner’s Status Report for 2/22/25

PERSONAL Accomplishments
  1. Electromagnet Testing (4hr): Since the electromagnets were delivered this week, I wanted to do some testing to ensure they would work for our system. We received two electromagnets — one with 2.5kg holding force and the other with 5kg holding force. Both were attached to a 5V input supply. We gathered some ferrous pieces of metal (more on that later) and some potential board materials to test. I determined that the 2.5kg electromagnet would not be strong enough for our design. The 5kg electromagnet was able to move pieces of metal smoothly through 1/8″ thick plywood and acrylic. Increasing the thickness to 1/4″ limited the functionality of the magnet. For the 1/8″ thick materials, the plywood appeared to be a better choice for smooth motion. We found that the magnet would not easily attract nearby metal if already holding onto a large piece of metal. I also found some random results, such as the electromagnet working better at 5.5V than 5V. Overall, this proved that the electromagnet could work through a chessboard surface. Now, testing will focus on moving actual pieces with other pieces nearby. A video of this test can be found below:

Video of Electromagnet

2. Finding the Right Metal (1hr): As mentioned above, electromagnet testing also brought about considerations of the size and shape of the metal needed for our pieces. Liam and I spent an hour retrieving various metal nuts, washers, and screws from TechSpark to determine the best fit. Testing showed that a heavier piece moved more smoothly, although the piece could be too heavy. Some washers/nuts didn’t move easily due to the large hollow middle. We will need to find a solid piece of ferrous metal with some weight to place inside each chess piece. The weight could also be provided by the chess piece itself.

3. Interfacing Stepper Motors with Arduino (3hr): I worked with Tarek to get the step motors moving using the Arduino Mega. First, I had to learn about the wiring of the step motors and the interface of the motor drivers. After that, I helped to wire the two together and connect them back to the Arduino. We played around with various input voltages (within the specs of the drivers) and configurations to determine step size. Ultimately we got the motors to spin with the desired rotation. Tarek will post more details on his status report.

4. Mandatory Lab Meetings (4hr): During our lab sessions, I watched Tarek present our design review presentation. Once again, we received good questions about handling edge case rules in chess. We also received feedback from Professor Kim, who advised that our pedal to lock in moves may go against the accessibility that our product advertises. We plan to carry this feedback into our design to handle chess logic properly and determine a better move lock mechanism (voice or facial recognition). I also got the chance to witness other groups present their design presentations and give valuable peer reviews. It is encouraging and stimulating to see the design choices of other groups.

5. Gathered Data for Design Report (2hr): As the design report is upcoming, I wanted to get ahead on some of the elements needed for my subsystem. As such, I began gathering data about my components into one shared document. I also started to create visuals to represent the design decisions that I made, and why I believe that my decisions were best for our project. We will continue working on the design review throughout the next week.

Progress

My progress is still slightly behind schedule to finish an MVP design by spring break. I believe that I can have some assembly completed by this week, but the design report could be a huge undertaking. Depending on how much work that requires, it may take away from my available time for assembly and testing this week. I will have plenty of time directly after spring break, which should allow me to get back on track.

Next Week Tasks & Goals
  1. Design 3D-printed trolley component to hold electromagnet in our gantry system.
  2. Assembly entire gantry system outside of the box.
  3. Finish design report.

Tarek’s Status Report for 2/15

What did you personally accomplish this week on the project? Give files or photos that demonstrate your progress. Prove to the reader that you put sufficient effort into the project over the course of the week (12+ hours).

I was sick for the majority this week and had to visit the hospital which hindered the amount of work I was able to do. That being said, I was able to complete the majority of my tasks.

I researched how to implement the through-board LED system. I thought of using a MAX7219 multiplexing LED chip, but after our faculty meeting and our pivot to magnetically controlled chess pieces, I realized this may actually be more complex than anticipated, as the electromagnet may destroy components of this circuit when moving pieces. As this is not a quality-of-life feature, and not a critical element of our design, I set this aside and focused on other tasks this week.

I ordered the Arduino Mega 2560 as well as cables to connect devices for the team. I also designed the communication protocol between the Arduino and Jetson. The Jetson will communicate over UART with the Arduino sending out messages as fast as the model can estimate gaze in the following format:

'''{row}{col}\n'''

The Arduino will only parse a line after seeing a newline character so that we can detect where messages start. We avoid fragmentation by discarding messages that don’t end in a newline character. The Arduino will select a move origin (or destination) as soon as it receives a complete coordinate message AND the user is using the lock-in mechanism (button/pedal).

I also researched libraries and implementation methods in case gaze estimation at our required accuracy is not possible and we are forced to pivot to having the user look at a screen. If this were the case, we would implement the eye-tracking and UI in Python. The eye-tracking would most likely be powered by the EyeGestures library. This would take in live webcam input from the user’s desktop machine and use it to output a coordinate of where on the screen the user is looking at. I would write a simple Python applet that displays a live-feed of a bird’s eye view of the board using the OpenCV Python library (this is just a commonly used live-feed library, OpenCV would not be actually using Computer Vision in this version of our project), then overlay the EyeGestures coordinate over the screen using tkinter to display where the user is looking. EyeGestures can also capture blinks, which the user would use to lock into a move.

Finally, I worked on designing and delivering the design presentation, which I will be giving unless my Monday morning doctor’s appointment takes too long, in which case Trey will give the presentation.

Is your progress on schedule or behind? If you are behind, what actions will be taken to catch up to the project schedule?

My progress is mostly on schedule. My illness and the change of plans to using magnets to move the pieces meant that I was not able to put enough time into finalizing the design of the through-board LED UI subsystem. I will park this aside for the time being and focus on the mechanical aspects of our system until the design report is due. Once that is working, I can go back to working on quality-of-life improvements.

What deliverables do you hope to complete in the next week?

Next week we will present our design presentation and receive the components we ordered. My main goal for next week is setting up the Arduino and figuring out how to use it to control the stepper motors.

Team Status Report for 2/15/25

General update
  1.  Jetson configured
    1. Packages installed and configured it to be connected through SSH
  2. Preparing for design presentation
  3. Parts ordered for the various subsystems which should begin to come throughout the next week. This will be particularly helpful for the Arduino and gantry system, as we can begin to assemble and test the interface between the two.
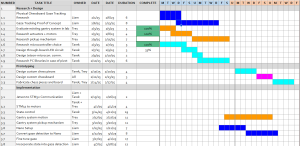
  4. New Gantt Chart
Potential risks and risk management
  1.  The same risk mentioned last week about the accuracy of the gaze model. If it fails horrendously we will switch to a screen or hopefully find a better model.
  2. There is a chance that the electromagnet is an ineffective solution. It could be too strong and attract nearby pieces during movement, or it could be too weak that it cannot move a piece through the board. In order to manage this risk, we will test this functionality as early as possible to allow pivots to other pickup mechanisms. The next option would be reverting back to an above-ground gantry that uses a mechanical grabber.
Overall design changes
  1. The gantry system design changed from an above-board system to a below-board. This decision benefits us in several ways, including eliminating the assembly and cost of a z-axis step motor and creating a more clean and accessible board (without the large rails on the sides). The below-board system will still meet all design requirements.
  2. No other design changes at this time. We expect many of our components to arrive throughout next week, which will allow us to determine if the design/parts are suitable.
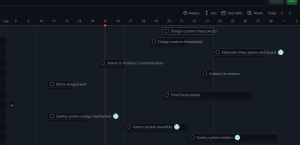
Initial Schedule
  1. After a conversation with Professor Kim, we have decided to accelerate the schedule of our baseline design. Achieving a minimum viable product (MVP) earlier will allow us to find flaws in our subsystems while still offering enough time for testing and integration. As such, our schedule has changed to reflect the new deadlines that we would like to follow.

Additional Week-specific Items

Part A: Public Health, Safety, and Welfare (written by Trey):

Check, Mate, Vision enhances public health and welfare by making chess accessible to individuals with limited upper body mobility, promoting cognitive well-being and emotional resilience. Studies show that chess improves memory and problem-solving skills, yet its physical requirements can be restrictive. Our system removes these barriers, ensuring all players can access its mental health benefits. Beyond cognitive stimulation, Check, Mate, Vision creates meaningful recreational opportunities, reducing social isolation and fostering engagement. By providing an inclusive and interactive experience, it helps improve mood, alleviate stress, and combat feelings of loneliness.

Our product prioritizes user safety by employing a controlled gantry system that ensures precise and predictable movement of the chess pieces, eliminating any hazards associated with manual handling. The gaze-tracking model further reduces physical strain by accurately tracking eye position at all times. Check, Mate, Vision also enhances overall welfare by fostering independence and inclusion, allowing users to engage in strategic play on their own terms. This promotes self-sufficiency, personal growth, and confidence, extending to daily activities and empowering users to take greater control of their lives.

Part B: Social Factors (written by Tarek)

Check, Mate, Vision is, at its core, a system to enable more people to play chess. This game is enjoyed by millions of people around the world, connecting fans of the game and allowing them to find a new way to socialize with one another and share the human experience. As such, it is important to us that Check, Mate, Vision preserves this aspect of social interaction.

In our ideation stage, we thought about having players play against a machine; however, it was important to us to preserve the human aspects of the game. Playing with another human in front of you, seeing their face, talking to them, and connecting over an appreciation of the game, is a powerful and important element of chess.

We also thought about having users talk to the machine in order to select moves; however, we didn’t want to limit the system’s accessibility to English speakers or those familiar with chess coordinates. Our design ultimately removes as many barriers as possible for as many people as possible to enjoy chess with others, fostering human connection and enabling people to connect with others.

Part C: Economic Factors (written by Liam)

Check, Mate, Vision is focused on providing an affordable chess-playing solution for individuals with limited upper body mobility. Traditional assistive technologies in this field are often bulky and expensive, primarily due to specialized hardware and complex manufacturing processes. By utilizing common components like a camera, computer, and gantry system, we significantly reduce production costs. These readily available parts are less expensive to source and assemble, which lowers the overall price of the system for consumers.

Simplifying the production and distribution aspects also means we can scale up more efficiently, making the technology accessible to a wider market. Reduced manufacturing complexity leads to lower inventory and supply chain costs, which translates into savings for users. This cost-effective approach not only makes the game of chess more accessible to those with physical limitations but also opens up opportunities for educational institutions and rehabilitation centers to adopt the technology without incurring substantial expenses.

Trey Wagner’s Status Report for 2/15/25

PERSONAL Accomplishments
  1. Finalized Gantry Design (4hr): My main goal for this week was to finalize decisions for each detail of our gantry system so part ordering could occur. One large question mark during last week was the pickup/movement mechanism for the chess pieces. Through my research, I decided to pivot from an above-board system to a below-board system. This decision will allow the board to look cleaner since all machinery will be hidden away. It also eliminates the need for a z-axis step motor as no vertical extension/retraction is necessary. I have decided to use electromagnets to move the chess pieces, as they provide a seamless and precise method for piece manipulation, even with a physical board acting as a barrier. The final decision was board sizing (which will be discussed in detail below).
  2. Board Sizing Decision-Making (1hr): I worked with Tarek and Liam to determine the sizing of our chessboard. This decision included considerations for the error of Liam’s gaze detection model and the materials needed to produce the gantry system at each size. We settled on the dimensions seen below: 
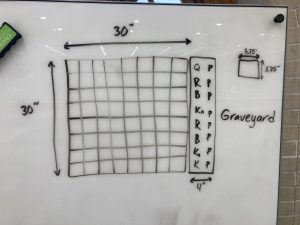
This design also includes a piece graveyard, which handles the cases where the user’s piece is taken. The placement of the pieces is optimized to handle potential edge cases such as promotion (where a player can replace a pawn with a queen, rook, knight, or bishop).
  3. Part Research and Ordering (2hr): Based on the decisions discussed above, I researched the parts necessary to assemble our gantry system. This includes pieces such as linear rails, timing belts, motor drivers, etc. I attempted to order pieces that worked well for our design specifications but also offered the flexibility to pivot in certain ways (i.e. changing the board size or switching back to above-ground gantry). All necessary pieces were ordered and will be assembled upon delivery.
  4. Mandatory Lab Meetings (4hr): During our lab sessions, we got valuable feedback during meetings with the teaching staff. One useful piece of advice was to get to MVP as soon as possible. As such, I changed my priorities to create a somewhat functional gantry (move from A to B) before spring break. The lab meetings also allowed our team to discuss key integration points between our three major sections.
  5. Design Presentation Work (3hr): I spent time laying out the outline and plan for completing our design presentation. My responsibility was to create an implementation guide for our hardware system, including block diagrams and a proposed design. I also helped to focus on testing plans and the use case requirements for our project. Some of these details will be finished tomorrow before the deadline.
Progress

My progress is slightly behind schedule for our new accelerated design plan. I plan to put in extra time to get the gantry system assembled and carry out baseline testing as the pieces come in. However, I am very much dependent on the delivery times at this point.

Next Week Tasks & Goals
  1. Assemble pieces as they come in and begin calibrating and testing the system.
  2. Devise the circuitry needed to control the motors and electromagnet so I am prepared when they arrive.
  3. Decide material and thickness for our chess board to allow for proper electromagnet testing.

Liam’s Weekly Report 2/15


Personal Accomplishments

This week I worked on setting up the Jetson Xavier as well as researching the proper way to do the gaze estimation. Setting up the Jetson proved to not be as easy as I thought since it can only be flashed from Ubuntu. WSL lets me flash the jetson but not install the toolset. I had to find an ethernet cable to connect the Jetson to the local network to install packages. I discovered a Nvidia toolkit called deepstream on the Jetson that comes with a preconfigured pipeline to use GazeNet for gaze estimation. I am considering buying a wifi m2 expansion card.

I also helped collectively to work on the design presentation.

I migrated our Gantt chart to using Github which allows us to group all the code In the project in one organization

Progress

I am currently on time. We are currently in the process of moving when we wanted an MVP so I will have to make sure I am ton op of my deadlines in the following weeks.

Future Deliverables

  • MVP Pipeline
  • Working Camera

Team’s Status Report for 2/8

Risks

One of the most significant risks that could jeopardize the project is getting gaze detection working properly while the user looks at a chessboard. If at any point in the project, we realize that we can’t continue with on-board gaze detection we will switch over to looking at a simulated chess board on a screen. We are developing a proof of concept of this subsystem so that this change can happen as early as possible if this is the case.

Changes

No changes so far since we have not started the process of building the chess assistant. We will implement changes as needed once our actual testing begins.

Gantt Chart

We have created an initial schedule that breaks down our tasks to complete in the first couple of weeks. These include proof of concept work, research, and initial prototyping. No updates have been made to our schedule as of now. The Gantt chart can be found below.

C8 Initial Gantt Chart

Tarek’s Status Report for 2/8

What did you personally accomplish this week on the project? Give files or photos that demonstrate your progress. Prove to the reader that you put sufficient effort into the project over the course of the week (12+ hours).

This week, I continued to do research into my specific subsystem of the project: the microcontroller. This is the component that will take in gaze information from the Jetson and the user, and use it to control the UI LEDs and the piece-moving robot. As a stretch goal, it will also keep the state of the game and provide move validation.

This week I focused on choosing a microcontrolle boardr. Given our use case, I considered the following factors:

  • Ready to use out of the box: With all the output and input pins and ports it needs, minimizing the time between opening the box and testing code on it.
  • Ease of use: Should be easy to set up and use, widely available documentation, easy to code on using C/C++/Python.
  • Number of pins: Considering we will be interfacing with board LEDs, two stepper motors, an undefined piece pick-up mechanism, and potentially a keypad/keyboard for the opposing user to manually type in their moves. We need a lot of pins of several types.
  • USB with UART: The board will communicate with the Jetson via UART, it would be ideal to do this over UART using a built-in USB port.
  •  Enough power for all peripherals: The device should have enough power to control all peripherals it is connected to.
  • Price: Lenient, as this is a key element of the design, but should avoid boards over $85.

Given the readily available documentation and help criteria being critical for speed of development, I narrowed the choice down to three extremely popular microcontroller boards under $85: the Arduino Mega 2560, the Raspberry Pi 4 Model B, and the ESP32-DevKitC V4. I made the following table to assist me in making a decision.

Criteria Arduino Mega 2560 ESP32 DevkitC V4 Raspberry Pi 4
Ready to use out of the box – Preloaded bootloader
– All pins available without additional configuration
– Simple USB connection for programming and power
– Preloaded bootloader
– Simple USB connection for programming and power
– No external programmer required
– Requires installing an OS
– Takes longer to set up
– May need additional components (e.g. SD card)
Ease of use – Arduino IDE is easy to use
– Extensive documentation and examples
– Large community support
– Simple programming in C/C++
– Supports multiple frameworks (Arduino, ESP-IDF, MicroPython)
– Extensive documentation and examples
– Large community support
– More complex pin setup
– Runs a full OS, offering high-level programming (Python, C++, etc.)
– Tons of documentation and tutorials
– May feel complex for simpler tasks
Number of pins – 54 digital pins, 16 analog inputs
– SPI, I2C, and UART available
– More than enough for multiple peripherals
– ~36 GPIOs (specific numbers depend on variant)
– Multiple SPI/I2C/UART interfaces
– Limited by multiplexing certain functions
– GPIO pins available (26)
– Plenty of USB and peripheral options through the OS
– Requires GPIO expansion for many dedicated connections
USB with UART – Built-in USB for programming and serial communication
– USB-UART bridge ready to go out of the box
– Onboard USB-to-serial converter
– Simple UART communication via USB port
– Several USB ports available
– Multiple UARTs possible via GPIO or USB serial adapters
– Requires additional configuration for UART over GPIO
Enough power for all devices – Provides 5V power via onboard regulator
– Can power LEDs, drivers, and basic peripherals
– May require external power for high-current motors
– 3.3V logic
– Capable of driving multiple devices
– Proper external power supply needed for motors and heavy loads
– Powered via a 5V USB-C port
– More than enough current for onboard peripherals
– May need dedicated motor controllers for high-power motors
Price ~$45 ~$10 ~$40

I will finalize my decision this week, but given the speed of development, number of pins, and power capabilities, I am strongly leaning towards the Arduino as a worthy investment.

Other tasks I did this week included peer reviewing presentations, and starting to research how to control the chessboard UI LEDs. I have not made a formal decision on this but rather than connecting each row and column to the board, I may export this labor to a LED matrix chip like the MAX7219 which is typically used to control 7 segment displays. This way, only three connections to the board, instead of 16, are necessary.

Is your progress on schedule or behind? If you are behind, what actions will be taken to catch up to the project schedule?

My progress is on schedule.

What deliverables do you hope to complete in the next week?

I will make a decision as to which microcontroller to use early next week, as well as picking an LED matrix control chip, and making a circuit schematic to go with it. After that, I will spend the rest of the week researching backup libraries in case we cannot do on-board gaze detection and have to have the user face a screen with a virtual chessboard instead. I will also start preparing to give the design presentation.