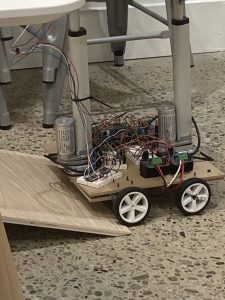
Raymond’s Status Report 4/12/25

Over the last two weeks, I’ve been working on getting the whole system working together. For mid-review, we were able to get the linear actuators moving such that when we tilted the platform, the IMU was able to detect that once the board was no longer at 0 degrees from the ground, the linear actuators would activate to even out the board. That IMU that we were using ended up breaking, and we knew this because it would get very hot to the touch when just supplying the correct input voltage. We purchased a new IMU, the BNO085, but when trying to read the data with I2C, I realized that it uses Sensor Hub Transport Protocol (SHTP), which is different from the standard I2C. So, when I was trying to access the different registers to get the sensor data, it would not return the correct information. This resulted in having to buy another IMU, the MPU 6050. I decided against buying the original IMU that I was working with because the gyroscope data was oddly inaccurate, and I had previously worked with the MPU 6050. Once the MPU 6050 arrived, through the PYNQ framework, I was able to receive the IMU sensor data and apply a simple complementary filter to get pretty accurate orientation readings.

In order to get the motors running with the PWM signal from the FPGA, I needed to use a logic level shifter since the PWM signal from the FPGA is 1.8V. I was able to successfully get all four wheels running, but just by moving the wires around, it would change behavior of the motors. They would either stop running, or they wouldn’t stop running when they were supposed to. After doing some research, I realize that this is probably because of capacitance coupling that is amplified by the level shifter. Our wires being longer does not help with this behavior, so I got a new level shifter that is supposed to be more resistant. In the meantime, we will be continuing with Arduino, such that we can test our control algorithm.

Throughout the last two weeks, we also decided to just try and get the system running with an Arduino since we were running into some blockers with the FPGA, so while simultaneously trying things with the FPGA, I was working on getting the system working with the Arduino. This was pretty simple since there is a lot of technical support for Arduino.

We are behind schedule, but we are moving along and not letting the blockers get in the way. We are working on tasks with the Arduino that can be replicated on the FPGA, so that we do not fall too far behind while working with the FPGA.

By Monday, I plan to have the whole system running up a ramp for two feet, while adjusting its platform. I will need to change the setup for the Arduino system such that are linear actuators extend halfway at the very start. Then, to make any adjustments, both linear actuators will run, but in opposite directions, so that we can increase the speed at which we change the angle of our platform. Then I will continue working on the control algorithm such that it reacts immediately to any change in slope, and try to reduce any oscillations.

Team Update – April 12, 2025

This week, the most significant risks identified include the bending of the board and the possibility of wires coming loose. The board bending is particularly concerning because if it bends too far, it could snap and damage critical components. Additionally, we’ve been having trouble keeping the wires securely connected, which can interfere with power and signal delivery. To address the bending issue, we’ve added an extra board underneath to help stabilize the structure. If this solution proves insufficient, we plan to glue the board for extra support. To prevent wires from disconnecting, we’re being more gentle during handling and may consider better cable routing or retention methods going forward. We also might use superglue to attach the wires to the board.

For design changes, we are adding the IMU and its circuit inside the platform. This placement will allow us to better monitor changes in movement or orientation on the platform.. However, this update also introduces the need to waterproof the circuit. Additionally, we’ll need to design and install wires long enough to connect the IMU from the platform to the main board below. These are relatively small changes.

There is a change where we might measure and record our results and simultaneously improve our robot.

Video of our platform working: https://drive.google.com/file/d/1AWDLh1zZTwN2v7Hf4jVGB7jIczxpfVpt/view?usp=sharing

Sara’s Weekly Update – April 12, 2025

This week, I helped wire and connect our new motors to the board, along with the linear actuators. I was pretty excited because we received a bunch of new parts for the robot. I also built a new wheelbase since we had to purchase new mounts for both the linear actuators and motor mounts, which required drilling a new board.

I made new wires for the motors and moved all the electronics onto the new board.

We also got a new room to store our robot, which allowed us to attach the platform. Unfortunately, I initially purchased the wrong level shifters, the wrong item, and the wrong shaft size. However, I improvised attachments using yarn and tape. I also reversed the wheel so the shaft rested on the outer rim. Later, I got the correct shafts, but they were too long and were bending the board, so I had to carve them down.

To address the bending issue caused by the board’s weight, I added an extra support board and secured it using leftover M5 screws as a temporary fix.

At one point, I accidentally burned out the Arduino, but I replaced it with a new one. I also finished purchasing the ramp.

I rewired the entire board, separating the linear actuators (LAs) and the motors onto separate boards because the signal interference was causing issues. I also rewired the LPWM and RPWM to always be enabled, which improved the control and correction.

Although we’re currently a bit behind schedule due to delayed parts, I plan to catch up by continuing to assist Raymond and keeping track of the robot’s measurements and performance.

Next week, I plan to start on the slides for the final presentation and meticulously run the robot for results.