
This post details the current state of the game and how to interact with and edit the systems that may be relevant to Arduino integration.
General Organizational Notes
See the “Resources” google doc in our capstone folder for a few linked Unity tutorials — for the most part as long as you know the basic terminology, you should be good. It’d also help to have a somewhat detailed understanding of the Input System and a basic understanding of how Unity Events work but I will try to go over the most important parts in this post.
Do all experimentation inside your own scene. When implementing features, abuse prefabs as much as possible.
Inside the “Assets” folder, you’ll find that there are subfolders for Animations, Scenes, Prefabs, Scripts, etc. Organize anything new you make accordingly, please. I don’t really care about naming conventions as long as it’s kind of descriptive and not totally unreasonable; ditto for coding style. Try to comment a little bit I guess. If it becomes a problem we can make a style guide but for the most part idc.
Also I think I need to manually add any collaborators so DM me your Github user when you start working on it.
Scene Setup
Currently there’s only one scene in the project (angela_scene) which contains all currently implemented features. Feel free to experiment inside the scene to test them out, but DO NOT SAVE ANY CHANGES YOU MAKE TO THIS SCENE. If you want to test or change anything, make a new scene to work in. This section will detail how to set up a new scene that will include all of the currently implemented features.
- Add the “submarine”, “ControllerInfo”, and “subFollow” prefabs to the scene.
- Add the CameraFollow script to the Main Camera. I’m using these settings:

drag and drop the submarine gameobject into the To Follow slot. You’ll need to do the same thing for the Camera Follow script on subFollow. Camera should probably be made into a prefab but I haven’t gotten around to it yet - Optionally, change the color of the background to something that’s easier to see. Under the “Environment” tab of the Main Camera, change Background Type to Solid Color and pick a background color you like. I’m using 3BBEBC but it doesn’t really matter rn
- If you press play on the scene, it should start working now. Controls for keyboard and standard controller are described in Angela’s Status Report 2/15
If you take a look at the ControllerInfo object, you’ll see that the ControllerSettings script is attached to it. Note that there is a slot for “AQ Prefab” in the editor; this is for the prefab of the custom controller player input object. I’ve been referring to the custom controllers as AQ (aquamods) in code and I’ll also refer to them as such for this post — controller = standard controller, AQ = custom controller.
For now, if you want to change the type of controls that each player is using, you can select player 1 and player 2 contype from the drop down menus. Note that if there’s no controller attached to the laptop then controller inputs won’t work, and setting contype to AQ will not work properly unless the AQ action map is set up (see “The Unity Input System” section). The “player 1 net” setting toggles whether player 1 or player 2 controls the net gun. Toggling this or changing contype while the game is running has no effect or will cause an error; they must be set before running the game to take effect.
I would like to request that you try to avoid editing any of the existing scripts or prefabs without giving me a heads up about it first. I’m not going to go into the detailed explanation of exactly what each of them do Right Now but I don’t think you should have to know the details in order to do the Arduino debugging. If it does come up I’ll add more documentation. You might also want to write your own scripts for testing purposes in which case feel free, unless you’re just trying to learn Unity stuff, in which case do that in your own project and not this one.
Edit 3/10/25: Sardine enemies are implemented! They don’t spawn automatically yet, though, so if you want to try them you need to add them into the scene on your own. You can do this by going to Assets->Prefabs and drag as many copies as you want of the “sardine” prefab into the scene.
The Unity Input System
Tentatively all you need to do in order to test the Arduino Leonardo + joystick library + Unity stuff is to configure the Unity Input System for input from the Arduinos. I’ve thrown together some of the setup stuff for the AQ controllers, but if you want to do some more in-depth experimentation and testing I’ll also include some details about + a link to the documentation of the Input System so you can set up some tests yourself.
To configure the Unity Input System for the AQs, go to the Assets folder under the Projects window and find the Input Action Asset (called InputSystem_Actions). Clicking on it will open the Input Actions Editor. Navigate to the “AquaMods” Action Map and you should see something like this:
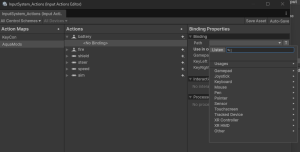
Currently, none of the actions listed have any bindings attached to them. You can add one by opening the Path drop down menu, pressing “Listen” and then wiggling whatever input you want that action to correspond to on the Arduino. If all goes well, you should be able to select that as the binding.
Once all the bindings are set up, you should theoretically be able to set the player contypes to AQ on the ControllerInfo object and control the submarine with input from the Arduino.
If you want to experiment with the Arduino inputs without tying them to specific submarine actions, you can create a new action map to mess around in. You can also experiment with the PlayerInput component: here is a link to the detailed documentation on the Input System, but I’ll also include a quick description here. (if you do read the documentation, note that because we are doing multiplayer we have to use the PlayerInput workflow and not the polling workflow)
If you take a look at the AQ_PlayerInput prefab (in the prefab folder) you’ll see that there is a component called PlayerInput attached to it, and that it is set to use the “AquaMods” action map. There should be an “Events” menu, and under that an “AquaMods” menu. Unfolding both of these will show a list of all the actions in the action map and what functions should be called when those actions are triggered.
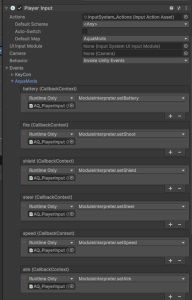
Currently it is configured so that the inputs from the AQ controllers will control the submarine, but if while you are testing you want them to do something else (ie, change color of something when a button is pressed or print value of an encoder input or something) you can change the functions that get called by the event triggers to whatever function you’ve written.
That should probably be enough to be able to test the connection with the Arduino. I’ll also try to go through the more relevant scripts and add a few comments. I’ll edit this post as more things come up.