
The game is now playable for players using any combination of left / right keyboard or standard controller, although not all game mechanics are implemented (See most recent progress on Github). I did not accomplish all of my goals this week for game progress because I was working on the Design Presentation. That being said, we are still on track with the original planned schedule; however, my estimate last week of when the game will be playtestable by (originally by the start of Week 7) will be pushed back a week as a result.
Programming Progress
The main accomplishment this week was creating some of the initial UI and mechanics that will allow players to select what kind of controls they are using and use them to control the submarine. Controller selection for keyboard and standard controller types are fully functional; the custom controller option is not fully set up and won’t be until we have a bit more progress on the hardware side of things, but the infrastructure for it is set up so that it should be fast to implement.
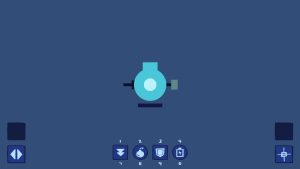
On the left and right sides of the screen are the modules “owned” by Player 1 and Player 2, respectively. In the middle of the screen are the up-to-4 floating modules that the players can switch out their current modules for. Sliders are represented by square icons, while buttons are represented by round icons.
For ease of future reference, I’ve included a diagram of the current controls for each controller option:
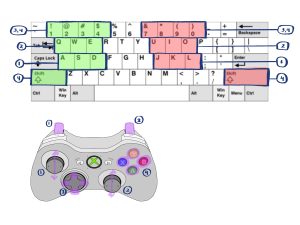
- These controls are for controlling module 1 and can be divided into a slider (A,D on left kb, left joystick y axis on gamepad) input and a button (S on left kb, left trigger on gamepad) input.
- These controls are for controlling module 2 and work similarly to the module 1 controls described above.
- These controls are for switching the current module 1 with the corresponding free module in the position (ex: 1 on left kb corresponds with switching module 1 with the module in slot 1 as seen in the game screenshot, the 4 directional buttons on the gamepad also each correspond to a slot).
- These are controls for switching the current module 2 with the corresponding free module in that position. Works similarly to the controls described in (3); on keyboard, this is done by pressing shift + slot id as described in (3).
- This feature is currently bugged for keyboard controls. Currently, pressing shift + slot id will switch both module 2 and module 1 with that slot id. This is a problem with Unity’s input system and I am trying to find an elegant solution to this before brute force checking if shift is being pressed for keyboard module switching.
I did not get a chance to work on sprites for the submarine this week because of the preparation for the design presentation, so the unfinished game mechanics from last week (battery and battery charging, net gun) are still unfinished. I will finish these next week.
Documentation Progress
We’ve been doing a lot of research and design in preparation for the design review presentation. Personally, I have been picking out parts for modules as well as digging around in the Arduino Joystick Library and doing research in order to find the best way to measure latency. In the end, we settled for focusing on controller latency; the time between an input being sent to the Arduino and the Arduino outputting an updated gamepad state. This article describes the results recorded by someone benchmarking standard controllers using this method.
With regards to latency measurement, another common method I found of measuring latency of game controllers was to… you guessed it… use a high speed camera to record the number of frames in between a button being pressed and an action happening on screen. In fact, this method is so common that it is usually one of the first methods listed for latency measurements. Here’s a professional giving a talk about using this method. We probably aren’t planning on using this but it is legitimate I am just putting that out there.
A tentative parts list, for ease of future reference:
- module buttons
- rotary encoders
- rotary encoder knob cover example (might 3d print these instead)
- slide pot (45mm or 35mm option)
- pogo pins
One Reply to “Angela’s Status Report 2/15”