
This week I researched ways to connect the modules to the panels and communicate between the modules and the Arduino.
Connecting modules to panel/controller
Players must be able to quickly connect and disconnect the modules without pausing gameplay and shifting their focus. This immediately rules out any connector that requires precise positioning, such as pin headers and sockets, USB connectors, audio jack style connectors, etc.
One viable option is a combination of pogo pins and magnets. Magnets will help guide the modules to the right position and the pogo pins can make a good connection without needing perfect alignment. They are also typically rated for tens of thousands of cycles (or more), which is important since the core of our game is switching modules around. These connectors are expensive, but worth it for us due to their importance.
Sending signals from the modules to the Arduino
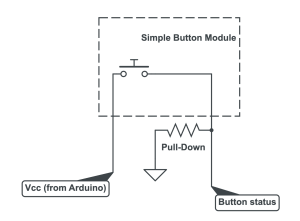
I looked at a few different options for how modules can communicate with the pins of a microcontroller (e.g. Arduino). The simplest option would be a module that is just a button with passive electronic components.
I also looked at different debouncing techniques. For our MVP, a simple RC circuit might work but I also considered the possibility of incorporating a Schmitt trigger. We’ll make the decision later after more testing.
Progress and next week’s deliverables
My progress is on schedule. By next week I hope to have some working hardware that is ready to communicate with a microcontroller. It should provide reliable, noise-free signals based on user input. I will probably start with a simple module like the push-button, but will also work on more dynamic modules that involve more electronic components.