This is the github for the joystick library
https://github.com/MHeironimus/ArduinoJoystickLibrary/tree/version-2.0/src

Carnegie Mellon ECE Capstone, Spring 25 – Alan Abraham, Angela Xu, John Pedraza
This is the github for the joystick library
https://github.com/MHeironimus/ArduinoJoystickLibrary/tree/version-2.0/src
This post details the current state of the game and how to interact with and edit the systems that may be relevant to Arduino integration.
Continue reading “Game Documentation for Arduino Integration”
This week we made progress on implementing game mechanics and created a GitHub for / started experimenting with Arduino code using the joystick library. There have been no significant design changes or schedule updates.
The documentation of the Arduino joystick library is not quite through enough for us to be able to exactly predict how it will interact with Unity. We will need to do a bit of experimentation and iteration to make sure that the interfacing between the two parts goes smoothly. Now that we have the Arduinos, we have begun experimenting with the joystick library and next week we will try to nail down the integration with Unity.
This week I finished implementing the player mechanics that weren’t finished last week as well as adding some sprites to the game. Gameplay features are now all implemented, except for enemies and enemy behavior, which I will be working on next week as well as working with John on Arduino-Unity interactions. Progress has slowed down a bit because of midterms, but everything is still on track Continue reading “Angela’s Status Report 2/22”
Arduino-Electronics Interface
Since we received the Arduinos this week I spent time working on code to interface with the modules’ electronic components. We’ll be using the Arduino Joystick library, which works with the Arduino Leonardo.
The Arduino can be made visible as a game controller using the following initialization code: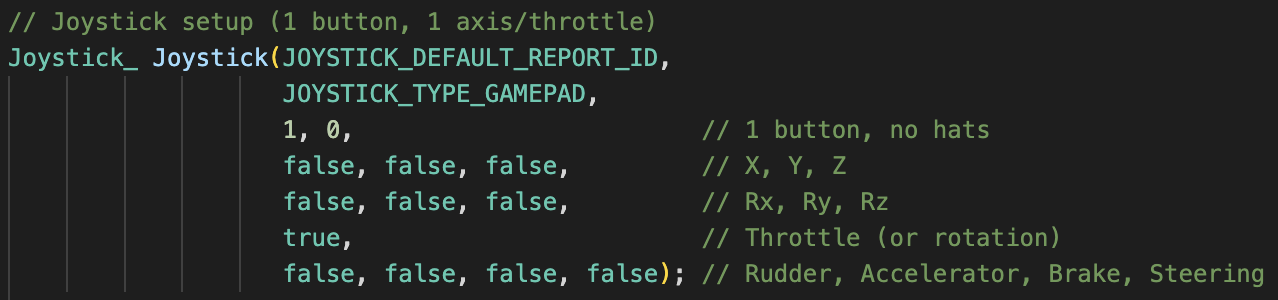
Our code will dynamically check the ID pins and process the modules’ data pins depending on which module is currently inserted: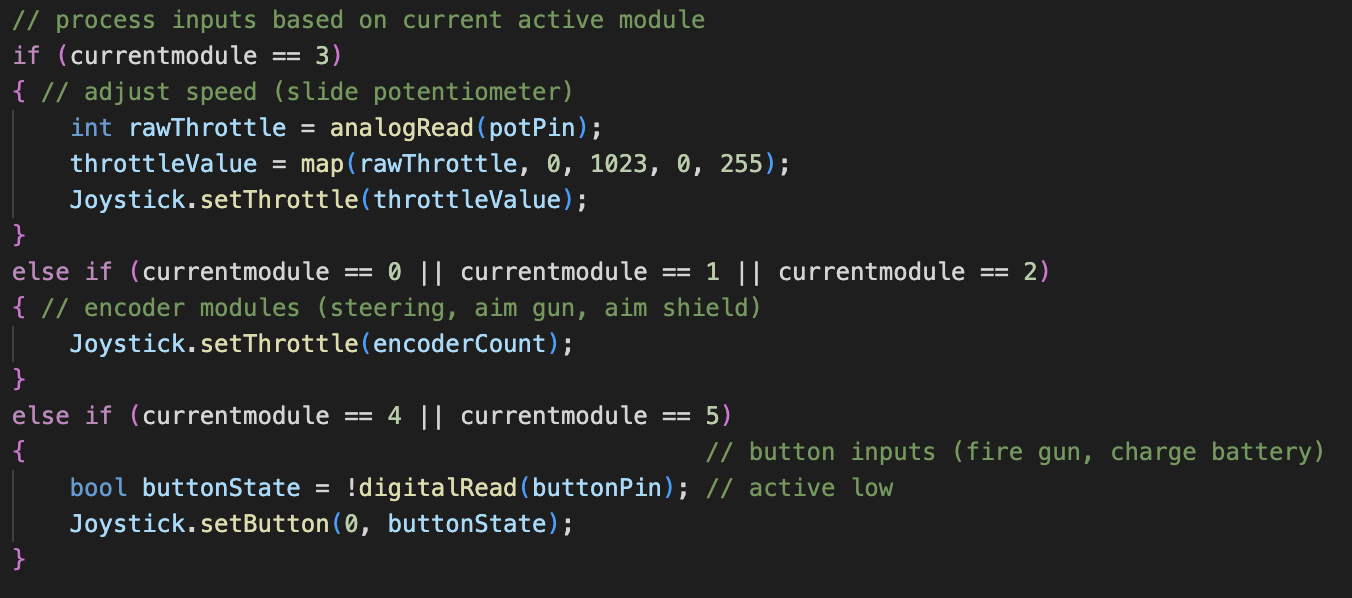
For reading from the encoder, we have two options: polling or interrupts. The polling option is less complex but risks skipping transitions if the encoder is turned very quickly. Here is an interrupt service routine that reacts to encoder state changes: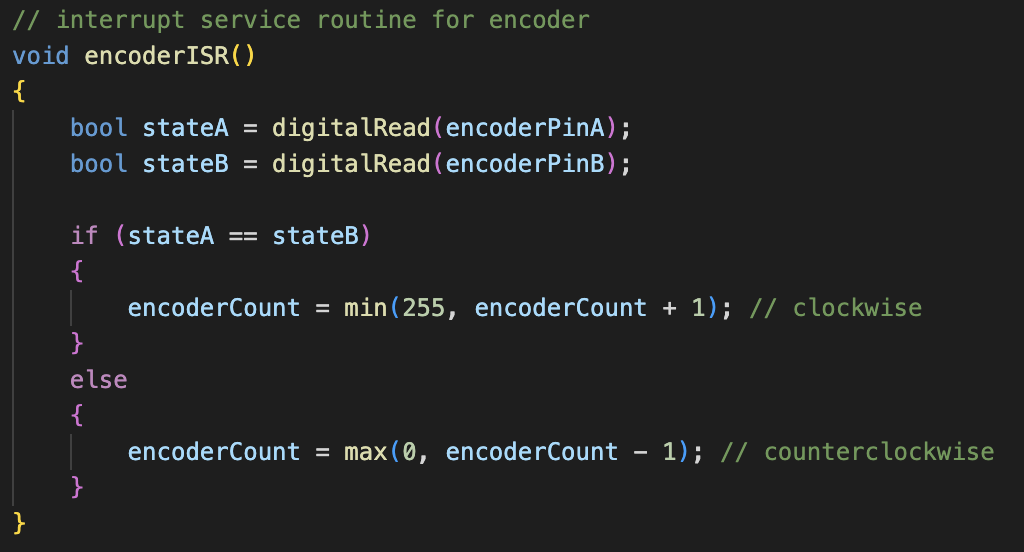 The ISR is attached using
 attachInterrupt(digitalPinToInterrupt(encoderPinA), encoderISR, CHANGE);
Progress and Next Week’s Deliverables
My progress is on track. Since we’ve now ordered all of our components, I’d like to get my code working with Unity by next week. If the Arduino-Unity integration goes well, I’d like to work on planning the spatial organization of the electronics within the modules.
This week I decided on the electrical parts we needed for our modules and arduino connection and made purchase orders for them. We are getting a slide potentiometer for the speed. Rotary encoders for the shield and aiming. We will use potentiometers from CMU for the steering. And then buttons for battery and shooting.
On the hardware/software interface side, I started the arduino code. I’ve looked a bit into what arduino libraries we will need. I’ve also written out pseudocode for what our program will need to do and initialized a github repo for us to work on.
https://github.com/amabraha/c3-aquamods-arduino
For next week, there’s some design changes I want to make to the module’s 3d designs. I also want to make more progress on the arduino code.
This week we have been doing more parts selection and research as well as designing the schematics for the module-arduino connections, CAD designs for modules and control panels, and making progress on working on the game. We have also been working on the design presentation.
The answers to week-specific questions are included at the end of the report. Continue reading “Team Status Report 2/15”
I spent this week looking at different approaches to interface between the modules and the Arduino.
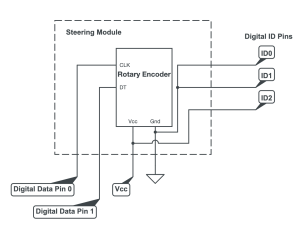
Module Pins
As a team we decided that each module would get Vcc and Gnd, 3 pins to identify the module, and up to 2 data pins per module. Using the identification pins instead of unique data pins per module allows us to reduce the total number of pins used which is beneficial since the Pogo pins we’re using can be expensive. This also reduces the total number of single points of failure. Each module will therefore have a unique 3-bit identification code. They will be wired as shown, with Vcc and Gnd driving the ID pins:
Debouncing
I also considered the problem of debouncing. We don’t want a single button press to be registered as many presses in a short period of time. I compared software solutions with hardware solutions and landed on a few different approaches. For the button-press module, a simple RC filter with a Schmitt trigger should work:
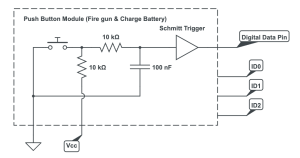
The RC filter smoothes the transition from LOW to HIGH and the Schmitt trigger replaces the single threshold voltage with two separate LOW/HIGH threshold voltages. This ensures that any oscillations near threshold voltages do not result in an oscillating output.
Progress
My progress is slightly behind since we just recently settled on the schematics and electronic components so I haven’t made the initial module prototypes. To catch up, we will place the remaining component orders soon and work with what we’ve got for the simpler modules.
Deliverables for next week
Since our Arduinos have shipped, I hope to have some working code that interfaces with hardware components by next week. Ideally we’ll be able to see a physical button press register in Unity software. I also hope to place the orders for the remaining electronic components so we can build all of the remaining modules.
This week I worked on designing the controller parts. I did CADs of the modules and the panels. These are preliminary designs and will likely need to be reiterated, but they are functional and also somewhat easily adaptable.
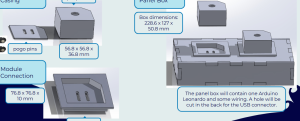
I also did some brainstorming on the electronic design part of things. We’ve been having many discussions about this so it’s taken a while, but we are going with 7 pins per module. 2 for ground and Vdd, 3 for a binary identifier of the module type, and (at most) 2 data pins. Modules that utilize peripherals like buttons or potentiometers will only need 1 data pin, but more advanced peripherals like the rotary encoder will require 2 data pins.
We are a bit behind schedule for the hardware components, since we’re still finalizing the exact circuit schematics and what devices we are buying. On the bright side, we have already started and have finished a prototype of designing the controller parts. That ended up getting prioritized this week because we felt getting that down was necessary for our design review presentation. Which, speaking of, I also worked on.
For next week, I hope to finalize electric components so we can order those and then start getting the controller prototype assembled. Also we can start working on the arduino code since we got that shipped.
The game is now playable for players using any combination of left / right keyboard or standard controller, although not all game mechanics are implemented (See most recent progress on Github). I did not accomplish all of my goals this week for game progress because I was working on the Design Presentation. That being said, we are still on track with the original planned schedule; however, my estimate last week of when the game will be playtestable by (originally by the start of Week 7) will be pushed back a week as a result.
Continue reading “Angela’s Status Report 2/15”