Wen Hui’s Status Report for 4/26

What did you personally accomplish this week on the project? Give files or photos that demonstrate your progress. Prove to the reader that you put sufficient effort into the project over the course of the week (12+ hours).

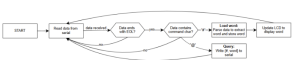
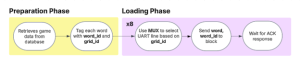
  • I worked on helping Nicole with the integration of the new webapp with the embedded controller, especially additional features like the 8 or 16 block options. There were also some modifications to the embedded controller code structure required, such as returning the grid positions that were missing / not ACKed so that the webapp can display to the user which block to adjust in order to ensure correct uploading.
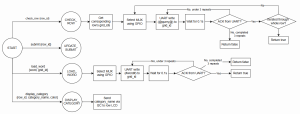
  • Another feature I worked on this week was the autoscrolling of the row category LCD. Some of the category names are really long (eg.
    SINGULAR OF THINGS SEEN IN PAIRS) and exceed the width of the LCD which has 32 characters. I had to implement multiple screens of text on the LCDs so that it is able to cycle through all the words and display the full category name without overlapping. Since I have to run the autoscrolling for all the 4 LCDs and have the program running together with the actual main program, I implemented this using multithreading. I spawned a thread for each of the LCDs that were in charge of making sure the text on the LCDs were scrolling. The main thread will then update the message variable for each LCD depending on whether display_category is being called by the webapp. With all these changes, I made a class called lcd_controller that encompasses all these functions. This will allow the seamless integration of the embedded controller with the lcd on each row.
  • I also conducted testing on the font size for the LCD on the Picos. I tried loading words of lengths 1 to 25 (the maximum length of words in the database) and ensured that the word(s) showed without being truncated and were a reasonable font size to the user.

Is your progress on schedule or behind? If you are behind, what actions will be taken to catch up to the project schedule?

My progress is on schedule. I plan to work on some final user testing next week, before focusing on deliverables like the video and report.


What deliverables do you hope to complete in the next week?

In the next week, I hope to work on getting a few more user testing done. I also plan to work on writing out the report in detail given the testing we have done. I will also work with my teammates to improve the aesthetic of our project and reflashing the Picos with a different display color that is more distinct to the user.


Wen Hui’s Status Report for 4/19

What did you personally accomplish this week on the project? Give files or photos that demonstrate your progress. Prove to the reader that you put sufficient effort into the project over the course of the week (12+ hours).

  • I also re-flashed all the Picos with the new code which includes error handling in cases where the received word does not include valid alphanumeric characters. It turns out that when an invalid string to be parsed is sent to the Pico, an exception is thrown and the Pico is unable to continue even if the right data is sent to this. Hence this requires us to turn on/off the Pico. With this modification, all the Picos can function with multiple repeat games without having to be turned off.
  • I verified the functionality of all the connections of each pogo pin on the grid and had to replace some of the jumper cables on the grid that were not producing electrical connections. One of the Picos also had a malfunctioning UART pin so we had to resolder that as well. This helps to ensure that any errors that could arise is due to the perf board itself instead of the grid.
  • I completed the soldering of the perf board PCB and integrated it with the 16 block test bed on Monday. There were a lot of issues encountered when soldering the perf board especially with weak connection for some of the pins, causing bad data to be transmitted or the blocks to not ACK all the time. I also encountered a strange error where block positions 0 and 2, and 1 and 3 will get uploaded at the same time. After repeated debugging, to figure out if it was the blocks, pogo pins or the perf board circuitry that was the issue, I found out that it was due to a malfunctioning GPIO pin in the RPi that was controlling the mux, causing there to be some lag when selecting the UART lines. After switching out the MUX select pins, I was able to implement successful uploading of words to all 16 blocks. (Refer to test video)
  • After Alexis laser cut the plywood for the grid, I helped with testing the electrical connections and debugging the circuitry to ensure that it all still worked with the actual grid instead of the test bed.
  • I also worked on the latency testing but modifying the embedded controller code to be able to specify the duration of latency delay to allow us to vary it for testing purposes.


Is your progress on schedule or behind? If you are behind, what actions will be taken to catch up to the project schedule?

My progress is on schedule. I plan to work on getting all the quantitative results for latency testing over the weekend in time for the final presentation.


What deliverables do you hope to complete in the next week?

In the next week, I hope to implement some extensions and aesthetic improvements to the project. I wish to ensure that the colors of the LCD on the Picos are visible. I also hope to try out multithreading to allow multiple words to be uploaded to different blocks concurrently, speeding up the process of the uploading phase.


As you’ve designed, implemented and debugged your project, what new tools or new knowledge did you find it necessary to learn to be able to accomplish these tasks? What learning strategies did you use to acquire this new knowledge? We recognize that there are quite a few different methods (i.e. learning strategies) for gaining new knowledge — one doesn’t always need to take a class, or read a textbook to learn something new. Informal methods, such as watching an online video or reading a forum post are quite appropriate learning strategies for the acquisition of new knowledge.

I was working on the embedded controller portion of the code, including the Rpi and Pico. I had to find out how to control all the components via Python such as the Sparkfun LCD, detecting button press, UART communication with each block and the RGB Waveshare LCD.

I referred to online documentation about Sparkfun LCD for the LCD portion of the code. I also looked at Medium articles and watched online videos to figure out how to enable UART1 on the RPi. For the serial communication between the RPi and Pico, I looked into online forum posts for references on how to structure my code, potential suggestions for waiting for the serial transmissions and delays necessary to ensure that sufficient time was given for UART transmission. I also looked into online forum for error handling processes. I also searched up Arduino forum to figure out the button circuit to use for our submit buttons. For the button callback function, I looked into the Rpi HQ guide online for how to integrate the button into the RPi program without blocking the rest of the program flow.

I also had to debug the perf board after soldering it, hence I looked into the datasheet for the MUX to figure out which pins have to be connected to ensure the MUX is working well. I also looked into online forums to figure out possible ways that could prevent a block from ACK-ing, deriving the solutions of: poor connection between ground of Pico and UART and loose wires of TX/RX.


Wen Hui’s Status Report for 4/12

What did you personally accomplish this week on the project? Give files or photos that demonstrate your progress. Prove to the reader that you put sufficient effort into the project over the course of the week (12+ hours).

  • This week, I worked on adapting the current code for the embedded controller by integrating another UART line for the next 8 grid positions. Initially I changed the UART controller class to be able to handle the internal switching of the position numbers (8-15) and (0-7) but it wasn’t able to work with the embedded controller. I ended up just creating two instances of the UART controller class and was able to transmit to all 16 positions using this new code design.
  • I also worked on the circuitry for the test bed to expand it to 16 blocks. I used a new breadboard and added two multiplexers, expanded the I2C lines and added two button circuit (with GPIO pins). This circuit is connected to the original circuit.
  • With the new circuitry for testing, I tested the code for the 16 blocks full game and it worked! However, the wire connections were not very reliable so we are working on building the real grid now using plywood.
  • Also, I worked on soldering all the connections that I designed on the breadboard onto an actual perf board for more secure connection and easier testing moving forward. We were deciding between options like using copper board or creating a PCB but we decided that the wait time for those options would be too long. Using a perf board is more secure that a breadboard as the wires would not be coming off as easily while allowing us to have a fast and easy way to create it.

Is your progress on schedule or behind? If you are behind, what actions will be taken to catch up to the project schedule?

  • My schedule is on track. I am currently working with the rest of my team to get the final version of the test bed working. In the meantime, we are also making plans for the testing and verification stage of our project.

What deliverables do you hope to complete in the next week?

  • Next week, I hope to work on testing to make sure everything is working properly. I have done some preliminary testing to make sure that the sub-components of the embedded side of things are working, but I plan to do more thorough testing for the latency of each step of the game (uploading, submission etc), tuning the parameters to find the balance between accuracy and efficiency.

Now that you have some portions of your project built, and entering into the verification and validation phase of your project, provide a comprehensive update on what tests you have run or are planning to run. In particular, how will you analyze the anticipated measured results to verify your contribution to the project meets the engineering design requirements or the use case requirements? Verification is usually related to your own subsystem and is likely to be discussed in your individual reports.

I worked on the embedded components of the project. To verify the functionality, I will first test all the connections between the pins/header pins I soldered to ensure there is the proper required connection and the power and ground are not shorted. Following that, I will run a basic testing program to make sure that data transmission between the blocks and the grids are working as expected for each phase (upload words, querying words and displaying correctness). This ensures that the new perf board that I soldered for the two sets of 8 rows works as the breadboard version did. I have already done the basic testing but will work on the end to end testing next week.

Next, I will run a latency test by measuring the time taken from when the upload_words function is called, until all the blocks have completed the uploading of the words (taking into account the 3-try repeat for each block). I will adjust the delay time between subsequent retries from the current implemention of 0.5 seconds to as low as possible until the accuracy is no longer 100% to find the trade-off between accuracy and efficiency. I will also measure the latency for the submission process. I will take the time starting from the detection of a button press (using the callback function) till the display_category function is called and all the colors of the blocks in one row are updated. This will be the submission latency. I will also utilize a similar adjustment process to find a relationship between accuracy and efficiency trade-off.

I will also work on testing the battery life duration which we have done informally previously. We kept using the blocks regularly without charging them and found that they were able to last for about a week before they ran out of charge. This met our requirement of >15 minutes which is the duration required for one game of Connections.

Wen Hui’s Status Report for 3/29

What did you personally accomplish this week on the project? Give files or photos that demonstrate your progress. Prove to the reader that you put sufficient effort into the project over the course of the week (12+ hours).

  • I was debugging the integration of the webapp with the embedded controller.
    • I added the code to successfully send color commands to all the Picos so we are able to play a full game with the uploading, submission and answer checking now!
  • I also helped with debugging the hardware issues related to the embedded controller-Pico connection.
    • I discovered a lot of issues such as some of the LCDs not working because of the overlapping pins with the LCD SPI. We just decided to change the pins to another set of UART0 pins.
    • During our testing on Wed, we also found a weird bug where the “@” and other command symbols will be appended to the LCD on the block because it wasn’t being parsed correctly. I added some robust text parsing and error checking to make sure the RPi and Pico only sends, receives and displays words that are alphabets and not part of the command.
    • I also added some code for button deboucing to prevent multiple submissions being detected when the button is pressed once. This ensures the correct number of mistake counts being tracked by the webapp.

Is your progress on schedule or behind? If you are behind, what actions will be taken to catch up to the project schedule?

  • As of today, my schedule is on track since we have completed MVP and it is working robustly. We will get started on building the grid now.

What deliverables do you hope to complete in the next week?

  • I will work on doing some tests on the latency next week since we have completed our MVP now.
  • I will also help with preparing the parts needed for 16 block expansion (soldering more picos etc).
  • I will also help with the grid construction after Alexis has a CAD design of the grid and we confirm how we are planning to construct it.

Wen Hui’s Status Report for 3/22

What did you personally accomplish this week on the project? Give files or photos that demonstrate your progress. Prove to the reader that you put sufficient effort into the project over the course of the week (12+ hours).

  • Last week when testing we realized that some of the Picos were not functioning so on Monday I did a thorough testing of all the Pico and power pins combination to identify the Picos that are not working. I found that for 4 of the Picos the UART0 was not working (the TX/RX did not receive signal even when directly connected), so I came up with a backup plan of soldering female header pins to UART1 and changing the code to utilize UART1 for communication instead. Afterwards, I realized towards the end of the week during E2E testing that the UART1 pins I chose conflicted with the SPI pins used for the block LCD. Alexis and I tried to explore using alternative SPI pins but it took up too much time and was not successful. We ended up switching back to another set of UART0 and got all 8 blocks fully functioning. I tested them individually with the embedded controller test code and the blocks were able to load words, respond to query and change color.
  • Alexis built the placeholder positions for each of the male pogo pins on the plywood. After she built the prototype grid, I worked on testing the grid and adjusted some of the wiring and circuitry according to the embedded controller code. I also tested all the grid pogo pins to make sure they were working.
  • I also worked on editing the Pico code for the LCD in terms of receiving color commands. I also adjusted the display font size based on the word length which is something we realized after we started testing that some words were too long to fit on the screen.
  • I also started working on the embedded controller integration with the webapp which has already been loaded onto the RPi. I installed the necessary libraries and tested the POST request being sent from the embedded controller to the webapp backend when the button is pressed. I also configured two buttons using two different GPIO pins, and two category row LCDs for the grid by changing the I2C address of one of them. This ensures we have an entire hardware setup we need for our MVP fully functioning.

Is your progress on schedule or behind? If you are behind, what actions will be taken to catch up to the project schedule?

  • As of today, my schedule is on track since we have completed the prototyping of 4 blocks and moved on to 8 blocks very quickly. I have also completed all embedded controller code and put together all the hardware electrical components necessary for our MVP.

What deliverables do you hope to complete in the next week?

  • I hope to work on making sure the hardware is reliable since the blocks are not well connected all the time. However we have checked that all the hardware is working and the code is valid as well. I hope to ensure that there is more robustness in our product for gameplay purposes.

Wen Hui’s Status Report for 3/15

What did you personally accomplish this week on the project? Give files or photos that demonstrate your progress. Prove to the reader that you put sufficient effort into the project over the course of the week (12+ hours).

  • I worked on enabling the other UARTs on the RPi5 by changing the configuration files /boot/firmware/config.txt. I also refactored the code to be generalizable such that in the future when we expand to more rows, we would be able to easily specify which UART to use. 
  • I also soldered the remaining pogo pins and Pico needed for the blocks in order to have sufficient resources for one complete row of testing.
  • After Alexis built the circuitry for 4 sets of pogo pins (pos_0 to pos_3) simulating one row in the grid, I worked on testing each of the Pico + LCD circuits to make sure they are functioning well. Each of the pogo pins on the grid can be accessed by indexing through the multiplexer. I managed to get two Picos with all the required functionalities working (receiving word from RPi, receiving query for word, changing color of LCD). I also tested the loading of one word to a Pico from one position (eg. pos_0) and reading the word from the Pico from another position (eg. pos_3). This verifies that the code we have written for the Rpi and Pico are correct.
  • One of the pogo pins on the Rpi did not seem to be functioning so I soldered a new set and now the grid circuitry has been verified to be completely functioning.
  • During the process of testing, I discovered some potential points of failures:
    • Some of the wires for the UART communication were coming loose during the testing process, causing the UART communication between the Pico and RPi to be unstable.
    • Some of the Picos were only able to receive from the RPi but were unable to send ACKs back. I tried checking the connectivity of the wires by making sure the TX/RX were connected correctly to the right pins. The soldering and wiring also seemed well-connected. I suspect that there might be issues with how the female header pins have been soldered onto the Pico which I will test in more detail.
    • There is also latency in setting the LCD color and word, hence I refactored the code such that we only update the LCD when we receive a word or a color from the RPi instead of setting it every iteration of the while loop so as to reduce the UART read latency.
    • There is also latency in the UART communication. Some Picos are able to respond within 0.1s but some Picos require a longer delay time. As such, we might have to experiment with different delay timings in between UART retries to ensure it works for all blocks in the same manner.

Is your progress on schedule or behind? If you are behind, what actions will be taken to catch up to the project schedule?

  • As of today, my schedule is slightly behind because we are supposed to have built the 4 block prototype to completion by Sunday but we are having issues with getting all the Picos working. I would try to find 2 more Picos out of the remaining Picos we put together that are working so that we have one complete row of blocks for testing purposes.

What deliverables do you hope to complete in the next week?

  • In the next week, I hope to finish building the 4 blocks entirely by early next week. I hope to then more on to end-to-end testing by integrating with the webapp code which Nicole has ported over to the Rpi. I will have to integrate the embedded controller code into the webapp codebase.

Wen Hui’s Status Report for 3/8

What did you personally accomplish this week on the project? Give files or photos that demonstrate your progress. Prove to the reader that you put sufficient effort into the project over the course of the week (12+ hours).

  • I finished the designing and coding of the embedded controller and UART controller (helper class within embedded controller to handle UART communication by abstracting away the processing of retrying + delays) on the RPi. I wrote the functions send_query, send_word and send_color within the UART controller that handles sending of the respective commands to the Pico. I wrote the functions on the embedded controller which interfaces with the game controller (the game controller will be written by Nicole along with the web application). I thought about and wrote the embedded controller submission logic by integrating GPIO with a callback function that sends a POST request to an endpoint that is specified by the web application. I tested the multiplexers which were newly acquired and integrated it to embedded controller logic for selecting the grid position to read/write from. 
  • All the code for the embedded controller to handle game play and user interaction is complete. I also finished testing all the functions within the Rpi within the limited capacity of a block and a grid circuit built on a breadboard.
  • I also helped with the replication of the other 7 blocks by soldering header pins onto components such as pogo pins and Picos.
  • I started looking into the design for the grid system and asked Techspark about wood materials for laser cutting. We found that purchasing wood is too expensive so we are switching to using cardboard instead.

Is your progress on schedule or behind? If you are behind, what actions will be taken to catch up to the project schedule?

  • I am currently on schedule with an upcoming task of testing 2 blocks once they are fully built with an independent power source within the block.
  • We have decided that I will focus on prototyping the code for a single block first before working on the grid design. I intend to test the grid circuit on the breadboard for now while I ensure that all the blocks we make are functioning.

What deliverables do you hope to complete in the next week?

  • I hope to start testing the integration of the embedded controller with the game controller (especially for submit button). I will test if the POST request is being sent from the embedded controller to the game controller.
  • I also hope to test out a fully built block and whether it interacts well with the grid breadboard circuit.

Wen Hui’s Status Report for 2/22

What did you personally accomplish this week on the project? Give files or photos that demonstrate your progress. Prove to the reader that you put sufficient effort into the project over the course of the week (12+ hours).

  • I built the circuit for the RPi on the breadboard for testing purposes. This included the pogo pins, LCD (for row category display) and button (for answer submission). 
  • I also tested the components we received including the pogo pins, regular LCD for row category display, RGB LCD for block word display and the button individually to make sure they were working well as expected. For the button, I utilized the RPi built-in GPIO functionalities to detect the button press by using a callback function. For the regular row category LCD, I utilized the Sparkfun QWIIC SerLCD library to interface with the LCD, allowing me to change the backlight color (when we display the answer) and the text on the screen. The RGB LCD for block word display was purchased from Waveshare and there were starter codes found on the Waveshare website which I referenced to set up the interface between the LCD and the Pico.
  • I also worked on implementing a basic UART communication between one RPi and one Pico via the pogo pins. To program the Pico, I installed Thonny on my computer in order to program the Pico using MicroPython. On the Pico, I utilized the machine library to read from the UART pins of the Pico. On the RPi, I utilized the pyserial library to read from the UART pins of the RPi. 
  • The main issues I was concerned about were transmission latency and accuracy. It seems like latency wasn’t an issue because one cycle of transmission (including sending and waiting for ACK) includes a 100ms delay. This will ensure that in the worst case scenario a block is not present, the RPi will detect this within 300ms. In the future, I might adjust the delay time period to allow for faster communication between the RPi and the Pico. In terms of transmission accuracy, I encountered issues where the Pico would not receive the entire word from the RPi or it might mistake a word that was transmitted twice to be a singular word. As such, I implemented a format for the data sending, by prepending all game words with “#” and all queries with “@” so as to differentiate between the two commands. I also added data parsing to extract the words and commands accurately. I used the highest baud rate of 115200 and managed to achieve accurate transmission between the RPi and the Pico. I simulated the entire game loop by having the RPi send a word to the Pico. (The Pico received the word usually on the first or second attempt by the RPi). Following this, I simulated the RPi querying the Pico for the word and the Pico was able to successfully transmit the word to the RPi and the RPi also changed the text on the row LCD.

  • I also created an FSM diagram to showcase the different states within my program.

  • I also asked Quinn about the PCB Milling Machine and came up with alternatives.


Is your progress on schedule or behind? If you are behind, what actions will be taken to catch up to the project schedule?

  • My progress is on schedule and I have completed most of the prototyping for one block interface, except for displaying the word on the block’s LCD.


What deliverables do you hope to complete in the next week?

  • Next week, once the Picos arrive, I hope to experiment with the testing of 2 and more block circuits. This will involve the use of the multiplexer.
  • I also hope to help with the construction of an actual block once the acrylic blocks arrive. The block would consist of a perforated board with the connections soldered to connect the Pico to peripherals such as the LCD and pogo pins (for UART)

Wen Hui’s Status Report for 2/15

What did you personally accomplish this week on the project? Give files or photos that demonstrate your progress. Prove to the reader that you put sufficient effort into the project over the course of the week (12+ hours).
– I crafted the design requirements and made calculations to ensure that our choice of parts fit within the design requirements.
– I helped with creating the block diagram to represent the different components.


– I also helped to design concrete testing procedures in the area of unit tests and integration testing with clear quantitative metrics to measure our project’s success
– Based on our ideation, we have designed that there will be three main components in the central RPi: the WebApp, Game Controller and Embedded Controller. Since I am working on the embedded communications, I created a flow chart for each of the functions of the embedded controller based on the inputs from the Game Controller and the physical hardware peripherals


– Since we received the RPi this week, I set up the RPi, installed the relevant libraries we will be using and set up the basic test programs for UART, I2C and GPIO testing based on the libraries I researched last week. I could only test UART since the components have not yet arrived
– I also designed a simple algorithm together with a message sending protocol to handle the sending of the words between the blocks and the grid.

Is your progress on schedule or behind? If you are behind, what actions will be taken to catch up to the project schedule?
My progress is slightly behind schedule as we did not expect that the initial integrated LCD screens with ESP32 would be sold by a banned vendor. As such, we only ordered the new LCDs on Wednesday after researching for alternatives. I will work on some tasks that has to be done next week (such as planning out the circuit connections) before the parts arrive so that I can still be on schedule.

What deliverables do you hope to complete in the next week?
Next week, I have to interface the RPi with the actual components such as Pico and LCDs once the parts arrive. I would be doing individual interfacing between the RPi and each of the peripherals using UART, GPIO and I2C according to the libraries I have tried out this week. I will also start building the breadboard circuitry to establish a prototype grid + single block circuitry.

Wen Hui’s Status Report for 2/8

This week, I prepared for the proposal presentation and conducted research on answering potential QnA questions. In terms of our project, I conducted research on the different LCDs and compared their specifications.

For each of the components that we are using, I also researched about how to interface with them. We will likely be using I2C for the LCD, GPIO library for the buttons to detect a rising edge and UART to communicate with the block microcontroller. I also researched about the libraries to use for the RPi and ESP32 / Pico in terms of UART, I2C and SPI communication. I decided that we can use Python to write our embedded code on the RPi since there is a RPLCD.i2c, RPGPIO and Pyserial libraries which allows us to interace easily with the components from the RPi. Using Python would allow us to integrate easily with the web application code as well since the backend will be written in Python.

I also wrote the implementation flow for how the embedded devices would communicate with one another.

Pre-Game:

During game:

I also drafted out a top level plan in psuedocode for how the implementation would look like on the RPi in terms of the functions and variables required. The main thing I would need to test out on the RPi would be the reliability of the serial communication with the block microcontroller. Since I am trying to implement serial communication with ACK, my current idea would be for the RPi to send a message to the block microcontroller, wait a certain period of time for an ACK and repeat the sending if nothing has been received. I am not sure if this would be the most reliable way to implement the communication until I test it out.

For the block microcontroller, I did research on both Pico and ESP32 as I was not sure which we will be using yet. For ESP32, we can interface with it using Arduino IDE and it also has a local file storage which allows us to store the block’s work. For Pico, we can load Thonny OS onto it to allow it to run MicroPython. It also has a local file system to store the word from the RPi. If we do use Pico, I will have to do more research into the limitations between using C vs Python on the Pico in terms of functionality and latencies.

I am currently on schedule for my tasks. In the next week, I hope to get started on writing the code for the Rpi after finalizing the parts list and procuring the microcontroller + LCD for the blocks.