Alexis’s Status Report 4/26

What did you personally accomplish this week on the project? Give files or photos that demonstrate your progress. Prove to the reader that you put sufficient effort into the project over the course of the week (12+ hours).

This week I gave the final presentation, worked on the poster, helped test out and debug some of the changes made to the webapp and gameflow, added labels to the grid so that users can know positions of the block on the grid. I finished the poster and all that we need to do is update the testing and verification values to what we have been doing this week. Also, I took a look at possibly adding neopixels inside our blocks and making it programmable to the colors itself. Another thing that I am thinking of adding is a 3D printed frame to cover the LCD’s glue to the top portion of the block. With the addition of sound effects I created a plan for how to construct the housing for the speaker to be the block logo that we have for Connexus. I am looking to sew some legs to give the housing for the speaker some character that would add more charm to our project. In terms of hardware I was trying to come up with different ideas for more stronger alignment and will be experimenting with these soon.

Is your progress on schedule or behind? If you are behind, what actions will be taken to catch up to the project schedule?

My progress is on schedule and with the poster out of the way, we have to come up with a draft for the video.

What deliverables do you hope to complete in the next week?

I will finish user testing, start outlining and then finishing the video, starting and finishing the final report, and finishing up all the additional cosmetic touches.

Alexis’s Status Report 4/19

What did you personally accomplish this week on the project? Give files or photos that demonstrate your progress. Prove to the reader that you put sufficient effort into the project over the course of the week (12+ hours).

This week I worked on laser cutting the grid, making 3D printed holders for the pogo pins on the grid, assembling, integration of our final product, verification testing and user testing. For the grid I was able to cut all the pieces out and wood glue it together, letting it set for 24 hours before we started playing around with it. Before that I had used scrap cardboard to ensure that everything would fit together and that it was an appropriate height. I found that I didn’t add enough tolerance and therefore had to modify some dimensions. I also initially had engravings to make way for the wires but it did not cut deep enough and took too long to do the engravings so we ended up laying out the wires in the back nicely and taping it down. I also printed out the holders for the pogo pins which helped to align it to its position on the grid ensuring that each pin was straight and flush to the board. These proved to be super helpful when installing the pogo pins and minimized variability in its positioning. I also added standoffs as I realized there would be some wiring on the back side that I didn’t want to get squished when laying flat on the table. I then worked on integrating with the soldered perf board and solidifying all our connections: removing jumpers when possible, soldering the joints and heat shrinking it to provide insulation. There was quite a lot of debugging and retesting connections as it got jumbled while migrating the test board to the grid, however we were successfully able to finish and start testing. I also discovered that there may be manufacturing defects with some of our pogo pins as there are times when the male pogo pins don’t come to the same height and one is sunked down (look here for reference) which may also attribute to some loose connections and why we may have troubles receiving ACKs sometimes. As for verification and testing I worked on uploading 16 different words to each block and at different positions. The way I did this was first starting out with block 1 on position 0, block 2 on position 1 and so on. I then wrote some code to recording the start and end of uploading a word associated with a particular position. I noted all the times and shifted all the blocks down by one so that now I had block 16 on position 0, block 1 on position 1 and so on. I continued this for 16 times and was able to see satisfying results with around 200 ms on average to upload varying lengths of words. I also conducted user tests where we set up the user to play NYT Connections and then Connexus and take a survey. I recruited about 5 people for user testing. I also made sure to weigh and check the size of the block which we found that the weight was 181g and so far everything is meeting our original design requirements. I also am working on graphs for displaying testing metrics for the final presentation.

Look here for more photos and videos!

Is your progress on schedule or behind? If you are behind, what actions will be taken to catch up to the project schedule?

My progress is now on schedule as I have finished the grid and integrating everything. The only thing that is left is more user testing.

What deliverables do you hope to complete in the next week?

More user testing and possibly making minor cosmetic changes. I will also be starting on the poster and looking at comments for the final report.

As you’ve designed, implemented and debugged your project, what new tools or new knowledge did you find it necessary to learn to be able to accomplish these tasks? What learning strategies did you use to acquire this new knowledge?

The new knowledge I have acquired is all the mechanical knowledge such as using the Epilog laser cutters and using Solid works to get the correct dxf files. I also learned that a lot of my designs were a bit of trial and error, I tried to use scrap material where I could to practice and then moved onto our actual product, but you can see that hear and there some of the mess-ups I had along the way, but once I got the hang of it everything became really easy. I also learned more about micropython and creating a protocol for the picos to communicate with the RPi. I enjoyed making a class abstraction to better structure my code so that it was easy for integration. I also became a lot more comfortable at soldering as repeating the same actions while scaling became a routine for me. I also learned how challenging it can be to scale as now there are so many moving parts and variability in places you didn’t know existed, but I think that my team and I came up with a good plan and we have been executing it well to ensure organization such as labeling the blocks and modularizing testing to ensure connectivity and functionality.

Alexis’s Status Report for 4/12

What did you personally accomplish this week on the project? Give files or photos that demonstrate your progress. Prove to the reader that you put sufficient effort into the project over the course of the week (12+ hours).

I have been working on assembly for the 8 additional blocks that we had, mostly laser cutting, hot gluing, spraying the blocks, and soldering all the pogo pins with the 6 pin header since these pogo pins were surface mounts. I also helped Nicole to create a 2nd test bed and created a “bridge wire” from the main board to the mini-breadboard of the second testbed so that we can daisy chain and get the wires we needed from the RPi5. I also worked on planning out how we would cut out all of our wood to assemble the grid with a CAD and researched into how another team was incorporating their pogo pins into their design. I came up with a new 3D printed pogo pin holder to ensure that the pogo pins are placed onto the grid in an organized and systematic way so that we can easily assemble the grid without variability. I did box joints for the grid so that we can apply wood glue to hold it in place and I also made the cut outs for the button and the LCDs. I made some design changes which was to reduce the spacing between rows and move the row LCDs to the right side of the board above the buttons. I also helped come up with some trade-off studies to prove our design choices as well as created a survey that we will ask users to fill out during user testing.

Is your progress on schedule or behind? If you are behind, what actions will be taken to catch up to the project schedule?

I am currently slightly behind schedule as I was supposed to finish the grid but we expanded to 16 blocks and I also had to come up with a solution for the pogo pins. Since I have the files now I will be doing an initial cardboard cut out to confirm the design and then I’ll be able to assemble the grid itself.

What deliverables do you hope to complete in the next week?

I will have the grid assembled, help debug the 16 block set up, and complete the user testing / verification tests that I have for the parts that I am responsible.

Verification Testing

I will be performing the battery life endurance test which we have already been doing informally and the blocks’ batteries have been able to last for weeks with several days of 2 – 4 hours of being on while we are testing. I will also be working on the trade-off tests for checking different delay times for the upload_words function as well as experimenting with different UART baud rates to show how we came to the decision to use certain specs. The blocks were my subsystems that I am responsible for and I will be weighing and measuring each block to ensure that it meets the requirements of being <4"x4"x4" and <400g. We purchased blocks that were already 3.3"x3.3"x3.3" so the measurements are already satisfied and I will just need a scale for measure but I also did this informally and it seems to meet this requirement. I will also be working on UART Send & Receive to test how 10 words are sent from RPi5 and using the time module we will collect data on the latency it takes from the upload word query to receiving an ACK on RPi 5 side. This will be performed on all of the blocks. In addition I will my other teammates by writing any scripts that help us collect our data and I will be recruiting people to take part in our user study as well as come up with more questions that would allow us to show how Connexus compares to NYT Connections.

Team Status Report for 4/12

What are the most significant risks that could jeopardize the success of the project? How are these risks being managed? What contingency plans are ready?
The only significant risk that would jeopardize the success of the project is the connection of the 2nd set of blocks that we created. It seems to intermittently work where sometimes it is really smooth and doesn’t cause problems and at other times it is very difficult for one of the blocks to get an ACK. The plan for mitigation is to do continuous testing and try to isolate the problem first. The hypothesis currently is that it is due to the leveling of the female pogo pins that are on the grid and that once the grid is built, we will have a more stable and flat connection between the block and grid which will help with uploading the words. Another mitigation is to modify our algorithm slightly by potentially bypassing the block that appears to be having a problem and maintain a list of those blocks. It will continue uploading the rest of the blocks and will re-try the blocks that weren’t able to receive the word. If it still fails to do so, we may need user help with resetting the block by displaying on the webapp to tell the user to check the connection of a certain block position on the grid to reposition the block or simply turn it off/on. The other plan is to exponentially increase the delay for an ACK on several subsequent re-tries. This would be the worst case scenario if we are not able to fix the problem.

Were any changes made to the existing design of the system (requirements, block diagram, system spec, etc)? Why was this change necessary, what costs does the change incur, and how will these costs be mitigated going forward? Provide an updated schedule if changes have occurred.
The changes made to the existing design of the system is the need for a 3D printed part to hold the pogo pin on the grid. We wanted to ensure a very stable connection and for a flush look which is why we wanted to make a holder for the pogo pins. At techspark, the 3D printers are $0.48 per gram and each holder is 1 gram. So $0.48 x 16 = $7.68 which I will round to $8 in case I have to do 1 trial print.

This is also the place to put some photos of your progress or to brag about a component you got working
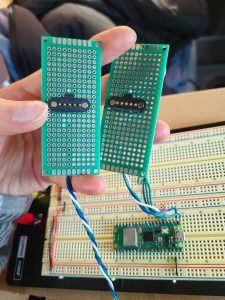
Since the last update, we were able to get all 16 blocks fabricated to completion which meant laser cutting the blocks, soldering the adapter and batteries, cutting out holes in the battery holder for the charging cable, and we decided on using hot glue to secure down the components in replace of tape which was a bit flimsy. Also we accidentally ordered a surface mount pogo pins instead of the through holes and so there was additional soldering where a total of 6 header pins were added to the surface mounts to provide stability and an electrical connection to jumpers. We had to do this for a set of 8 blocks. We also worked on creating another testbed for the 16 blocks as a proof of concept before we build a grid that is for 16 blocks instead of 8. We noticed that there was a lot of wiring on some mini-breadboards that we had and we felt that it felt bulky and decided to create a perf board to minimize the circuitry instead. As it was kind of late in the semester ordering a PCB may not come in time so perfboard was the best option, we may end up being able to move everything to a PCB towards the end if there is enough time. Also corresponding modifications were made to support all 16 blocks as well as a 1 word away feature on the webapp. Also, the grid CAD was created to plan the cutting of the wood that we purchased, with 16 blocks working we were finally able to create a grid to size and also worked on a 3D printed part pogo pin holder to ensure that everything fits. In addition we tested E2E with the 16 blocks and did some preliminary testing by changing the delay to receive an ACK which allowed us to reduce our total uploading latency from 22 seconds to only 3.2 seconds.
Link to Photos

Additional: Comprehensive update on what tests you have run or are planning to run. In particular how will you analyze anticipated measured results to verify your contribution to the project meets the engineering design requirements or the use case requirements?
Next week is reserved for testing and so we worked on creating a testing plan. So far we have been playing around with the delay values for the uploading_words algorithm and we were able to reduce our upload time. The verification tests that we plan on performing next week is game logic accuracy, weight and size of all 16 blocks, battery life – endurance trials, UART send and receive latency, hint retrieval latency and ability to retrieve all the hints through the Merriam Webster API. For the game logic accuracy, we will take 10 known puzzles and ensure that each will have a 100% correct answer checking when a submission takes place. We will measure and weigh all 16 blocks with a caliber and scale to ensure that it meets the requirement of <4”x4”x4” and <400g. For battery life, there will be 5 endurance trails with the block displays turned on to ensure that the average battery life can last at least 15 minutes for game play. We have currently been simultaneously testing this while we test our actual implementation of our code and the blocks last very long with like a week of gameplay each session being anywhere between 2 – 4 hours. For the UART tests, we will have 10 known words sent and read from each of the picos and ensure that the pico receives and displays the correct word as well as have the upload latency be <400 ms. The last test is for the virtual companion by loading 20 puzzles and looking at the hint retrieval latency as well as accuracy of Merriam Webster API to have that word in the API. We want a 95% retrieval of hints and an average of 3.2 seconds per puzzle. As far as validation testing, we have been performing these such as playing several games subsequently and trying different edge cases to ensure that those are handled properly.
Link to plan

There are a few other tests that we have to look at tradeoffs such as with accuracy and speed as well as a comparison of 8 and 16 blocks. For uploading words we will be varying the delay and recording the latency as a result of that delay value. We will also play around with UART baud rate as well to look at the latency.
We also worked on creating a survey (google form) for user studies so that we have it set up for next week and we can just test with people. We will be recruiting 10 novice NYT Connections players and 10 ESLs to play the game and provide their feed back through the google form. We will have them play a NYT Connections puzzle first through the original mode (online) and then we will have them play Connexus and gather their input / feedback. We would ideally like to see that Connexus outscores NYT Connections by 1 point in each of the main categories that we have: ease of Use, game completion rate, level of enjoyment, and frustration toward game.

Alexis’s Status Report for 3/29

What did you personally accomplish this week on the project? Give files or photos that demonstrate your progress. Prove to the reader that you put sufficient effort into the project over the course of the week (12+ hours).

This week I worked on integration test, error handling on the pico, font size changes, and on spraying the blocks. I was integration testing the website and grid with Nicole and we discovered an edge case where the web app seemed to have errored out while attempting to retrieve a definition for a word that does not exist in the Merriam Webster API. This sparked a move towards doing error handling across the board as we found some additional bugs during our Wednesday meeting with Professor Mukherjee and our TA Ankit. We discovered that there was an issue while the RPi 5 was uploading the words to the blocks and if any of the blocks are moved out of their position slightly during that transmission, there seems to be an bug where the buffer seems to append on the word retrieval during the upload and ACK phase which causes part of our command that we received from the RPi 5 to be displayed on the LCD and appended to the current word itself. I worked on doing error handling in regards to making the queries have a more strict format and dynamically removing any bad data we receive during a transmission from Rpi 5. This created a more robust system for us and handles potential edge cases where we receive bad data and shouldn’t be displaying it on the LCD. In addition, I added dynamic font size changes where words that have a length greater than 9 will decrease a font size down and then greater than 14 will decrease another font size down. This handles another edge case for lengthy words. In regards to the blocks I worked on spraying those with a frosted coat to cover the circuitry and they look great.

Is your progress on schedule or behind? If you are behind, what actions will be taken to catch up to the project schedule?

I am currently slightly behind schedule as I need to assemble and cut the grid but we were discussing the best routes to help guide the alignment of the blocks to the pogo pins with the additional magnets that we purchased. I did purchase the wood that we need for the grid this week but I need to make the dxf files for laser cutting and assembling. I will be working on this tomorrow (Sunday) and will laser cut by Monday.

What deliverables do you hope to complete in the next week?

I will have the grid assembled by next week. We also are expanding to 16 blocks and so I will be working on manufacturing those: soldering battery holders to adapters, soldering pogo pins onto perf boards + soldering on the wires for those, soldering the double sided male/female header pins, laser cutting the blocks, and spraying them.

Alexis’s Status Report for 3/22

What did you personally accomplish this week on the project? Give files or photos that demonstrate your progress. Prove to the reader that you put sufficient effort into the project over the course of the week (12+ hours).

This week I worked on getting the upload 4 words to the row working and creating a test bed for a grid set up. While I was trying to get a row working I felt that our testing setup was inefficient and a bit messy so I decided to layout the initial grid. I worked on creating all the slots for the blocks and wiring everything up so that we can test code more easily and also show our proof of concept. Also I finished soldering the rest of the wires for another 5 sets of male (grid) pogo pins as well as 3 more female (block) pogo header pins. With this set up, it helped us to identify and create a testing plan as well so that we can figure out what components may not be working as intended. We found a few pogo pins that needed to be resoldered as well as some picos’ UART lines were broken and we had to switch to a different set. We ended up using UART0 on pins 16 and 17 and I worked on soldering on the female header pins and wiring those to female pogo pins, which allowed us to get a 2nd row of blocks working. I tested our embedded controller and ensured that we were able to get all 8 blocks working with our upload_words function. I also worked on filling out our testing sheet and testing components individually via continuity test to isolate any parts that need to be re-done. I originally had wanted to work on laser cutting and the 3D component holder this week but instead switched gears to the grid set up as I felt that was more of a priority for us to be able to reach our goals.

Please click below to see videos of the set up.
Pictures / Videos of Progress

Is your progress on schedule or behind? If you are behind, what actions will be taken to catch up to the project schedule?

I am currently on schedule and a little bit ahead as I was able to get to the building of a prototype grid that is a good test bed to test/finish out the software side of our project.

What deliverables do you hope to complete in the next week?

I will print out the 3D component holder, laser cut the on/off switches, and work on thoroughly testing our code end to end (E2E).

Alexis’s Status Report for 3/15

What did you personally accomplish this week on the project? Give files or photos that demonstrate your progress. Prove to the reader that you put sufficient effort into the project over the course of the week (12+ hours).

This week I worked on laser cutting all 8 blocks for the ports that were needed. I decided not to do the on/off switch for the battery cut out yet because I wanted to design the CAD for the component holder first before deciding on where it would be as I wasn’t sure of the battery would be elevated or not. I learned and experimented with the Epilog laser cutters in Techspark as these had visual layovers to ensure the correct cutting position which would be more accurate than the rabbit laser cutters. I also had to try different power settings in order to find the right one for our thickness as well as what gave us the cleanest cuts. I found that for laser cutting the LCD on the lid 6% speed, 10% power, 70% frequency, and 2 repetitions gave me the best results. For the bottom ports (pogo and micro-C) a speed of 6%, 5% power, 70% frequency and 4 repetitions.

Aside from that I help to set up the circuitry for the remaining 4 slots and am working on integrating and testing. I am also investigating the connections between pico, LCD, UART, and GND since Wen Hui found some loose wires that tampered with the communication. I am working towards getting that full row set up.
CAD + Grid Pictures

Is your progress on schedule or behind? If you are behind, what actions will be taken to catch up to the project schedule?

I am currently slightly behind schedule as we needed to get a full row working this week. I am working over the weekend to catch up so that we are back on track and will hopefully have the full row and submit button working by Sunday.

What deliverables do you hope to complete in the next week?

I will print out the 3D component holder, laser cut the on/off switches, finish a row that is fully implemented, and start working on the next row.

Team Status Report for 3/15

  • What are the most significant risks that could jeopardize the success of the project? How are these risks being managed? What contingency plans are ready?
    • The most significant risk that could jeopardize the success of the project is the wired connection between the RPi Pico UART (RX and TX) and GND wires to the Pogo pins. A problem that we are facing right now is that steady and sturdy connection that will allow the RPi Picos on each block to communicate with the RPi 5 via the multiplexer that indexes each grid position. Right now we are doing thorough testing on the soldered connections and we’ll also make sure that no picos were damaged from desolder the old male header pins that we had when we were replacing it with the longer female header pins. The contingency plan is to verify all of our hardware as of right now and if that still doesn’t work we will move to directly soldering the wires to the picos instead of having them connected via header pins.
    • On the website end, we set up the Docker container that would ideally allow for the website to run on the RPi without too much set up. The only risk for that the Docker container potentially does not work and the mitigation for that is just to install all the dependencies locally on the RPi 5. Currently we have the local installed dependencies and a working web app running on the RPi 5.
  • Were any changes made to the existing design of the system (requirements, block diagram, system spec, etc)? Why was this change necessary, what costs does the change incur, and how will these costs be mitigated going forward? Provide an updated schedule if changes have occurred.
    • There were no changes made to the existing design of the system. There isn’t a change to the updated schedule even though we are slightly behind but we are catching up over this weekend and on Monday as well to help stay on track.
  • This is also the place to put some photos of your progress or to brag about a component you got working
    • Press here for photos
    • We finished laser cutting all 8 blocks and designed/CAD a 3D component holder to keep help secure the components in place.
    • We set up the circuitry for 1 full row: 4 blocks with corresponding 4 grid slots, button, and row category LCD.
    • Docker container was created which will simplify set up on RPi 5.


Alexis’s Status Report for 3/8

What did you personally accomplish this week on the project? Give files or photos that demonstrate your progress. Prove to the reader that you put sufficient effort into the project over the course of the week (12+ hours).

This week I help set up the infrastructure for 6 blocks where I soldered the battery case to the adapters and added on wires for GND, TX, and RX for the LCD to pogo pin. We received the rest of the items so I was able able to cut pref boards and solder all the pogo pin pairs onto their respective boards. In addition, I was able to laser cut the LCD opening at the top of the block as well as the pogo pin and USB-C charging port at the bottom. I first experimented with card board and did it on one block after creating the cuts on ink scape software that is compatible with the rabbit laser cutters in tech spark. From that experience I was able to extrapolate the best settings for the acrylic cubes that we had. For now based on how long it took to manufacture just a row of blocks I feel that a PCB is not needed at the moment and so I am focusing my efforts on other things such as CAD for the grid and for the holder of the components inside the block. On the software side, we discussed handshaking signals and functions that would be used / called between game controller and embedded controller to ensure that we are all on the same page as we are developing.

Is your progress on schedule or behind? If you are behind, what actions will be taken to catch up to the project schedule?

I am currently on schedule with my progress! There is an added need for a 3D printed holder of components in the blocks but that will be accounted for with the time that was originally allocated for the PCB constrution.

What deliverables do you hope to complete in the next week?

I hope to finish laser cutting the rest of the blocks this week, come up with a CAD for the holder of components inside each block, and I would establish a full working row with the submit button in conjunction.

Alexis’s Status Report for 2/22

What did you personally accomplish this week on the project? Give files or
photos that demonstrate your progress. Prove to the reader that you put sufficient
effort into the project over the course of the week (12+ hours).

This week I worked on the hardware, prototyping, and communications. I manually soldered the pogo pins onto cut pref boards as the pins were too small to fit on a standard bread board. This was done for just two blocks I then wanted to test the continuity of the pins and wires connected to it so at first I did a simple test with a multi-meter and later on I tested through the UART TX and RX line. I also created a cardboard 3″x3″x3″ with cutouts for the pogo pins, the standard LCD that we had available, and on/off switch for battery. From this cardboard prototype we were able to determine that all the parts we initially planned for would all fit. I also put together the power system and tested it by plugging the micro-usb b into the port of the Rpi to which it was able to turn on. With the initial layout going according to our original plan we felt that we could now order all the remaining parts to build all of the 8 blocks that we need for MVP. We bought acrylic boxes that are 3″x3″x3″ and we got a rough weight of what the blocks feel like and we are on track to meet our dimension and weight design requirements. On the software side, I was able to set up UART between Rpi and the Rpi pico via the pogo pin connection. I did a simple test of sending and receiving a message that is printed onto the console while Wen Hui added more logic to it for a proper protocol. Though I haven’t measured the exact latency we found that it was fairly fast and which I meets our design requirements as well. I am currently working on using the new LCD that we received from wave share on Friday and interfacing with the LCD library.

Is your progress on schedule or behind? If you are behind, what actions will be
taken to catch up to the project schedule?

My progress is on schedule. This week was a good determination of whether we needed the PCBs for the blocks and we settled on a plan that I would create a PCB that is on “hold”. After manually building 2 blocks and timing it, we will determine if we need to place the order for these or if we have enough time to just manufacture each ourselves. We will also look into PCB milling at Techspark. But as of right now we are on track!

What deliverables do you hope to complete in the next week?
The deliverables that I have for next week is to get a full E2E of 2 blocks communicating with the Rpi via the multiplexer and laser cut all of the blocks for the ports and slots that we need as well as the battery holders. It would be ideal to get 1 full row working as well. I will work on interfacing with the LCDs on each block and the design for the PCB. I will also produce a CAD for the grid and assemble it when we can ensure everything will fit based on the row we produce.