Nicole’s Status Report for 2/22

  • What did you personally accomplish this week on the project? Give files or photos that demonstrate your progress. Prove to the reader that you put sufficient effort into the project over the course of the week (12+ hours).
    • This week I finished implementing the web app front end pages and the entire backend for the web app. I created all the backend API functions that the game/embedded controller would just need to call in order to control the game flow display on the web app. I was able to simulate a game session by making POST requests to my web app backend.
      • link to Flask backend file: app.py
    • I registered for the Merriam-Webster API and obtained API keys.
    • I also helped Alexis to prototype UART communication between the RPi and the pico on a breadboard using the pogo pins.
  • Is your progress on schedule or behind? If you are behind, what actions will be taken to catch up to the project schedule?
    • My progress is mostly on schedule. Currently the web app is still using the free dictionary API, since I still have to figure out how to parse the Merriam-Webster dictionary API output to extract the definition and context for a word. I need to research a bit into the documentation for the Merriam-Webster dictionary API to see how I can do this.
  • What deliverables do you hope to complete in the next week?
    • Next week, I hope to have the Merriam-Webster dictionary API fully implemented into the web app, and I hope to be able to host the web app on the RPi 5. Once hosted on the RPi, I hope to start our testing plans for the game logic accuracy and hint retrieval latency. However, a significant portion of my time next week will be spent on the design report, so these deliverables may extend into Spring Break.


Team Status Report for 2/22

  • What are the most significant risks that could jeopardize the success of the project? How are these risks being managed? What contingency plans are ready?
    • The most significant risk that could jeopardize the success of the project is the communication between the RPi 5, pico, and LCD not working properly. If this communication doesn’t work, then we need to rethink the entire embedded communication portion of the project. To manage this risk, we have tested basic UART communication between the RPi and pico, and SPI communication between the pico and the LCD, and found both to be working separately. We plan to test the full path of communication before moving forward with building more blocks. If we run into issues with our single block prototype, our contingency plan is to swap out elements based on what is not working. We do not expect the RPi5 and pico communication to fail since these are widely-used components that many people have successfully used in other projects . Most likely, if the LCDs are the problem, we will pivot to the familiar RGB backlight I2C LCDs from 18-100.
    • Additionally, there are physical design risks such as the acrylic blocks being too thick for the pogo pins to stick out of (thus preventing a good connection to the grid’s pogo pins), the fact that the USB-C ports on the batteries require us to drill right on the seam of the battery holder in order to make an accessible charging port, and the fact that the LCDs have female header pins for the picos that force us to solder wires onto very small contact points on the LCD manufacturer’s board, which could be less secure and take longer to fabricate. To mitigate these risks, we will fabricate 1 block to see if these physical design specs will work out. Afterwards, we will adjust our components and construction plan accordingly if certain approaches or components do not work out.
  • Were any changes made to the existing design of the system (requirements, block diagram, system spec, etc)? Why was this change necessary, what costs does the change incur, and how will these costs be mitigated going forward? Provide an updated schedule if changes have occurred.
    • No changes were made to the existing design of the system since last week, when we fleshed out the details for our design presentation. However, we have updated our schedule to take into account shipping/ordering delays in retrieving our parts. As part of our risk mitigation plan, we are ordering parts in batches to make sure we don’t spend all our budget on parts that won’t work for our project. However, this strategy increases the waiting time between stages of our project as we have to wait for parts to arrive every time we order. This updated schedule can be seen in our Gantt chart.
  • This is also the place to put some photos of your progress or to brag about a component you got working
    • We setup, implemented, tested, and verified that UART works between RPi5 and RPi pico using Micropython and pogo pins.
    • We were able to get SPI LCD displays working with the pico.
      •  
    • We finished implementing most of web app frontend + backend (game controller just needs to call backend API functions to control game flow display on web app) — still need to use Merriam-Webster API instead of free Dictionary API.
    • We tested and verified that I2C works between RPi5 and row LCDs.


Alexis’s Status Report for 2/22

What did you personally accomplish this week on the project? Give files or
photos that demonstrate your progress. Prove to the reader that you put sufficient
effort into the project over the course of the week (12+ hours).

This week I worked on the hardware, prototyping, and communications. I manually soldered the pogo pins onto cut pref boards as the pins were too small to fit on a standard bread board. This was done for just two blocks I then wanted to test the continuity of the pins and wires connected to it so at first I did a simple test with a multi-meter and later on I tested through the UART TX and RX line. I also created a cardboard 3″x3″x3″ with cutouts for the pogo pins, the standard LCD that we had available, and on/off switch for battery. From this cardboard prototype we were able to determine that all the parts we initially planned for would all fit. I also put together the power system and tested it by plugging the micro-usb b into the port of the Rpi to which it was able to turn on. With the initial layout going according to our original plan we felt that we could now order all the remaining parts to build all of the 8 blocks that we need for MVP. We bought acrylic boxes that are 3″x3″x3″ and we got a rough weight of what the blocks feel like and we are on track to meet our dimension and weight design requirements. On the software side, I was able to set up UART between Rpi and the Rpi pico via the pogo pin connection. I did a simple test of sending and receiving a message that is printed onto the console while Wen Hui added more logic to it for a proper protocol. Though I haven’t measured the exact latency we found that it was fairly fast and which I meets our design requirements as well. I am currently working on using the new LCD that we received from wave share on Friday and interfacing with the LCD library.

Is your progress on schedule or behind? If you are behind, what actions will be
taken to catch up to the project schedule?

My progress is on schedule. This week was a good determination of whether we needed the PCBs for the blocks and we settled on a plan that I would create a PCB that is on “hold”. After manually building 2 blocks and timing it, we will determine if we need to place the order for these or if we have enough time to just manufacture each ourselves. We will also look into PCB milling at Techspark. But as of right now we are on track!

What deliverables do you hope to complete in the next week?
The deliverables that I have for next week is to get a full E2E of 2 blocks communicating with the Rpi via the multiplexer and laser cut all of the blocks for the ports and slots that we need as well as the battery holders. It would be ideal to get 1 full row working as well. I will work on interfacing with the LCDs on each block and the design for the PCB. I will also produce a CAD for the grid and assemble it when we can ensure everything will fit based on the row we produce.

Wen Hui’s Status Report for 2/22

What did you personally accomplish this week on the project? Give files or photos that demonstrate your progress. Prove to the reader that you put sufficient effort into the project over the course of the week (12+ hours).

  • I built the circuit for the RPi on the breadboard for testing purposes. This included the pogo pins, LCD (for row category display) and button (for answer submission). 
  • I also tested the components we received including the pogo pins, regular LCD for row category display, RGB LCD for block word display and the button individually to make sure they were working well as expected. For the button, I utilized the RPi built-in GPIO functionalities to detect the button press by using a callback function. For the regular row category LCD, I utilized the Sparkfun QWIIC SerLCD library to interface with the LCD, allowing me to change the backlight color (when we display the answer) and the text on the screen. The RGB LCD for block word display was purchased from Waveshare and there were starter codes found on the Waveshare website which I referenced to set up the interface between the LCD and the Pico.
  • I also worked on implementing a basic UART communication between one RPi and one Pico via the pogo pins. To program the Pico, I installed Thonny on my computer in order to program the Pico using MicroPython. On the Pico, I utilized the machine library to read from the UART pins of the Pico. On the RPi, I utilized the pyserial library to read from the UART pins of the RPi. 
  • The main issues I was concerned about were transmission latency and accuracy. It seems like latency wasn’t an issue because one cycle of transmission (including sending and waiting for ACK) includes a 100ms delay. This will ensure that in the worst case scenario a block is not present, the RPi will detect this within 300ms. In the future, I might adjust the delay time period to allow for faster communication between the RPi and the Pico. In terms of transmission accuracy, I encountered issues where the Pico would not receive the entire word from the RPi or it might mistake a word that was transmitted twice to be a singular word. As such, I implemented a format for the data sending, by prepending all game words with “#” and all queries with “@” so as to differentiate between the two commands. I also added data parsing to extract the words and commands accurately. I used the highest baud rate of 115200 and managed to achieve accurate transmission between the RPi and the Pico. I simulated the entire game loop by having the RPi send a word to the Pico. (The Pico received the word usually on the first or second attempt by the RPi). Following this, I simulated the RPi querying the Pico for the word and the Pico was able to successfully transmit the word to the RPi and the RPi also changed the text on the row LCD.

  • I also created an FSM diagram to showcase the different states within my program.

  • I also asked Quinn about the PCB Milling Machine and came up with alternatives.


Is your progress on schedule or behind? If you are behind, what actions will be taken to catch up to the project schedule?

  • My progress is on schedule and I have completed most of the prototyping for one block interface, except for displaying the word on the block’s LCD.


What deliverables do you hope to complete in the next week?

  • Next week, once the Picos arrive, I hope to experiment with the testing of 2 and more block circuits. This will involve the use of the multiplexer.
  • I also hope to help with the construction of an actual block once the acrylic blocks arrive. The block would consist of a perforated board with the connections soldered to connect the Pico to peripherals such as the LCD and pogo pins (for UART)

Alexis’s Status Report for 2/15

This week I worked on the Design Review Slides, making tables to compare the different communication protocols and microcontrollers that we looked at which ultimately helped us decide on what we wanted to move forward with. I also help to quantify our tests and draw connections to our requirements so that we can better measure our success. I also updated some of the diagrams in the solution approach and the power block diagram to reflect the components that we are going to be prototyping with. As for the Rpi, I helped Wen Hui boot up the OS and set up Real VNC viewer. Also, I made CAD models of our proposed block and planned where we will need to make cut outs for the ports and switch of the battery. I also helped order parts this week and acquire some scrap materials to help us make an initial prototype for next week. Also, I went to Techspark to solder jumper cables onto our battery holders, buttons, and header pins on row LCD to make prototyping easier.


My progress is slightly behind schedule according to our initial gantt chart because we need all the parts to come in before we decide if we actually need a PCB or not. For now I am just modeling where things will go and am planning out what the inside of the block will look like so that maybe we can just 3D print holders for all our components if a PCB is not necessary. I am shifting my focus into preparing as much parts as I can so that we could easily merge things together for prototyping a block.

My deliverables for next week is to create a mock on the block in its entirety with a plan for where each component will lie in the block. I also will work on establishing the UART protocol between the Rpi and Rpi pico as well as get the 2 row LCDs working so that we can display the proper category and flash it with a particular color. After getting all the parts I’ll also decide if a PCB is needed or not. If it is needed I will research the etching machines that are down in techspark for faster PCB development.

Team Status Report for 2/15

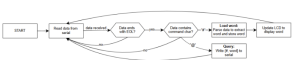
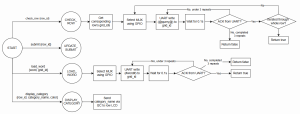
This week we mainly took on creating the Design Review slides. For the Design Review slides, we discussed and created the game flow logic in which we made FSMs and flow diagrams to explain our process in more detail. The more high level flow diagrams were created for the slides and the more detailed ones will be reserved for the Design Review document. We researched many different components and discussed them largely, coming up with the design requirements for Connexus. We also looked into timing and clarified our testing strategy so that we could better measure our success in meeting our requirements.

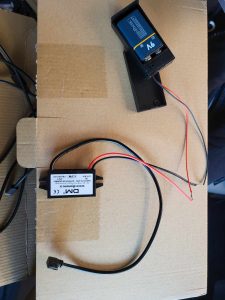
We ordered our 1st batch of parts and the most significant risk at this point was obtaining parts that would create a functional block as well as meet our dimension and weight requirements. This risk is being managed by ordering our parts in batches and buying enough to build 2 blocks to ensure that all the components that we selected will work well together. We will move fast with initial developments and use the built in slack time if necessary in the event that we need to order different parts. Also, one of the LCDs that we initially put out an order for was on the banned list of vendors and this helped narrow down our options of microcontrollers. The initial order of LCD included an already integrated LCD with ESP32 and at a fairly low cost for the abundant features we could implement like touch screen once we reach MVP. However, due to that ban, we decided to go back to a low-level and just buy components that are readily available to avoid a back and forth on that component we originally wanted. Now we have narrowed the microcontroller to an Rpi Pico which was the one we wanted to do in the proposal so our plans haven’t exactly strayed far. We then found an LCD that perfectly aligns with the Rpi Pico which would reduce wiring and allow for more compact layout when we place it in the cube. This option was also cheaper which allows us more wiggle room with budget when we have completed the MVP and want to move onto having all 16 blocks.

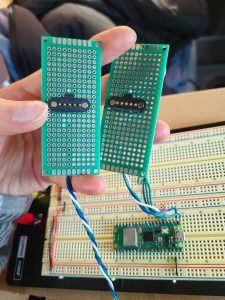
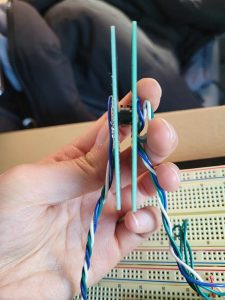
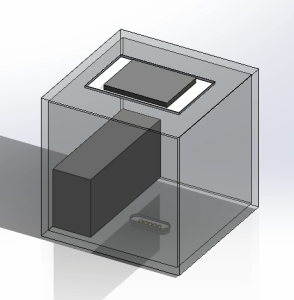
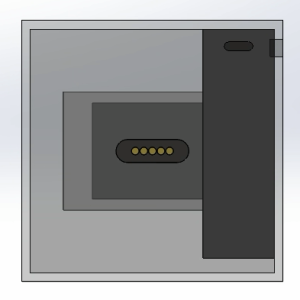
Our schedule has updated as we ordered parts slightly later than we had wanted to and we were also waiting for them. While waiting for parts CAD models can only be made to mock the system, but we felt that the actual building/assembling of the block and grid should wait until all the components are in and we confirm that their sizes are as true as their documentation says. We shifted the focus to flushing out the web app and doing as much as we can there as we wait for parts. The website has most of the pages setup and also functionality for uploading custom words. In addition, we are looking into various Rpi libraries that would help with development. Since we borrowed the Rpi 5, we immediately were able to use it so we just booted the OS and set up a remote virtual machine through Real VNC viewer so that we could all access the Rpi with ease. We soldered jumper cables onto some of our parts to help with prototyping when all the parts we need to make an initial block come in. For next week we will focus on establishing our communication protocol and also test that connect through the pogo pins that we bought. We will also swap out the temporary API calls from the free dictionary API to the Merriam-Webster API once we are able to register our App with them. Also we will build 2 blocks out of cardboard to get the initial dimensions before we decide on ordering acrylic cubes as well as a fake grid slot holder to connect blocks to the main Rpi.

Website Interim Demo

Part A written by Alexis Duong
Connexus is enjoyable instead of being frustrating as many novice players and English Language Learners (ELL) might feel while playing NYT Connections. It not only engages a user’s mind but it offers a physical interaction that would entice the user’s sense of touch and sight that is not offered with Connections. We hope that Connexus can be fun to play with and boost a person’s mood so that they leave the experience more happy and satisfied than when they started. Connexus ensures safety through electrical isolation of our circuitry and the user. The grid will contain some electrical components in a separate layer inside the hollowed out part of the grid so that electrical components are not exposed to the user and are insulated in that manner. The blocks themselves will be easy to hold and the user will only have access to the charging port as well as an on/off switch for the blocks so that they can de-power the system if they sense any hazards. We want the users to feel safe while playing the game and will therefore make sure that all electrical hazards are accounted for so that the user can focus on just having fun. In terms of welfare, Connexus is a game that sparks mental and physical engagement that is educational for the user and it can be a break from staring at a screen all the time as most people tend to do these days. NYT Connections is online and having to stare at blocks on a screen while you are thinking of a solution isn’t particularly the best as this can cause further eye strain for the users. Connexus helps to remind people to take a break from their screens and enjoy playing a game in real-life!

Part B written by Wen Hui Leng
Connexus is based on NYT Connections which is an American English word game. To perform well in the game, players would require an extensive knowledge of vocabulary to understand the double meaning of words and also be familiar with American cultural references to understand the context in which some of the words might be used. Our game, Connexus, targets novice players and English Language Learners. We aim to make the word game more accessible by having a virtual companion that provides hints and assistance to the player in solving the puzzle. These hints are in terms of word definitions and clarifications on American cultural references. Having the virtual companion would allow these players who might initially feel discouraged when playing NYT Connections to have the ability to learn more about the meaning behind the words and solve the puzzle as well. This ultimately makes the word game a lot more inclusive and accessible to players from all backgrounds. Additionally, we also aim to include a custom word upload feature on the virtual companion. If the actual NYT connections are too difficult, ELLs would still be able to utilize our game by uploading their own words. This would allow ELLs to utilize this engaging game to learn new vocabulary in English in a fun and interactive way. Having physical blocks that players can interact with is also more engaging and fun, hence targeting certain users who might have low attention spans or are tactile-based learners. This will allow them to enjoy playing Connections as much as those who play the online version of the game.

Part C written by Nicole Feng
Connexus is marketed towards novice NYT Connections players and English Language Learners (ELL) as a game that is more interactive and less frustrating to play than the current NYT Connections game. Thus, novices and ELLs would be the main audience purchasing or consuming our product. English is the number one language that people learn on DuoLingo, and is taught as a second language in many countries as it is widely considered the current global language. Our product is a tool that makes learning English more fun as it is wrapped up in a physical game that users can play, so we anticipate Connexus being able to satisfy the need for engaging English-learning tools. Additionally, the parts used to make Connexus are common electrical components (LCD displays, batteries, microcontrollers, etc.) and manufacturing materials (acrylic, wood, etc.). Acquiring these parts to manufacture our product shouldn’t really pose a problem since they are widely available and relatively inexpensive, so producing and distributing Connexus would be very doable and would contribute to the economic sectors related to electrical consumer goods.

Wen Hui’s Status Report for 2/15

What did you personally accomplish this week on the project? Give files or photos that demonstrate your progress. Prove to the reader that you put sufficient effort into the project over the course of the week (12+ hours).
– I crafted the design requirements and made calculations to ensure that our choice of parts fit within the design requirements.
– I helped with creating the block diagram to represent the different components.


– I also helped to design concrete testing procedures in the area of unit tests and integration testing with clear quantitative metrics to measure our project’s success
– Based on our ideation, we have designed that there will be three main components in the central RPi: the WebApp, Game Controller and Embedded Controller. Since I am working on the embedded communications, I created a flow chart for each of the functions of the embedded controller based on the inputs from the Game Controller and the physical hardware peripherals


– Since we received the RPi this week, I set up the RPi, installed the relevant libraries we will be using and set up the basic test programs for UART, I2C and GPIO testing based on the libraries I researched last week. I could only test UART since the components have not yet arrived
– I also designed a simple algorithm together with a message sending protocol to handle the sending of the words between the blocks and the grid.

Is your progress on schedule or behind? If you are behind, what actions will be taken to catch up to the project schedule?
My progress is slightly behind schedule as we did not expect that the initial integrated LCD screens with ESP32 would be sold by a banned vendor. As such, we only ordered the new LCDs on Wednesday after researching for alternatives. I will work on some tasks that has to be done next week (such as planning out the circuit connections) before the parts arrive so that I can still be on schedule.

What deliverables do you hope to complete in the next week?
Next week, I have to interface the RPi with the actual components such as Pico and LCDs once the parts arrive. I would be doing individual interfacing between the RPi and each of the peripherals using UART, GPIO and I2C according to the libraries I have tried out this week. I will also start building the breadboard circuitry to establish a prototype grid + single block circuitry.

Nicole’s Status Report for 2/15

What did you personally accomplish this week on the project? Give files or photos that demonstrate your progress. Prove to the reader that you put sufficient effort into the project over the course of the week (12+ hours).

  • This week I made progress on the web app. I set up the Flask backend, began the registration process for Merriam-Webster Dictionary API, cleaned up the NYT Connections Dataset that we will be using, and implemented the custom word upload, hint retrieval, and definition display functions of the web app. For now I used the Free Dictionary API, but will change this to Merriam-Webster API once registration is complete. I also made a Github repo for the web app.
    • Video demo of web app progress so far: link
  • Additionally, I made a detailed FSM for the display (web app frontend that interacts with backend and game logic) and a flow diagram for the game flow logic.
FSM for display logic
Flow diagram for game flow logic
  • I prototyped a paper cube to get a feel of what size we should make the blocks, and consequentially discovered that 3″x3″x3″ is ideal, and 4″x4″x4″ is the max size holdable in a single hand.
Paper cube prototype, 3″x3″x3″
  • I also worked on the Design Presentation slides.

Is your progress on schedule or behind? If you are behind, what actions will be taken to catch up to the project schedule?

  • My progress is mostly on-schedule. I still have to complete work on the frontend, mostly the portion of the web app that has to do with communicating with the embedded controller signals.

What deliverables do you hope to complete in the next week?

  • Next week, I hope to have the Merriam-Webster dictionary API up and running, implement the “existing puzzle retrieval” method for the web app, implement the remaining frontend pages, and hopefully try to host the web app on the RPi if possible.

Nicole’s Status Report for 2/8

What did you personally accomplish this week on the project? Give files or photos that demonstrate your progress. Prove to the reader that you put sufficient effort into the project over the course of the week (12+ hours).

  • This week I made a Figma board for our web app that shows all the different pages and the different flows that the user may go through.

  • I finalized the resources and APIs we will need for the web app after doing some research about different databases and web app backends. Ultimately after taking a look at the functions and load of the web app, I decided on Merriam Webster Dictionary API, Flask for backend, React for frontend, and CSV file or SQLite for database.
  • I also started coding up the frontend for our web app in React and Typescript, creating the reusable components that we will be using for the different pages and finishing most of the pages’ front end.

Is your progress on schedule or behind? If you are behind, what actions will be taken to catch up to the project schedule?

  • My progress is on schedule.

What deliverables do you hope to complete in the next week?

  • Next week, I hope to have a cleaned NYT Connections Dataset for our MVP in the form of a CSV file.
  • I also want to make more progress on the web app frontend as well as setting up the Flask backend.
  • I also hope to have the basic game logic planned out (pseudocode + flowchart).


Alexis’ Status Report for 2/8

This week, I helped finalize several key aspects of our project. After researching LCD options, I identified models with integrated ESP32 (IC) that perfectly suit our needs and offer enhanced functionality. I contributed to developing the narrative for our project proposals and conducted comprehensive research on required components. We have decided to order the LCDs before the actual blocks and prototype with cardboard or similar so that we can determine the final dimensions after everything is put together. I made a trip to techspark to ask about the possibility of laser cutting slots in our pre-made acrylic blocks. I asked about the possibility of drilling too for more complex areas. We devised a plan to be able to do this without too much drilling. I also submitted a borrow request for the Raspberry Pi 5 and picked it up from the receiving office.

Additionally, I explored the possibility of implementing a rechargeable circuit system. The concept involved using a power path IC with a LiPo battery for power management, where the blocks would charge when connected to the grid and switch to battery power when disconnected, ensuring uninterrupted power supply. However, I ultimately decided against this approach as of right now due to the complexity of the circuitry and the time it would take to prototyping and testing. Given our timeline constraints and the need for reliable power delivery, I believe that sticking with a known, absolute power supply solution with the 9V batteries would be best and so I found all the necessary components to make this happen.

Diagram of Power on block

I am on schedule with all of my tasks. Next week I hope to finish selecting the LCD, order all of our preliminary parts, start a PCB (if we decide this is still necessary as this will depend on what LCD + MCU on the block we are getting), and finish the CAD of the blocks and grid maybe even create a mock model out of cardboard for our blocks and use an LCD I already have to get the rows working.