Team Status Report for April 26, 2025

Here is a link to our testing plan. This reflects the current state of the testing plan and will continue to be updated as we complete our last integration tests.

and highlights of our unit testing as detailed in our final presentation.

This week, Diya and Charvi met to make a software testing plan and all three of us met to make a plan for poster completion. We plan to have testing and the poster completed by tomorrow (4/27) night.

Individual progress is addressed in our individual reports.

Charvi’s Status Report for 4/26/25

This week, we continued further with integration.

Individual progress this week has been sparse as I have been working on other final projects for other classes.

Diya and I met this Wednesday to come up with a thorough testing plan for all the software parts. We asked Josh for feedback and we got some mostly about the analytics and gesture recogniton part, which we are taking a look at. Our testing plan is linked in the team status report.

I am currently working on running tests and will finish my assigned tests tommorow. The three of us also met to work on the poster which I have also been working on my assigned parts for, we also need to finish the poster by tommorow.

While I am all done with my individual components and integrated as much as possible without the working display, I am behind on my testing assignments as I had a lot of other final projects to work on this week. Other than my final exams I am free to work on this so I will have to grind this out. Tommorow I will finish all the tests and finish my portion of the poster. I will update here if there is anything else to be said on the weekend progress.


Rebecca’s Status Report for April 26, 2025

Report

I spent a good chunk of my time this week (the vast majority of Sunday, ~8hr) working on the final presentation, and then since my slot ended up being on Wednesday, I spent a few more hours on Tuesday night reviewing the work and polishing my spoken words (though the slides of course had already been submitted). Then yesterday and today sunk a significant amount of time into writing the poster, and assembling a list of unit and integration tests for the team status report. Writing words takes so much time.

I soldered together the power lines and re-did the I2C one more time after I realized that the iron I was using last time wasn’t just oxidized, it was corroded and actually damaged, so it wasn’t transferring heat well. It went much smoother, and now the I2C connection isn’t intermittent at all.

The frame finished printing pretty late tonight, since unfortunately the first time I printed it I didn’t give the front piece enough support so it collapsed partway through, and then I got caught up in another class’s work so it took awhile to get it restarted.

It looks like there’s just one hole that didn’t cut clear enough for the machine screws to go through on the first shot, but it’s clear enough that I should be able to force it in/cut away the material with minimal effort. I had to put a lot of support under the two upper battery prongs (not very visible from the photo’s angle), so I’ll have to come back with someone else tomorrow and cut it away with the Dremel (don’t use power tools alone, etc.). I’m not going to install or epoxy anything together until that’s done so it’s not more difficult or more dangerous than it needs to be, so now I go to sleep.

Progress Schedule

There’s not really any schedule anymore, these last two weeks were deliberately left open for “crunch crunch crunch get anything left to be done done now” and that is. Just what’s happening.

Next Week’s Deliverables

Poster, video, demo, paper. In that order.

Rebecca’s Status Report for April 19, 2025

Report

I spent much of this week finishing the CAD for the headset. It takes so long. It really takes, just so many hours, and since it’s got lots of small details at weird angles I had to think so much about printability. That said! He’s done, basically, with the exception of a few measurements I approximated with my tape but would really like to get a better number on with The Good Calipers that live in my org’s shop. Which I will go out to at a time that is not some bitter hour of the morning when look I am simply not leaving my dorm. So!

As I said last week it’s in several parts to make it easier to print. I’ve also decided to use some parts of the original casing my display came in, particularly the parts that mount the optical lens and the screen together at the right angle, since trying to replicate its details in an already-complicated print at what would have to be a suboptimal angle would be very prone to printing problems. Like the sidebars, I’ll be able to attach the several front pieces with a combination of the original display casing’s screws and a small amount of epoxy.

I also intended to attach the display to the Raspberry Pis, but when I wired it together by hand I did the I2C for the early tests, it… didn’t work. It lit up with a blank blue screen when I powered it, sure, and I was easily able to get the brightness control lines to work as expected, but when I actually connected the AV data input line to the Rasppi’s AV output while running a very simple test frame generation script, the screen just went dark.

There are several things that could be wrong.

  • The Rasppi isn’t outputting the right format.
    • Unlikely. I tried with my Rasppi configured for all three major standards, and none of them worked.
    • There are three major standards for composite video: NTSC, PAL, and SECOM, with North America generally using NTSC. It’s the default for the Raspberry Pi along with most devices, and the standard I understood this display to use.
  • The Rasppi isn’t outputting at all.
    • Possible? This device’s configuration is persistently obscure and arcane, so it may be a configuration problem. I used an oscilloscope to detect the waveform on the AV test pads, and it appeared to be what would be expected for a solid black screen. So maybe not just that there’s no signal at all, but maybe:
  • The Rasppi isn’t outputting what it should be outputting.
    • Also possible. It’s a known but that when using an HDMI peripheral with a Raspberry Pi board, sometimes if the device isn’t attached when the board boots up it just won’t recognize when the attachment occurs. I wasn’t able to find anyone saying this is also true with the AV output, but then, I wasn’t able to find really much discussion of the AV output at all.
    • Also a note in this or the previous possibility’s favor: the same behavior occurred when the AV was configured entirely off.
  • The Rasppi isn’t outputting in the right resolution.
    • Technically possible, but unlikely. NTSC is 720×480, and that’s what the Rasppi generates when configured therefor. The display is nominally 640×480, which I thought was the screen output and not the resolution input, since NTSC is a standard and if you’re going to claim your device takes composite input, it has to take it as a standard. Honestly I don’t even know how I would detect this. Nobody makes tools that output 640×480 composite, because that’s just not a thing. I’ve seen this exact device work with an off-the-shelf HDMI-AV converter, so surely it’s not some obscure custom resolution type. How would you even do that, it’s an analog signal.
  • The signal is getting corrupted between the Raspberry Pi and the display.
    • Unlikely. I ran ground twisted with the signal on a very short wire in a relatively low-noise environment. A corrupted signal would at least sometimes show me a couple colors that aren’t solid black, I think.
  • The display is broken.
    • God, I hope not.

I’ve already done some amount of testing to get to the approximate likelihoods as described above, and have more to do early next week when the tools I ordered to help my debugging (RCA AV cable, HDMI-AV converter) arrive. Those tools will also help me build workarounds if the issue cannot be entirely fixed.

I’ve also spent a bunch of hours mostly today and yesterday writing the slides and script for the final presentation.

Progress Schedule

With the completion of the CAD, only a few more steps remain in building the hardware- printing, cutting the mirror and acrylic lenses, and assembly. My machine screws even arrived early. There’s a little bit more testing to be done on the communication between the camera’s Rasppi and the display’s, with the I2C mostly working, but then the on-headset data communication will be complete.

I’m running behind all-around, especially with this AV issue cropping up, but I don’t think it’s irrecoverable yet.

Next Week’s Deliverables

Fixing or finding a workaround for the AV problem is my first priority. Additionally, writing the final paper is going to take a significant amount of time. Then assembly. All of the devices can be hooked up and tested working together before they’re mounted.

Verification & Validation

I accidentally wrote up this week’s additional response last week instead of the intended one (oops), so this week I’m filling out last week’s. I’ll probably come back and switch them when I’m cleaning up my links and such so at least they’ll be in the right place eventually.

Subsystem verification tests:

  • I2C communication
    • Small messages (a byte, the size of our real messages) sent five times per second over the I2C line to determine how solid the connection is, though it’s known to be somewhat faulty. Four-in-five returned acknowledged, on average, which is more than I had the first time I tried a similar version of this test with another method, but I believe this is more accurate since it uses the real messaging methods that my I2C library provides rather than just i2cdetect, which may have had an artificially low success rate due to timing weirdness in the clocks. I’m not sure. I wasn’t able to replicate the low rate again.
    • Messages replicating those that the algorithm run by the camera board will trigger sent manually to the display board, to test its responsiveness.
    • The whole on-headset system, with the wrapper on the MediaPipe algorithm sending I2C messages (mediated by a debouncer, so it doesn’t send a ton at once before the user processes the update has occurred and removes their hand) which are received by the image generation script and used to modify the display output.
      • This one hasn’t been run yet, but I plan to time it as well using the Rasppis’ real-time clocks to ensure we hit our latency requirement.
  • AV communication
    • All my problems with this are described above. These are tests I have or will run in an effort to debug it.
    • Oscilloscope to make sure there’s output on the pad (as expected for solid black, not what should be in the image buffer).
    • Run it with different standards, and with AV entirely disabled (no behavior difference).
    • Run it with the AV device already connected before power on (will require additional hands).
    • Run the AV output to a known-functional AV device (the TVs in my dorm house take composite, and I’m shortly to get my hands on an RCA cable).
    • Run HDMI output to an HDMI->AV converter board, which itself is connected to the display (only maybe necessary- possibly part of a workaround if it’s the Rasppi I absolutely cannot get it to output what I need).
  • CAD print
    • Test print with some mounting points available. Mostly to see how accurate my printer is at fine details, and make sure my measurements at the margin of error I expected were good. Outcome was positive, despite the poorly designed print triggering a lot of support structures being necessary.
  • Recognition algorithm
    • Pipe the camera output with the MediaPipe landmarks identified as an overlay to my laptop screen (X-forwarding through my SSH tunnel) to see what it’s doing, make sure it’s doing what I expect.
      • Used this to identify the source of the initial extreme fall-behind, before I forced a ceiling on the frame rate (and fixed the camera interpreter settings).
    • Run the full recognition algorithm at very low frame rates and raise it slowly until it cannot keep up; i.e., its own reported frame rate drops below the nominal one delivered by the camera. We want to keep it at the edge of functionality but not over, because pushing it too far tends to trigger overclocking (sometimes okay in short doses, very bad on long loops: causes overheating, ultimately slowdown, very high power draw, shortens the lifespan of the processor).
  • Display
    • Most of the display design was done by Charvi, so she did its verification tests. I set up the HDMI output so she could see the actual images as she went before we had the display attached (mostly before we had the display at all, actually).
  • Battery life
    • Run the Raspberry Pis with the scripts going on battery power from full charge for at least an hour and a half, make sure it doesn’t die. The power draw from the scripts, based on their design, should be relatively constant between nothing happening and actual use. Additionally, I expect the peripheral devices to draw a marginal amount of power, and this already accounts for power supply/boost board inefficiencies, so an extra half-hour over our spec requirement is certainly enough to ensure that with those extra parts it will still be enough.
      • Also, ensure the boards do not rise above comfortable-to-the-touch. Since we’re strongly avoiding overclocking, I do not expect it to.

System validation tests for the headset:

  • Run all the devices (including peripherals) for at least an hour, with periodic changes of environment, gesture inputs.
  • Time the latency from gesture-input (marked by when the camera registers the first frame with a given gesture) to display-update. This is referenced above from one of my verification tests. The setup in order to take this time will greatly resemble that.
  • Use the device for an extended period of actual cooking.
  • User comfort-survey; have other people wear the device and walk around with it, then take their rating out of five for a few points (at least comfort and interest in trying real use; probably others as well).
    • If the users are interested and willing to give us a more detailed holistic review we may allow them to actually use the device, but since this depends on their short-term available time and resources, we will not be requiring it.

Charvi’s Status Report for 4/19/25

This week I further worked on the display to webapp connection (as mentioned in my previous report) as well as ironing out a lot of bugs and making good progress towards our final product.

Early this week, Diya and I met to fix a bug in the webapp that led to a recipe item database mixup that was causing problems when calling funcitons on those recipe objects. This was due to merge conficts that were not resolved properly, so we fixed that and got the webapp to work again.

Once that was done, I got the display pi to send information to the webapp and the webapp to send information to the pi. This was what I had ready to demo on Monday.

I also fixed the I2C issue mentioned earlier where the display pi was not showing up as a reciever device to the gesture pi. Now, the connection was working properly.

Once these changes were made, the pi was now successfuly opening a websockets connection with the webapp and able to send information back and forth. However the problem remained that in order for this to run at the same time as the display, there would need to be some sort of multiprocessing used. After talking to rebecca and doing some additional research, the tradeoff of having the pi open for consistent back and forth communication with the webapp would be a pretty big power draw, and is ultimatley unecessary. Thus, I the following pipeline for WiFi communication:

  • upon bootup the display pi opens communication with webapp, which then sends acknowledgement.
  • display pi waits for a recipe to be selected on the webapp.
  • once “start recipe” is selected on the webapp, the recipe data is loaded into the display and the display starts. The websockets connection is closed.
  • session data is loaded into a payload
  • upon completion of a cooking session, the pi opens another websockets connection with the webapp and sends the payload. The connection is then closed and the glasses are shut off.

While this means that once a recipe is selected it is locked in and cannot be changed, this is a tradeoff that is worth it for lower powerdraw, since if the user wants to change recipes they can simply finish or exit the session then select another recipe.

Once that pipeline was set up and fully functional, I spent some time integrating the WiFi communication with the I2C connection and the gesture recognition signals. This code is tested in pair integrations but not the fully integrated pipeline. More on this later in the report.

I recently met with Diya to test these changes on the analytics functionality she worked on. There were a few bugs created from merge conflicts that we sorted out, but now we are confirmed that this works! The workflow of booting up the glasses, selecting the recipe, running through the receipe and receiving the session data in the webapp works. We ran through a couple of edge cases as well.

The next thing I need to work on (its already done we just need to test actually) is the i2c connection between the pis – specifically checking that the data sends properly and the gestures captured by the camera are changing the display. This works on the code really well, we just need to test this on the hardware. Though I don’t ancipate there being many issues, the biggest thing is setting up the pis and the connections and also getting x forwarding to work so I can acutally test this. I was hoping if Rebecca was done with the display to just quickly test this on the already existing hardware, but this doesn’t seem feasible. I should’ve done this earlier but I was busy with other classes and this seemed like a daunting task.. but I think we should be fine as long as I get this tested and check the full integration pipeline (only thing missing is the physical display on the glasses) within the next few days.

Beyond this, I will continue to fix the issues that have been coming up during integration, and though Diya and I are close to done on the software end (knock on wood), I will also do what I can to help with the hardware. We also have to do the presentation and start our final report and poster so this will also take a lot of time and I will put a lot of effort towards this when I am not activley working on implementation.

Team Status Report for April 19, 2025

This week, Diya focused on the analytics functionality on the webapp and then Charvi and Diya got together and integrated the webapp with the display system (all operating over wifi). We successfully tested the full flow: sending recipes from the webapp to the display, progressing through the steps, flagging confusing steps, and uploading session analytics back to the backend upon completion. 

This confirms our end to end pipeline is working as intended and our next steps are to iterate on edge cases such as skipping steps too quickly, interrupted sessions and run thorough testing on both the display and webapp sides. Also, the I2C connection needs to be tested in conjunction with the rest of the pipeline for full integration testing. We’re both on track with our respective parts and coordinating closely to finalize a smooth user experience. More in our individual reports.

With the CAD of the headset complete with the exception of a few measurements that Rebecca wants to take with a caliper instead of their on-hand measuring tape, only a few steps besides the final installation remain for the construction of the hardware. Unfortunately an unexpected issue with the display has cropped up (more details in Rebecca’s status report on the possibilities of what this is and further investigation planned) and we may have to utilize some workarounds depending on the specific nature of the problem. Several contingency plans are in the works, including switching off the Rasppis if it’s a hardware issue and using an additional HDMI->AV converter board if it’s a software issue. If the display is entirely broken, there may not be anything we can do- Rebecca ordered four displays from different suppliers a month ago to account for this exact situation, but of those it’s the only one that ever arrived, and unless the one last device that we don’t currently have details on is suddenly delivered this week and is fully functional, it’s the only one we’ll ever have. After the tests Rebecca will be running within a day or so- depending on when the tools they’ve ordered arrive- we’ll know more. With only a tiny, marginal amount of luck, literally anything else besides “the display is broken” will be what’s wrong.

Team Status Report for April 12, 2025

Following team feedback on the importance of accurately detecting step completion (versus accidental flickering or skipping), Diya is taking on the analytics feature. The feature has been described in more depth in her personal status report and addresses some edge cases such as users revisiting steps, skipping steps too quickly, or pausing mid recipe. The system will consider gesture sequences, time thresholds and user interaction patterns to actually understand if a step is completed. Next steps include integrating the analytics dashboard into the web app UI. Connect it to real time session data and begin testing core metrics like time per step, step completion confidence and flagged step overview.

Charvi has addressed progress details in personal report but essentially the raspi and webapp are integrated and are able to communicate with one another using websockets communication over WiFi. This will be ready to demo on monday and will be easily modified to fit the final needs of the product. Following this, she will debug an I2C issue and then work on further integrating the communication data with the display and web analytics feature, as well as working on some of the analytics features themselves (splitting the analytics work with Diya).

Rebecca got the I2C soldering mostly working and has been working on finishing the CAD design, and once Charvi is done with the Raspberry Pis early next week will be able to switch over the video output to AV, solder its connections onto the Pi, and start mounting devices to the final headset print. They’ve put in orders for the last few parts needed to complete the physical device which should arrive in the middle of the week, around when, accounting for other coursework they’re responsible for, they’ll be able to assemble the final device.

The team will meet tomorrow to fully discuss a plan for the next two weeks as these are vital and we are behind. We need to get everything integrated and working together as well as deal with the inevitable integration and final issues that will come up, and also run all the testing and write the written deliverables and documentation. While there are no concrete blockers, there is a lot of work to be done and we must be organized, communicative, and diligent for the next few weeks.

Rebecca’s Status Report for April 12, 2025

Report

I corrected the soldering issue on the I2C pins as best as I could, and while the connection is still inexplicably intermittent, it’s consistent enough that I feel like sinking more time into fixing it is not worth the cost and there are better things I could be doing. We’ll have to account for the fact that when messaging over I2C it may not go through the first time you try with the software, by giving it multiple attempts until it receives the correct acknowledgement. As the amount of data being sent is minimal, this seems to me like a fairly low-cost workaround.

Additionally, since the first 3D print of the headset itself, I’ve reworked the design of the CAD into three parts- the front and the sidebars- that will all print flat, which is simpler, lower-cost, and will not require cutting away so much support material after the fact, which was a major problem in the initial design. I plan to attach them after printing with a small amount of short work-time epoxy resin at the joints. Additionally since the display came in the week of carnival, I’m working on the mount for it and the battery, as well as the power management board. I worry that because of the battery being mounted at the front of the headset, the device will be very front-heavy, but believe that this is the best of the options I considered, which are as follows:

  • Mounting to the front-middle, over the brow. Front-heavy, and also places the battery fairly close to the user’s face. I don’t expect the battery to get hotter than somewhat warm, so I don’t think this is a problem.
  • Mounting to one of the sides, which would make the device side-heavy. I believe that side-heaviness, asymmetry across the human body’s axis of symmetry, is more difficult to deal with and more uncomfortable for the user than front-heaviness.
  • Mounting at the rear of the head, from, for instance, an elastic that attaches to the headset’s sidebars. The battery is light enough that acquiring an elastic strong enough to support it would be possible. However, this demands that the power lines between the battery and the devices on the headset be very long and constantly flexing, which is a major risk. The only mitigation I could come up with would be making the stiff plastic go all the way around the head, but this severely constrains the usability.

So to the front of the frame it goes. If it proves more of a difficulty than I expect, I will reconsider this decision.

Progress Schedule

My remaining tasks, roughly in order of operation:

  • Finish designing the mount for the display on the CAD.
  • Print the CAD parts and epoxy them together.
  • Solder the display wires to the corresponding Rasppi and run its AV output.
  • Purchase machine screws and nuts to attach the devices onto the frame.
    • I need #3-48 (0.099″ diameter) screws that are either 3/8″ or 1/2″ long, and nuts of the same gauge and thread density.
  • Purchase car HUD mirror material for the display setup.
  • Cut clear acrylic to the shape of my lenses.
  • Solder together the power supply (charging board & battery).
  • Solder the Rasppis’ power inputs to the power supply.
  • Mount the Rasppis, camera, display, and power supply to the headset.

Next Week’s Deliverables

Pretty much everything as listed above has to get done this week. As much as absolutely possible.

Also, the slides and preparation for the final presentation, which I’m going to be giving for my group.

New Tools & Knowledge

I’ve learned how to use a great deal of new tools this semester. I’d never worked with a Raspberry Pi before of any sort, only much more barebones Arduinos, and just about all of the libraries we used to write the software therefore were also new. I learned about these through the official documentation, of course, but also through forum posts from the Raspberry Pi community, FAQs, and in a few cases a bit from previous 18500 groups’ writeups. I’ve used I2C before, but only with higher-level libraries than I had to use this time, because I had to manually set up one of my Raspberry Pis as an I2C slave device.

Also, my previous knowledge about 3D printing is minimal, though I’ve worked with SolidWorks and Onshape before (I’m using Onshape for this project). I learned a lot about how it works, how the tools work, the tenets of printable design, and so on, kind of through trial and error but also from some of my mechanical engineer friends who have to do a great deal of 3D printing for their coursework.

Charvi’s Status Report for 4/12/25

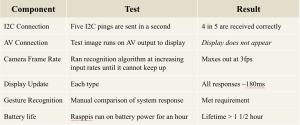
The week of carnival (right before interim demo), I coded the I2C integration with the display renderer, which has the raspi receiving and processing signals from the gesture recognition output from the other pi. We discussed this during the interim demo, but at that point there were metallic connection issues so it did not work. As of this thursday those issues have been fixed by Rebecca, and the pis were handed off to me to debug an additional issue with the display pi not showing up as an I2C slave, probably due to a minor issue on the script. I have since taken the pis and have to debug this issue tommorow, but since then I have been working on the wifi connection between the display pi and the webapp, which I will discuss in a later section of this report.

Right after interim demo and at the beginning of this week, Diya and I worked on writing up the features, details, and user / technical requirements for the analytics feature. We discussed this with Tamal and Josh, and continue to further refine this.

This week, my primary work was getting the WiFi connection between the display raspi and the webapp working. Essentially, we want the user to click a button on the webapp and send information about that particular recipe such as steps and ingredients to the glasses, that can then display that information. And after the cooking session is done, send information about the stats of that session (time spent, steps flagged) to the webapp.

Originally, we did not do enough research on how exactly to do this and thought to use bluetooth. Then, realizing this was not feasible for an AWS deployed webapp (our original plan), we switched to possibly deploying the server on the pi itself. We should’ve done a lot more research admittedly way before this, but this is the sitatuion we were in.

Before starting on this task, I did several hours of research on how to best do this, as I have never worked with a raspi before, rarely ever worked with networking, and certianly never deployed a server on a raspi. I quickly realized this was not very feasible on a pico and also not very necessary or scalable, and realized that it would be a better idea to simply have the raspi and the webapp have a websockets connection.

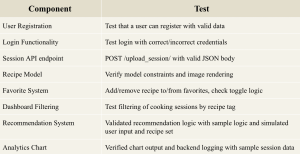
Implementing this involved setting up daphne and channels for websockets requests on the webapp, setting up the websocket routing and comsumer commands, and adding the feature to send information over to the pi. Then on the pi side, sending an initial connection request to the webapp on boot up, setting up a listener on the display script, and listening for and displaying information that was sent. This fully works, and now the pi and webapp are connected and can send and receive info from one another over WiFi.

While doing this I realized that something happened with our webapp, probably because of merge conflicts, that has caused diya and I to have very different model definitions on the webapp (my guess is that when diya started working on the webapp frontend some of the models I made did not get pushed / pulled, and Diya wrote additional definitions for these models that do not match with the old db). This has caused our database to be messed up, and a lot of recipes have mismatched ids and feild names. I am meeting with Diya tommorow to sort this out, should not be too bad hopefully. I have also noticed I am having some issues where my local git clone is not letting me pull (repo does not exist error), which I hope is just a local issue. I can probably delete the clone off of my computer then reclone, but I am waiting on confirmation from my teammates that this is a me issue and not a repo issue.

This coming week, we have a lot of work to do. For me personally, once this issue is sorted out, It will be relativley easy to display the info that the webapp sends to the glasses and vice versa, so we can demo this on Monday. Then, I will figure out the I2C bug. After that, I will see where else the team needs help. I assume this will be on the analytics feature on the webapp, so that will be my task for the next week including random things that will inevitably come up here and there with integration.

I feel like I have done a lot of work this week especially on the WiFi connection so I feel on track in that sense, but I definetley have a lot of work to do in these coming weeks!

Team Status Report for March 29, 2025

Project Risks & Mitigation Strategies

Our most significant risk, the arrival of the display, is officially behind us. I’m sure there’s something else that we need to keep an eye on but I really just can’t remember right now.

Changes to System Design

We may have to change how the battery is mounted on the frame from what we originally drafted, since we’ve realized that where it was would likely cause the headset to be untenably front-heavy. I haven’t figured out where it’s going to go instead, but I’m working on it.

After receiving feedback during our last check-in, Diya is going to contribute to the CAD design for the smart glasses to support Rebecca’s work on the hardware. The first printable version is complete, and we can move forward with integration in earnest.

More changes to individual contribution plans discussed in individual reports.

Schedule Progress

We always knew this upcoming week was going to be functionally unusable and we’ve done our best to work around it. There’s a bit of work that has to be done tomorrow to prep for the demo, but besides that it’s looking very light.

Next Steps:

  • Begin testing the integration of all systems
  • Finalize and connect the recipe database to the display
  • Continue refining both software and hardware components after the interim demo
  • (More immediately) Meet briefly to create a script / plan for our interim demo