What are the most significant risks that could jeopardize the success of the project? How are these risks being managed? What contingency plans are ready?
One of the most significant risks is environment compatibility, since currently each of us is coding independently, so some members have to work from the Mac ecosystem, so running our software on the Jetson may present unforeseen challenges, such as driver conflicts or performance limitations.
Mitigation: We will pass the access of Jetson one by one in our team to ensure smooth integration before full-system testing.
Another minor risk is performance bottlenecks, 3D face modeling, and gesture recognition involve computationally expensive tasks, which may slow real-time performance.
Mitigation: We are each trying different tricks to optimize computation like using SIMD, and also evaluating accuracy trade-offs between accuracy and efficiency to ensure the best performance within required frame rate bounds.
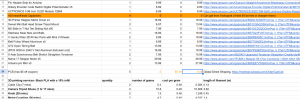
One risk that was faced was uploading the Arduino code onto the Arduino. We had anticipated that we would just need to buy the materials as instructed so that we can be ready to code and upload it to the Arduino. However, we found out that there’s no way to upload the code to an Arduino Pro Mini, so with our leftover budget, we bought 2 USB to serial adapters for around $9 so that we can upload the code.
Were any changes made to the existing design of the system (requirements, block diagram, system spec, etc)? Why was this change necessary, what costs does the change incur, and how will these costs be mitigated going forward?
The overall block diagram remains unchanged, and few details within the software implementation of the pipeline are tested (e.g. what exact opencv technique we use in each module).
However, we will have to meet next week on going through our requirements again to make sure that the previously described performance bottlenecks are be mitigated within our test requirement, or to loosen the requirements a little to ensure a smooth user experience with the computing power we have.
Updates & Schedule change
So far we are good with the schedule, some changes have been made, and the UI development has been pulled in the front since the hardware parts have not arrived yet. In terms of progress, we are positive and will be able to reach our system integration deadline in time. We will also ensure weekly synchronization between modules to prevent any latency in final integration.
A was written by Shengxi Wu, B was written by Anna Paek, and C was written by Steven Lee.
A) The product we design provides an efficient system that allows seamless operation across various global use cases inside and outside Pittsburgh. Since our system involves modular design, so it should be able to be deployed in different regions, once the camera rig is up and ready, it is easily reproducible for anyone with some basic knowledge using our software system. Not only is this product interesting work for academia, it also adheres to industry standards for many requirements like robustness and security since we does not involve the use of clouds but having all storage local by default. This system we designed thus has the potential to improve AR mirror application as well as AR filter application using part of our software system for emerging markets, making it a globally viable solution.
B) Our AR mirror meets the specific needs of people from different cultural backgrounds. It will consider and respect different religious values reflected in the style of the makeup. For example, Muslim women prefer natural makeup over bold makeup styles, so the AR mirror will have a settings for softer makeup looks. There are also different beauty standards for each country. For example, Korea prefers lighter makeup to achieve that natural beauty look while other cultures may prefer bolder makeup. As for eyeglasses, the mirror will account for the fact that eyeglasses are used differently. They can be used to make one look more intelligent or just for fashion. Depending on the purpose, the mirror will provide a collection of eyeglasses suited for that purpose. Some regions ban certain cosmetic ingredients, so the AR mirror will account for that when generating filters. The mirror will also have privacy protection for the user’s face and ID to be protected.
C) One environmental aspect that our product aims to meet is affordability/reusability. Many traditional AR mirrors have proprietary, expensive parts such as transparent displays, which are hard to repair (hence producing more waste). Our AR display aims to be achievable with commonly found parts such as off-the-shelf computer monitors and webcams, so that it’s easier to repurpose used technology into this product.
Moreover, our project aims to be low-power, through the use of a low-power constrained device, the Jetson Nano, to power the software for the AR mirror. Also, the use of affordable cameras and basic depth sensors rather than costly LIDAR or 3D cameras helps to meet that low-power goal.