Group Status Report for 5/8
This week we prepared the final housing for the device and ran a lot of tests. We finished preparing for the final presentation, which Manny gave on Monday. Otherwise we had a light week of testing and are spent the weekend preparing for final deadlines.
Joanna’s Status Report for 5/8
This week for me was directed mainly to testing and project management. We got together as a group to finish up the integration and do a lot of testing. Then I prepared the slide deck for Monday’s presentation. The rest of the week I worked on the poster and planning out the video to finish over the weekend. It was a fairly straightforward week of prepping for the final demos and report next week since we’re in such a good place. We all needed a light week for finals prep 🙂
Manny’s Status Report for 5/8
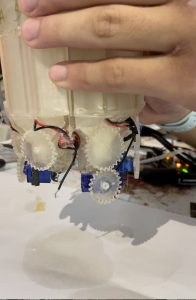
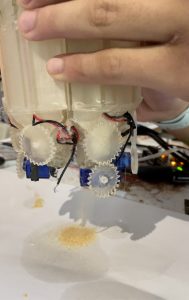
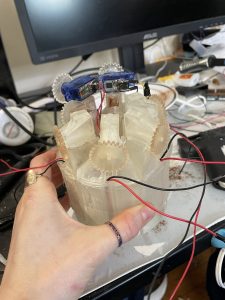
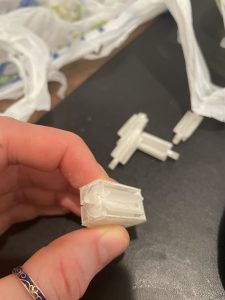
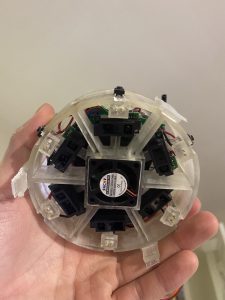
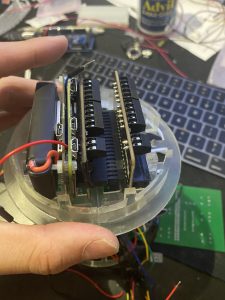
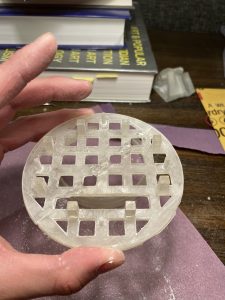
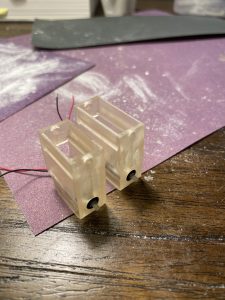
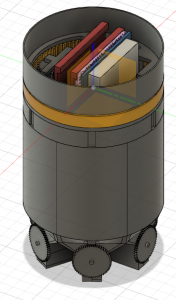
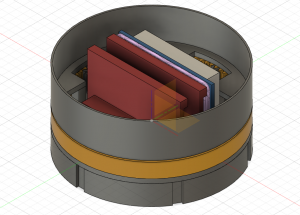
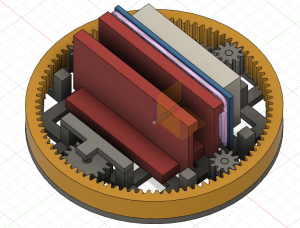
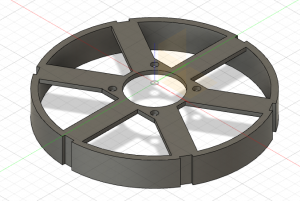
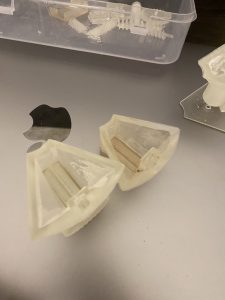
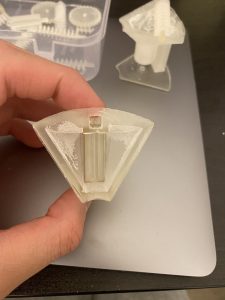
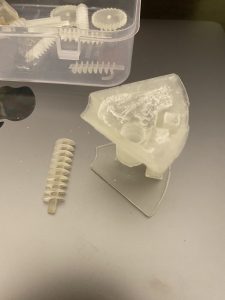
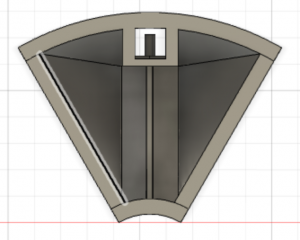
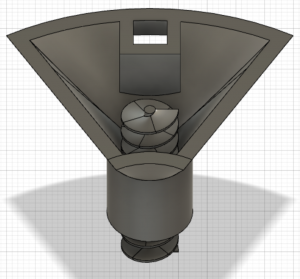
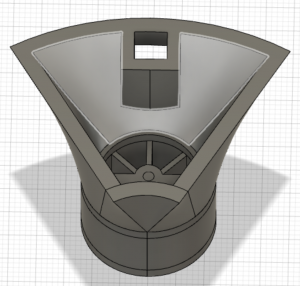
This week, I had to prepare and present for the E section of capstone all of the work we have done so far this semester. So we worked on obtaining all of our metrics and we were able to pass almost all of them. After the presentation, we focused on wrapping up our final design. We printed the final cover for the control housing and for the servo housing. To add more aesthetic to our design we also added a sticker of our logo. Here is what our final prototype looks like:

These next few days, we need to focus on getting the poster and video together for the design expo!
Xander’s Status Report for 5/8
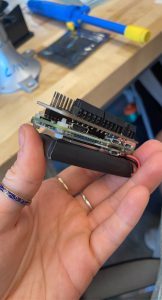
This week, I prepared the presentation with Manny and Joanna. More excitingly, we were able to complete the physical aspect of our devices. I assembled more dispense mechanism due to prior production defects. In addition, I CADed and printed our the top and bottom assembly. I had to borrow another 3D printer from my neighbors since these parts are rather large, taking on average 5 hours to print half of a shell. Further, I completed most of the testing.
Plan for the tomorrow and next week is to complete the poster. On my part, I’ll be focusing on preparing the 3D models for demo, which includes taking pretty pictures and adding label, learning and attempting call outs or explosion views.
Group Status Report for 5/1
This week the significant aspects of the physical setup were finished, minus some debugging. Xander made serious headway on the code for the e-ink screen and we’ve begun serious testing for calibration and performance. We’re on schedule and finishing up well. The final demo is this week and we’ll work on the final reports in the coming week or so.
Joanna’s Status Report for 5/1
As mentioned above, Manny and I worked on finishing up with the last servos. We’re having some small issues that we’re debugging with a couple of them. We started serious testing and the bulk of the week was spent on this. We practiced with different compartments to gauge speed of measurement, that is the relationship between dispense time and dispense amount. We also need to debug a couple servos that dispense at vastly different rates than the bulk of them. We were pleased to find that for most of them there is a very clean linear relationship (i.e. the servos are working evenly across trials). Xander is using this data calibrate the code. Lastly we made the presentation for the final demo this week. Next week we will give our presentation and continue testing. The photos below are from one of our trials!
Manny’s Status Report for 5/1
This week, we started to test all of the subsystems integrated together to start calibrating the code to dispense the right amount of spice requested by the user. As seen above, Joanna and I worked together to fill and dispense each spice compartment while measuring the amount of spice dispensed for the arbitrary speed and time of the motor. While measuring how much is dispensed, Xander would adjust the code simultaneously until we obtained the correct time and speed to dispense a quarter teaspoon. One issue I encountered was that some servos had physical connection issues and one servo no longer worked. Another issue was that different compartments have different behaviors because of the physical assembly. We plan to fix this problem by calibrating each compartment separately. The calibration is good for the 4/6 motors. One of the servos is no longer working and the other has a problem with the dispensing mechanism that causes it to dispense very slowly. This week, I plan to replace the servo and help refine the physical assembly while working on the demo presentation.
Xander’s Status Report for 5/1
This week, I further improved the control software and added the UI for selecting the desired volume. Now the list of available volumes will be displayed, with square brackets surrounding the selected one. Example
0.5 1 1.5 [2] 2.5
Means selecting 2 tsp. One issue remains with the unreliable reading from the potentiometer. Also, I helped measure the time vs volume and applied it to the controls. I created the sheet and recorded the values. I also controlled the dispense time remotely. (Our pi is exposed on public internet so I could ssh from home). I helped re-install Pi OS after our pi got hacked
Next week, I’ll finalize the mapping from IR reading to the volume remaining. After some research, it seems like I can assume a linear relationship for the region of our interest. I will also be
Group Status Report for 4/23
Last week we had our interim demo and are continuing integration and testing. There was nothing particularly novel to report on since we’ve approximately reached MVP. In the past week, we made more headway on integration and significant progress on the upgraded UI via an e-ink screen. We’re still on schedule 🙂
Joanna’s Status Report for 4/23
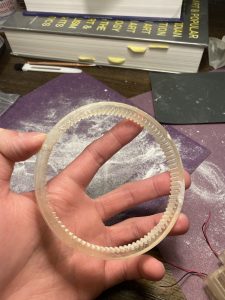
Last week Manny and I got together a few times to work on integration. We came in and ran a bunch of tests in preparation for the interim demo, which we did on Wednesday. The rest of the week we continued to upgrade or print our 3D parts. We’re testing new gear ratios, and think we’ve settled on 22/26 teeth. We now have 2 compartments fully integrated in and will continue to finish those up this week. They are all installed, we just need to do some debugging on some of the connections, A photo is shown below for the new gears.I soldered the servos Manny worked on onto the product.  This week I finished all 6 housings which are just awaiting servos. Manny and I also worked on integrating the e-ink screen, soldering in ports and running tests over zoom with Xander (who is working on the code). Our next big challenge will be to finalize the integration of the e-ink screen into the final design, given that it was an add on we weren’t necessarily expecting to reach.

Xander’s Status Report for 4/23
This week I completed the software support for EInk Screen, and helped Joanna & Manny with assembly remotely. The EInk Screen by waveshare is tricky. The library and support document is horribly written. You can see software bugs everywhere in the python library. The EInk Screen relies on SPI comm as well, thus sitting on the same bus as ADC. However, they use two different SPI library, thus I must switch the use between them manually (Can’t have two SPI devices talking at the same time). Also, I used more multithreading to allow the screen to go to sleep after a certain period (powering it all the time breaks the screen). Another difficulty is the refresh rate, which after changing the library, I was able to get it low. All pictures are above^.
Next week, I’ll finalize the interaction between humans and UI. I’ll test selecting items using the ring selector (separate components are unit tested). In addition, I’ll help joanna and manny to test and to figure out dispense parameters.
Manny’s Status Report for 4/23
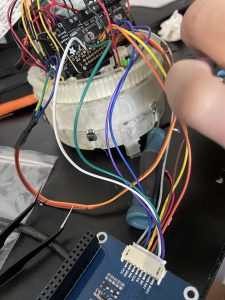
This week, we started to assemble beyond our MVP of only 2 compartments after more servos arrived and we all felt we wanted our final product to look complete. To finish the other compartments, I took apart the servos so all that is left for each of them is the gearbox and dc motor. Since servos are not continuous, I had to take apart the gears and cut out parts of the servo that limited its range of motion. After all of the servos were modified, Joanna and I wired and glued them to the spice compartments and tested each servo works. The E-Ink screen had also arrived this week so I had to configure the SPI interface with the raspberry pi through the top motor bonnet since the ADC is already communicating through SPI as well and because the screen will sit on top of the device. Here is where the E-ink screen was connected to the raspberry pi:


Next week, we need to finish the gears and ensure all of the servos can dispense each spice in its respective compartment. While doing so, we will begin to calibrate the code to dispense spice to an accurate measurement.
Group Status Report for 4/10
This week we focused on integration and prep for the demo. Since we did so much work last week, this was a lighter week for us to prepare for the final integration steps. We are on track with our schedule, especially since we made a new one (shown in Joanna’s status report)
Joanna’s Status Report for 4/10
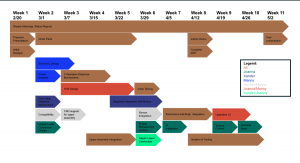
This week I mostly worked with Manny on integration. We have a lot of 3D printed parts that needed to made, sanded, and otherwise made ready for use (e.g. photo below). I also ordered the (hopefully) last parts we need and made the updated schedule (see below). Lastly, Manny and I have been prepping for the demo by means of testing and preparing the features we’d like to highlight (I won’t spoil anything). We will be approximately at MVP for the demo and thus will be focusing in future weeks on “extras”.
Xander’s Status Report for 4/10
Earlier in the week while I was in Pittsburgh, I helped assemble the upper assembly. The upper assembly has been tested (with PCB). All sensors (analog & digitals) work nominally. I improved some minor aspect of the CAD designs to incorporate the new servo as our power train. I also tested & improved software, especially the part handling the ring selector. Figuring out the direction of rotation was difficult. We chose to do direction & magnitude instead of mapping absolute values to selected item because it’s more intuitive (Like the ring are ipod, the old ones)
Next week, I’ll guide them through the assembly of more lower section dispensing mechanism and prepare for demo. Also, I will fix up the software to map the button to the corresponding IR sensor and motor. In addition, I’ll start re-thinking the latch issue that holds the upper and lower stage together.
Manny’s Status Report for 4/10
Now that the PCB came in, we were able to assemble the inner circuitry of our device. The PCB we received was a little larger than we had hoped for so I went to Ansys, to trim off the edges using a band saw so it would fit inside our device. The only components that needed to be soldered onto the PCB are the header pins and the ADC. All of the other components will be wired to the PCB. Each connection for the PCB was tested to ensure that there weren’t any shorts. After all of the individual components were tested, we soldered all of the wires for the buttons and for the IR sensors.
After configuring all of the sensors to the gpio ports, we were able to get our MVP function for the actuators, sensors, and code. This week, we need to test our MVP more for practical use and start calibrating our code to give accurate measurements. I am also waiting on more servos so we can go beyond our MVP and have 6 functioning units for spice dispense.


Group Status Report for 4/3
A lot of progress was made this week now that most of the parts are in (more detail will be in individual reports). We tested the motors, which didn’t work as intended (low quality, gears slipped, wobbly axle) so Xander took apart a servo and hacked it into a more stable motor with better torque. The IR sensors are all soldered onto the breadboard and await the PCB. The upper lower pogo-pin connection is finished and the other modular integration components are almost done. Once the PCB arrives, assuming it’s functional, we should be ready to begin serious integration and testing. The project management side of things should be ready for the interim demo and for the final report. With a new adjusted schedule, we are fully on track.
Joanna’s Status Report for 4/3
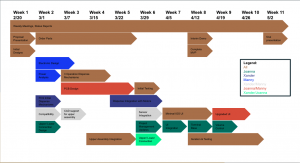
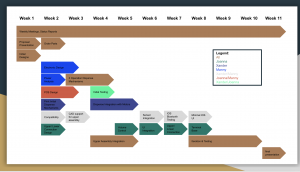
Early this week I had to fly home for a family emergency; I worked then on a bunch of administrative/ project management components. After ordering some final parts, I tackled the edits on the design documentation based on the comments received. Then I went and updated our schedule ahead of the interim demo, shown below. I also designed our new logo, shown below. The upper/lower connection designed previously was also installed and successful! At the end of the week (Thur/Fri) the whole team got together to work on integration. I mainly prepared all of the 3D printed parts (lots of filing) and we connected/tested the housing for the electronics. Next week Manny and I will be working on more integration and testing
![]()
Xander’s Status Report for 4/3
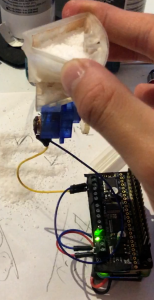
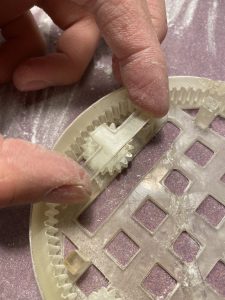
This week I made some radical changes to the dispensing mechanism. The gear ratio required for our original DC motor implies the gears will not fit in the casing. Upon some searching, I realized that the SG90 micro servo can provide enough torque, and when placed horizontal, has similar footprint and height. However, the SG90 is a standard servo, meaning that it doesn’t spin continuously. Further, servos are PWM controlled which will make our electronics obsolete. After some experimentation, I took apart the servo, removed the keyed hole on the gear and some gear notches that’s limiting the rotation, removed the PWM decoder, and soldiered on wires to control the DC motor inside of it. Dispensing works even work bigger salt particles, we also tested with some other finer spices. (I attached a screenshot of the video below)
I replaced the position sensor since the last one failed to work reliably. The new one is obtained inside of a servo (Yes, the fixed range servo has a continuous pot).
The pogo-pins and the receiving end are completed. I tested for both connectivity and short and everything works well. On the same section, I’ve attached the IR sensors and buttons (See below) I assembled and placed the upper assembly into the Ring Gear (see picture below). Manny and I also completed analog input tests with the ADC
Next week, I’ll be working with Manny once the PCB is here. We’ll mainly be focusing on soldiering everything correctly and testing the PCB. In addition, I’d like to close out the PCB section with walls and finalized the middle, upper stage. In the meantime, we will proceed with the production of the lower stage.
Manny’s Status Report for 4/3
This week, I focused a lot on assembling the entire system together. I worked with Xander all week to test each of our components. Once we got our micro sd card, we were able to boot up the system and start implementing the software for the raspberry pi by ssh-ing into it. Once the raspberry pi was setup we could then install the PiSugar to make it completely wireless. The pi sugar will be used to drive the motors we wired leads out of PiSugar’s 5V port.
All of our hardware components started to come in so Xander and I began to test each of our components and started to write code to control them from the raspberry pi. We tested driving the motors through the i2c interface of the raspberry pi. We also tested each of the button inputs to the raspberry pi. We also tested all of the IR sensors and potentiometers using an Arduino mega because we were stalled on the ADC. Once we tested all of the individual electronic components. We were able to start wiring our system together.
While this was going on, Xander and I started to 3D-printing many of the casing components so we started testing the physical assembly system as well. We went through assembling many physical components such as the ring selector (geared to a potentiometer), and dispensing mechanisms as seen in Xander’s photos.
I also finalized and ordered the PCB earlier in the week and it had just recently arrived. So next week we will be able to put together our complete hardware system with the physical casing. We have made significant progress this week and soon most of our work will just be calibrating the software for accurate MVP function.
Group Status Report for 3/27
The raspberry pi is now up and running since we fixed the issue of waiting for the SD card. As will be talked about in the individual reports, a lot of pieces are falling into place (including the code for the raspberry pi). The PCB has officially been ordered. We’re on track now that Xander is back in Pittsburgh and we have most of the components we need. We’ll start prepping things for the interim demo soon and are otherwise (more or less) chugging along according to the schedule.
Joanna’s Status Report for 3/27
In the beginning of the week I did the Ethics assignment because the extension had not yet been announced. Otherwise, I helped Manny with the PCB and how/where to get it manufactured. The final PCB design has some new custom components to organize our vias for easy routing. It’s now been ordered! I also went in to solder the stacking header to the raspberry pi and connect the pisugar battery/ adafruit stepper motor bonnet (shown below). Next week we should hopefully start meeting up to do some initial integration and testing ahead of the interim demo. Our big holdup right now is the PCB manufacturing, but hopefully that should be coming in the next week or so. Please enjoy this additional photo of me and my steady hands in action.
Xander’s Status Report for 3/27
This week, I iterated through numerous 3D designed and finalized most of the parts.
- Ring selector is held in place now by a guide rail, test reflected that this is a lot smoother and consistent than gears
- Ring selector’s position sensor is installed inplace
- I decided to stack 2 fans on top of each other to help with airflow, design is updated correspondingly
- I thinned out the walls on all section mainly to increase the storage volume
- I tested the DC motors and they have sufficient torque to drive the empty wheel, however, we might need to have additional axel support since the axle on the DC motor wiggles a little bit, which increases the chance of stall. (1 DC motor is burned during the testing)
- I wrote the control software for the Pi, which is a multi-threaded, event base system. Please DM us for github access.
Manny’s Status Report for 3/27
Earlier this week I worked at Ansys with Joanna to plan out and begin to solder some of the hardware together such as the pin for the raspberry pi. Our PCB design was also completed this week and was ordered through PCBWay. Here is what the Gerber files look like.
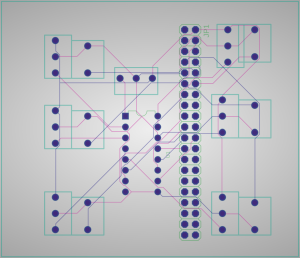
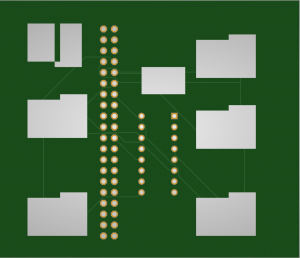

Later this week, I finally obtained the sd card and booted up the raspberry pi with the Raspian OS. Then I met up with Xander to start coding the raspberry pi to test our individual components such as the motors, sensors etc. We never received our ADC so we ordered a new one because we need to test its function as soon as possible; So to test our analog components, we utilized an Arduino to test their function. Next week we plan to finish the software for the raspberry pi and hopefully receive our PCB and ADC so the entire hardware can be assembled.
Group Status Report for 3/20
In our design document, we made some changes to the schedule. Xander is back in Pittsburgh so we should be able to better divy up the parts we’re waiting on and focus on integration. At this stage we are preparing everything for initial testing and printing out the body of the product. The PCB should be ready and printed soon. Same goes for the raspberry pi setup.
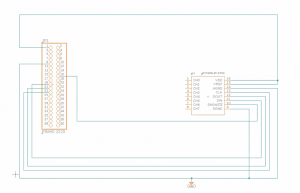
Joanna’s Status Report for 3/20
The bulk have of the first half of the week the entire team collaborated on writing the design report. We split up the sections equally. For electronics, the design document includes a new mapping of pins. In addition I changed up some of the schedule to reflect the subtle changes we’ve made over the past few weeks. Manny and I finished up the PCB design (schematic shown below) and should have it ready for print next week. We realized our original design was overcomplicated, since most of the components we included will be through-hole components. Overall this was a pretty chill week as we are still waiting for parts to ship! Next week I will be focusing on the ethics assignment and working with Manny on the raspberry pi.
Manny’s Status Report for 3/20
Xander’s Status Report for 3/20
This week I printed the upper assembly. This includes the Ring selector, sensors & fan frame. I sanded the ring gear as well as the gears holding it in place (including the gear that’s attached to the position sensor, see picture below). The issue was found with the flexibility of the ring gear. Since a smooth rotation relies on the fact that the ring gear is rigid, i found that my current product gets tough to rotate at times since the deforming ring gear would jump teeth, causing an uneven number of teeth between four gears holding it in place. I re-designed a system with a guide rail and only one gear that senses the rotation, since the guide rail would be directly printed on the base, it would not be flexible. In addition, adding lubrication (electronic safe lubrication) would not cause any issue since this part is separated from food.
In addition, I designed a printed two versions of the gumball wheel. With the feedback from the design presentation, I made a shorter version to test the trade-off between speed and dispense velocity. I also added motor housing to both designs and they fit perfectly. The picture is attached below The next target will be print sets of gears with different ratios.
Group Status Report for 3/13
Nothing major to report from the team perspective. We’ve ordered most of our parts and are waiting for those to come in (many have already). Our timeline hasn’t changed much, besides waiting on doing some group initial testing (this was buffer anyways). Some of the timeline is perhaps slightly pushed back, i.e. PCB design, but we allowed for enough buffer to make this a non-issue. Xander gave our design presentation this week and we are happy with how it went and the questions asked.
Joanna’s Status Report for 3/13
The rest of the weekend and early into the week I helped finish the presentation and prepare necessary talking points. I spent the bulk of the week downloading and learning Fusion360 so that I could meet later on with Manny to work on the PCB design. There were some initial issues with the download that I had to refer to the IT department to fix, but that didn’t take more than a day. We were mostly successful in working on the design, but there are a few specific components I couldn’t find models for. There is an option to buy the schematics, which we are still debating. I also was in charge of finding and ordering parts. I had no major personal deadlines this week on the timeline, so my focus was on PCB design. Xander and I had marked this week for some initial testing, which is mostly being pushed due to Xander not yet being in Pittsburgh and us waiting on some more parts to arrive.

Manny’s Status Report for 3/13
This week we started to plan how our PCB will work. Joanna and I met up in Ansys, where we will be doing the bulk of our design assembly. We really started to think about what is required for our PCB. We concluded that because the motor controllers and batter will be stacked directly on top of the raspberry pi zero W, that there is no need for these components to be included in the PCB. We also debated whether the SPST button switches would also need to be included because the buttons are laid on the outside of the device, and we decided (for now) that buttons will have a better/safer connection if they are wired to the PCB. The two options for our PCB schematic are shown below. This week I had planned to boot up the Raspberry Pi Zero W; however, the starter kit did not come with an SD card, so I am waiting on that to come in. Despite this minor setback, I am still on track to start initial testing of the motor this week, all I need is the SD card.

Xander Status Report for 3/13
I presented the design presentation and received many helpful feedback!
This I finalized the designs for CADs, produced more variation of the gum-ball wheel design with different trade-offs between speed & accuracy. We finalized the choice of electronics, and what goes on the PCB. I also adjusted the upper assembly to give enough room for PCB, including the electronics on it.
3D printing is underway. I’m encountering quite a bit of re-prints. The issues are print quality and difficult sanding job. I’m getting more experience at sanding stuff.
Group Status Report for 3/6
No major setbacks to report -we’re on track! We ordered a bunch of parts this week and put together the design presentation. We’re about halfway through our budget but are feeling confident about the overall budget. We have a full schematic for our design. We are going to order an ADC for our analog inputs, longer pins for stacking modules, and an SD card for the Raspberry Pi.
Xander’s Status Report for 3/6
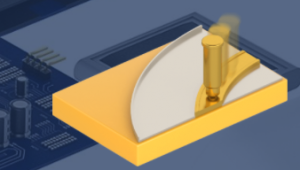
This week, I completed the design, CADing of storage section, sensor & fan plate, ring selector as well as electronics housing. I decided to use a position sensor (continuous potentiometer) for the ring selector. Four gears are on the ring selector and one of which is connected to the position sensor. This ring selector is the primary method to take any user input. We’ll be using it to let the user to select what volume to dispense.
Our electronic housing is really compact. Pisugar, Pi, 2 motor drivers house directly stacked together with stacking header pins. The electronics sit within the ring selector. We left some wiggle room just in case we cannot stack as tight as I like. PCB will sit on top of sensors & fan stage. The fan is primarily for dispersing the powder more evenly over the area. The design also utilizes the fan to cool the electronics (we don’t really need this function). Below are some images of CADs. I included a rendering of the whole thing to give a better sense to viewers. The rendering holds a flat small display on the top, this component is currently unknown. We hope to find a short wide flexible e-ink screen to wrap around the ring selector

Manny’s Status Report for 3/6
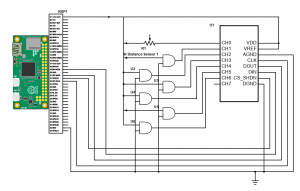
This week, the components we ordered started coming in the mail, so I was able to see how we are going to stack the motor controller bonnets and PiSugar onto the Raspberry Pi. From this, I could see that we will need longer pins to stack these modules. I also started to put the schematic together so we can get to testing our components as soon as possible. In the making of the schematic, I realized that the Raspberry Pi cannot read analog inputs, we added an ADC to our components list. This will be soldered onto the PCB, maybe with the pick and place machine in Ansys. I used Digikey to build this schematic. I used and gates to represent the IR distance sensors and an arbitrary I2C chip for the motor controller bonnets.
Here is a picture of the schematic:
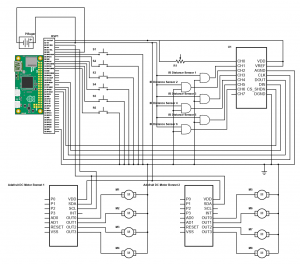
This upcoming week, I need to focus on booting up the Pi and learn how to configure the I2C and SPI communication protocols to communicate with the devices. But first, I need to order an SD card for the raspberry pi. I also need to place an order for the ADC (MCP3008). This communicates via SPI and has 8 different analog input channels.
Joanna’s Status Report for 3/6
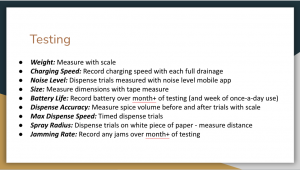
This week I focused on a bunch of little tasks and continued re-education on PCB design/ communication protocols. I’m feeling more comfortable with the PCB design Manny is working on. My big tasks for the week were finding/ordering parts (and having to make some adjustments based on shipping issues). The other big component was doing the design presentation. I had no personal deadlines this week because I knew I’d be out of town for some personal stuff, so I focused my time not spent on the presentation on research. Next week Xander and I hope to finish initial testing on our 3D printed parts. Based on feedback from the last presentation, I made more solidified plans for testing, shown below. We’ll use spice packing density data I collected to determine how long the device should dispense for in order to test dispense accuracy.
Group Status Report for 2/27
The main group task of this week was to give the proposal presentation (Joanna as presenter, All for Q&A). Our biggest roadblock thus far is ensuring all of the parts we need are available and will arrive when we need them. We might need to order some rudimentary interim parts (i.e. for breadboard prep for PCB), but this hasn’t affected our budget much since we’re in the first round of ordering parts. The schedule has not changed, but included is that from the proposal presentation.
Manny’s Status Report for 2/27
This week, we had to prepare for our proposal presentations. After discussing with Joanne this week, we finalized the list of components necessary for our design and submitted order requests for the components. We will use 4 DRV8833 DC motor drivers to drive the 8 DC motors with the GPIO ports from the raspberry pi. The IR sensors/potentiometers/buttons for measuring volume are analog devices, so they can also be connected to the raspberry pi without the need for intensive circuitry. The PiSugar2 has a 5V power output for all the other components that require voltage (motor drivers, IR sensors etc) and we plan to communicate with the battery via I2C. After discussion with my team, I decided that we should breadboard our design with all the components prior to ordering our PCB design to make sure that there would be no errors when we get it delivered. However, this means that we need to breadboard and validate our schematic as quickly as possible. This week while waiting for the components to arrive, I can start designing our schematic for the PCB.
Xander’s Status Report for 2/27
This week I proceeded with the production of the dispensing mechanism as planned. It took many iterations to learn the shortfalls and limitations of 3D printering since our design is pushing the limit of how tiny things can be. I completed the gum-ball wheel model and vertical auger. Image 1 below shows the two versions of the gumball wheel. Version 1 contained some design flaws (not enough spacing for gears). In addition, after testing with salt, V1 also shows that the axle is too thin. The frictional force of powder is greater than I expected. Version 2 (Image 1 on the left,2) contains the adjustment and work as expected. I tested all models by manually turning the gear and see how it performs. The vertical auger leaks powder when shaking violently. The model is tested to failure and the auger snaped to pieces, need to increase the axle diameter as well. Visually auger seems to have better granularity control.
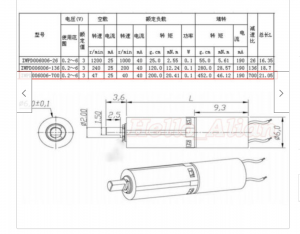
Further, I participated in the selection of electronics parts. The spec below show the motor I selected (the previous choice was out of stock).
Joanna’s Status Report for 2/27
At the beginning of the week, I practiced and gave the proposal presentation for our group. Otherwise, this week my tasks were to work with Manny on the PCB design and then decide on the upper/lower connection. For the former, Manny and I met to discuss the plan of action for assuring our design is functional before ordering. We’ve gathered a list of parts which we hope to have shipped by early next week. As I’m unfamiliar with a lot of PCB design (due to having a different speciality), I invested time into researching communication protocols (e.g. I2C and SPI), refreshed myself on general circuitry design, and looked into motor drivers. We’ll need to provide accurate voltage to the motor despite voltage reliance between the motors/drivers/raspberry pi. The original plan was to use I2C for the communication protocol, since Manny had worked with it before, but we’re investigating SPI since it might be easier to use (e.g. easier slave addressing system, faster data transfer rate). We’re planning on ordering some rudimentary motors and first breadboard our circuits before officially putting together the PCB. I’m also spending this weekend and early next week researching how to control the IR sensors for accurate measurements and am looking into E-ink screen options compatible with a raspberry pi (e.g. PaPiRus https://github.com/PiSupply/PaPiRus). For the upper/lower connection, I’m placing an order for contact pins (i.e. pogo pins) and conductive tape so that the parts will seamlessly connect. This seemed like one of the cheapest solutions that is also moveable, small, and easy to install. Next week as a group we will start testing in order to decide on the dispense mechanism. I’ll also continue my research and re-familiarization with IR sensors, communication protocols, motor drivers, etc and assist Manny with the ultimate PCB design. It’s my desire to invest the time early to catch up on a lot of the hardware/software info I haven’t needed since ECE Core courses.
 Moveable Pogo Pin Example
Group Status Report for 2/20
This week we narrowed down the scope of our project plan. We’ve assessed potential difficulties, as outlined in the proposal presentation. Our biggest expected challenges are going to be meeting our accuracy expectation for the powder/solid dispense system, storage capacity, and integration. We will continue to focus on these areas as the project more seriously commences (i.e. when parts are ordered and the proposal presentation is complete). We’re brainstorming three different options for the dispensing mechanism. There were no major changes to our initial designs beyond abandoning complex cleaning systems for MVP, including the idea of including a theoretical analysis of nano cleaning for our MVP. This was due to the abstractness of this component. Our original schedule remains intact.
Xander’s Status Report for 2/20
I researched powder/solid dispense technology. It turns out to be a difficult problem. Two industries have existing technology. The first is lab equipment companies. Their solutions have extremely high accuracy and they’re mainly used for lab automation. Another industry is the packaging industry. I found a lot of inspiration from automatic packing machines. The comparisons of these products clearly show the tradeoff between dispense speed and accuracy. One similarity between the products is that they are all large. In fact, their size is several magnitudes larger than our product size.
I concluded three types of dispense mechanisms as shown below. Gum-ball wheel (like cereal dispenser), auger (vertical/horizontal), and rotating “cup filler” (with offset opening on top and bottom).
I CADed all threes for our design and printed the first one for testing (manual, no motor). Learning all the tricky things (deformation, out of specs) about printing moving parts with resin printers. Sanding is crucial in making things actually and did produce a moving proof of concept. Testing with salt did not succeed since the axle is so thin and I could not pinch it hard enough with my fingers. CAD adjustments for next week.
Manny’s Status Report for 2/20
I researched hardware components that we will need for our device. After deciding on using a raspberry pi zero W, I began to look at sensors/actuators that we can use. We are planning to use IR distance sensor (x6) and DC motors ( x7) in total. We will probably use I2C to communicate with the motors and sensors. We will also need DC motor controllers (x7 or x2) to drive the motors. We are not sure if we can use one controller to drive all 6 motors since only 1 motor will be active at a time. I will have to design a pcb board to route all of the components in a more compact space. We plan for all of our hardware components to be powered by the Pi Sugar 2 since it is rechargeable, compatible with the Raspberry Pi zero W, and also has 5V power rail for peripherals.
Joanna’s Status Report for 2/20
This week our team worked to complete the deadline for the proposal presentation. We met multiple times during the week outside the recitation meetings in order to determine our workflow, etc. While our team combined efforts to prepare the contents of each section collaboratively, I spent additional time working on formatting/style. I worked on finding various parts for the user interface, which we hope to order next week. In charge of the cleaning mechanism, I completed research to determine the best method to prevent cross-contamination without additional mechanisms. I did research into spice packing densities to determine our average output in order to achieve an accurate dispense. I also designed robust tests for our device.