Team Status Report for 10/04

Progress
  • Found/ordered all main components need for breadboarding and prototyping, so that we can begin development and integration of the sensors ahead of when we get the hardware. These components include the MPU6050, haptic motor controller, and the DonkeyCar.
  • Moved development for the STM32 onto the STM32CubeIDE and development for the ESP32 to Arduino IDE. Got FreeRTOS running on the STM32 that was able to print debug messages and blink LEDs in different tasks.
Design Changes
  • Due to the higher-than-expected costs of PCB manufacture, we have decided to cut the PCB for supporting the IMU attached to the user’s finger. It is simply much cheaper to use a SPI-enabled adafruit IMU breakout board, and connect that to our custom glove PCB than to make both ends custom.
Risks & Risk Management
  • There seems to be a conflict with enabling both FreeRTOS and the WPAN BLE Stack on the STM32 that could be due to both the Sequencer (ST’s bare-metal task scheduler) and FreeRTOS running on the same core (Cortex-M4). We may need to look into another microcontroller or research additional workarounds to get an RTOS and BLE enabled on the kar.

Caitlyn’s Status Report for 10/04

Accomplished

This week, I worked with Enrique to set up FreeRTOS on the NUCLEO-WB55RG board that we will be primarily using for kar prototyping. We followed a tutorial that I linked two weeks ago, however instead of setting up FreeRTOS in VSCode which I worked on last week, we decided to set it up in STM32CubeIDE. After setting up LEDs, redirecting printf to Serial Wire View (SVW), and FreeRTOS, we were successfully able to create two tasks where one toggles an LED and the other prints to the serial monitor. We decided to stick with using the ST IDE for setting up the environment because there are more resources online using this setup, and we will probably stick with using the ST IDE for the remainder of the STM32 development.

I also worked on a more complete architecture diagram of our system that was used in the design presentation. For this diagram, I communicated with Nick on where the hardware is and communicated with Enrique on what the communication protocols look like between components.

Progress / Schedule

I am a bit behind schedule, since I was supposed to finish FreeRTOS setup for the STM32 last week and finish up researching IMU algorithms this week. Since I have just received the ESP32-S3 microcontroller and found an additional MPU6050 that I can use, I will focus on getting the IMU reliable, accurate, and consistent. I have updated the Gantt chart, and believe that I can still catch up with my goal of finishing up the IMU subsystem by next week.

Deliverables / Next Steps

Next week, I will:

  • learn how to use the ESP32-S3 for IMU.
  • research the FIR and Kalman filters for the IMU.
  • collect measurements from the IMU and process them through filters.
  • set up FreeRTOS on my own Nucleo STM32 (not the NUCLEO-WB55RG) on STM32CubeIDE since it looks like we will be doing all development on there.

Nick’s Status Report for 9/27

Accomplishments

This week I worked on completing the preliminary layouts for all of the boards. With our chosen design for our hand controls, we were able to solidify our IMU choices and get back on track for our board design schedule. Now that we have decided to use two IMUs for the hand controller, two boards were required for the glove: one for the primary microcontroller on the back of the hand, and one for the IMU on the fingers. This required some extra work like selecting connectors and a cable for connecting between the two boards, so that the power, ground and SPI lines could reach the IMU. The one bottleneck for board design is that the Kar PCB sizing is still a little bit uncertain, as we do not yet know where the holes for the Kar PCB will be. This will be solidified when the Kar arrives and is measured; it has already been ordered.

Progress/Schedule

Progress is essentially back on schedule, although ideally all the layouts would have been done by now. However, adding holes to the PCB should be a very quick process once the Kar arrives.

Next Steps

This coming week I will be working on purchasing many of the components we need for the boards, as well as potentially putting in orders for the PCBs + assembly as well. I will need to see what the order process is for boards in order to do this.

Enrique’s Status Report for 09/27

Accomplished

So far, I’ve been working on setting up a development environment for the XIAO ESP32S3 that works on both macOS and Windows. We have decided to move forward with the Espressif-IDF (Espressif-IoT Development Framework), given that Espressif Systems is the company that makes the ESP32 and there is extensive amounts of support online through documentation and forums.

There is a Docker image that is built and published by Espressif on their official Docker Hub account. This makes building ESP32 code seamless across different operating systems. I wrote the Dev Container configuration file for the ESP32 which uses the Espressif image. However, I personally develop on macOS, and have found that the flashing process specifically is easier to do locally, given that Docker spins up a Linux VM and does not run on the macOS kernel. Windows can bypass this with WSL and USB passthrough, on the other hand.

We accomplished writing a simple program that flashes an onboard LED via simple GPIO set calls and delays. The program also launches an additional thread that prints to a serial monitor via UART. This basic multithreading program was possible due to FreeRTOS running on the board after being flashed (it is the default with Espressif-IDF).

Progress / Schedule

According to the gant chart, I completed my part of the “FreeRTOS Setup for ESP32/STM32”. However, “Bluetooth Communication Implementation” is still work-in-progress, and I could not fully finish it this week, so it will carry on to next week.

Most of my time spent went into setting up development environments for microcontrollers, and figuring out the correct software dependencies for our project. This video in particular was pretty helpful in getting set up for macOS. Some code, along with our PCB schematics/layout are in this GitHub repository. Overall, I’m mostly on track. I don’t have an official task for next week, which gives me some slack for Bluetooth communication. I’ll also help Caitlyn with STM32 code.

Deliverables / Next Steps

Next week, I will:

  • Finish pushing some of the ESP32 setup code to our GitHub repo.
  • Start implementing with wireless communication with 2 microcontrollers.

Team Status Report for 09/27

Part A: Nick (public health, safety or welfare)

The one major health/safety concern for our product is the concern of a haywire car driving around without control. In order to address this, we are implementing engineering solutions to ensure this will not occur. The three major solutions we are planning are 1) keeping the Kar in an enclosure will doing our demo, 2) allowing a user to easily put the Kar in a stopped idle mode, and 3) implementing timeouts between the glove microcontroller and the Kar such that if there is no communication between the two over a certain length of time, the Kar automatically switches into its idle mode. We believe these solutions will be sufficient to ensure Kar safety at all times.

Part B: Caitlyn (social factors):

Our glove controller and kar meets the need for more natural and immersive interaction by allowing people to drive a kart directly with their hand movements. Unlike a 2D driving video game, the experience is physical and tangible, enabling the user to feel the kar’s motion rather than only seeing it on screen. Compared to an RC kar with a traditional controller, the glove is more intuitive and inclusive, since it removes the learning curve of joysticks or buttons, allowing anyone to pick it up quickly. This project lowers the barriers to driving RC kars for everyone, making it more accessible, engaging, and fun. It also supports community interests in interactive driving, collaboration, and friendly competition.

Part C: Enrique (Economic Factors)

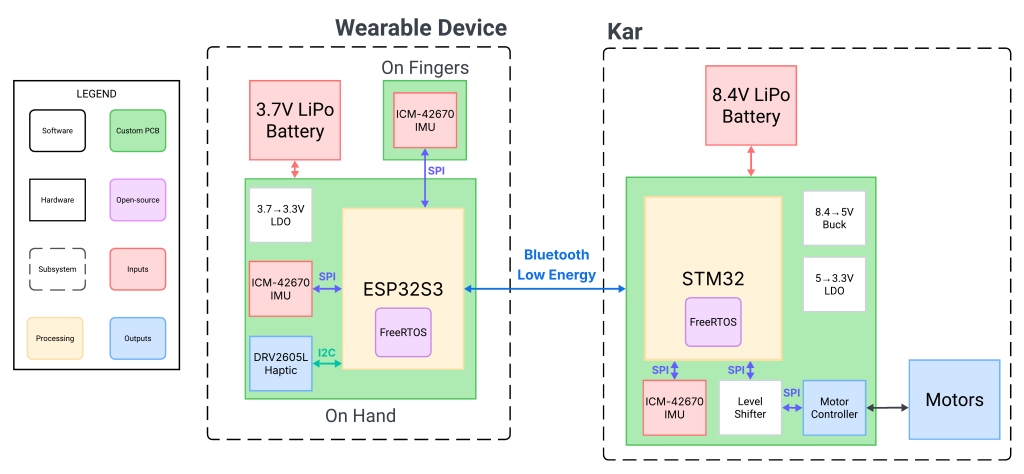
Our Mario Kar system balances performance and affordability by leveraging widely available microcontrollers (ESP32 and STM32) and low-cost IMU sensors. These components are mass-produced, making them economically viable for both prototyping and potential scaling. Using Bluetooth as the communication channel avoids the need for specialized hardware and reduces distribution costs, since wireless modules are integrated into the ESP32. From a consumption perspective, the design is energy-efficient and powered by inexpensive batteries, minimizing recurring costs for users. Overall, the project demonstrates how accessible embedded hardware and open-source software can be combined to deliver an interactive system that is both technically capable and economically practical.

——————————————————————————–

Nick wrote section A, Caitlyn wrote section B, and Enrique wrote section C.

——————————————————————————–

Progress
  • Worked on the Design Presentation, which addresses how use-case requirements will be addressed through design requirements. Also designed out the system-wide and individual subsystem architectures and flows.
  • Purchased multiple components, such as the DonkeyCar for PCB layout and microcontrollers for initial prototyping and breadboarding.
  • Setup FreeRTOS on the ESP32-S3 and STM32 Nucleo board and began setting up development workflow.
  • Completed the component selection, schematic, and layout for both the glove/controller and kar PCBs.
Design Changes
  • Beyond our MVP, one of our stretch goals is to add a first-person camera to the kar. However, if we continue using Bluetooth or Bluetooth LE for communication between the controller and the kar, receiving the camera feed may be difficult. Therefore, we may need to reconsider our current communication methods to support future camera integration.
Risks & Risk Management
  • An ongoing risk is meeting our use-case requirement of 30–50 ms round-trip latency between the glove controller and the kar. This latency includes sampling IMU measurements, transmitting them over Bluetooth to the kar, mapping them to movements, and sending haptic feedback back to the controller. The main challenges lie in the IMU sampling frequency on both devices and the reliability of Bluetooth communication in both directions. We can mitigate this risk by optimizing IMU sampling rates, minimizing Bluetooth packets, and exploring more efficient communication protocols.

Caitlyn’s Status Report for 09/27

Accomplished

This week, I followed multiple tutorials to set up FreeRTOS and the beginning of what our team’s workflow would look like on the STM32.

Using an STM32 Nucleo board that our team had on hand, the STM32F401xE, I used the STM32CubeMX software to enable FreeRTOS on the board. This software has a user interface for easily using methods in the FreeRTOS library, which I experimented with to create two simple tasks. I was able to change the priority of tasks and figure out other settings like configuring the heap size. Since STM32CubeMX is more for configuration and code generation, I couldn’t figure out how to compile and deploy the code without installing STM32CubeIDE, so I moved onto setting up the STM32 development environment on VSCode.

Recently STM32 developed an extension on VSCode called “STM32Cube for Visual Studio Code” which integrates build systems like CMake so users can compile STM32 projects within VSCode. With this extension, I was able to compile and deploy the STM32CubeMX-generated FreeRTOS firmware onto my STM32 Nucleo board.

Progress / Schedule

I will need to spend a bit more time making the STM32 development workflow more seamless and integrated, since it took me some time to install and debug drivers for the STM32 Nucleo board. This way it will be easier for the team to work on different parts of the STM32 software concurrently.

Otherwise, I am mostly on schedule but will have to prepare and do some research for collecting IMU measurements and experimenting with different filters, namely the FIR and Kalman filters.

Deliverables / Next Steps

Next week, I will:

  • push the STM32 development environment up to the team GitHub and work with Enrique to set up a more seamless workflow for working on the STM32.
  • outline and plan what types of tasks we will need on the TX and RX MCUs. This will include identifying what initialization and run will look like for each task, as well as task priority.
  • research the FIR and Kalman filters for the IMU.

Nick’s Status Report for 9/20

Accomplishments

This week I worked on completing the preliminary schematic for the both the glove and the kar. This primarily involved doing component selection for the different aspects of each system. For example, the kar needed a motor controller IC for the BDC motors on the COTS RC body we are purchasing. For this, I selected TI’s DRV8242-Q1, as it does all the required current sensing and has all the needed H-bridge circuitry internally. However, this necessitated the use of a level-shifter IC, as the DRV84242 has a 5V logic level and the STM32WB55 we are using only supports 3.3V logic levels. In terms of power supply, I also had to select voltage regulators as the battery inputs we are using provide  8.4V and the motor controller and the STM32 will need 5V and 3.3V as described. I decided to use a buck converter to drop from 8.4V to 5V for the greater efficiency at the higher motor driver amperage, and then a 5V to 3.3V LDO for providing a low noise input for the STM32. The ESP32 needs to step 3.7V down to 3.3V. At low amperage, the 5V to 3.3V LDO I have selected (LM3940) has a low enough dropout voltage that it can effectively regulate for the ESP32 as well, which is convenient. After performing component selection, creating the schematic in Altium for all the components was relatively straightforward. The one component I have not yet selected + put in schematic is the IMU, as the team is still discussing regarding IMU selection and/or the usage of a flex sensor in the control glove.

Progress/Schedule

Due to not having selected an IMU, my progress is slightly behind schedule. However, I am confident I can quickly select the IMU and put it in schematic at the start of next week, and continue with my tasks as normal.

Next Steps

As described, this coming week I will be selecting the IMU and doing the schematic for it to catch up to the schedule. Additionally, I will start work on the layout for the PCBs as described in our gantt chart. By next Saturday, I should have preliminary schematic and layout prepared for review.

Team Status Report for 09/20

Progress
  • Wrote and presented the Proposal Presentation to the class. We provided information such as our target user, user requirements, possible technical challenges, as well as proposed solution from a high-level. After the presentation, we got some good feedback regarding how the user will control the kart.
  • Investigated how FreeRTOS would be setup on the ESP32-S3 and STM32 microcontrollers, and made plans to implement them next week.
  • Investigated how BLE would be etup on the ESP32S3 and STM32WBx. Tested some starter code on Arduino IDE for ESP32 BLE services, downloaded/installed environments for STM32 firmware and debugging, and read through documentation and community forums for ST.
  • Began the Order List and will finish ironing it out by the end of next week.
  • Mostly completed component selection + schematic for both the glove and kar PCBs.
Design Changes
  • For hardware on the controller, instead of sticking with IMU sensors for inferring user command, we will also investigate flex sensors to detect motion on the user’s fingers. This will enable us to explore more controls that the user can do with their fingers, in addition to the tilt/rotation of the user’s hand.
Risks & Risk Management
  • One of the current risks that the team thought about this week is getting an accurate and reliable reading from the IMU. When creating the Order List, we will need to research extensively and explore a variety of IMUs online. To mitigate this concern/risk, we will order a few different types of IMUs and experiment to see which can provide the best measurements.
  • Another risk is that the PCB development is already behind schedule, but due to the team taking a moment to evaluate IMU and flex sensor options, this is to be expected; it is fully expected that the team will be back on track once this design decision is resolved.

Enrique’s Status Report for 09/20

Accomplished

So far, I have confirmed the use of the XIAO ESP32S3 as the ESP32 platform for this project. The board supports Bluetooth Low Energy (BLE 5.0), which makes it a good candidate for communicating with the STM32Wx family (I have a XIAO ESP32S3 of my own and have tested BLE services with my laptop, with some starter code from the Arduino IDE). On the STM32 side, I have searched the avilable options and identified that the STM32WB series is most relevant, since it includes an integrated BLE stack and has development boards such as the Nucleo-WB55 that provide convenient debugging and GPIO access through STLINK. I have also set up development enviornments for both platforms: Arduino IDE / PlatformIO for the ESP32S3 and STM32CubeIDE / CubeMX for the STM32. In addition, I have reviewed documentation and example projects for BLE communication on both chips to understand their capabilities and constraints. I also found this video to be helpful with BLE  / firmware drivers setup for the STM32WB55.

 Progress / Schedule

At this point, the main task underway is finalizing the STM32 board selection and preparing for proof-of-concept testing. The Nucleo-WB55 is the leading candidate, as it is well-documented, actively supported (frequent posts in ST Community forums), and includes the BLE middleware needed for this project. Once the hardware is secured, I will be able to begin prototyping a minimal BLE connection. The plan is to first establish a simple communication channel where one device (likely the ESP32) advertises a BLE service and the other (STM32) connects to it. This milestone is targeted for completion within the next couple of weeks to stay aligned with the overall project schedule.

Devlierables / Next Steps

The immediate deliverables will include (1) finalized hardware selection of the STM32Wx board, and (2) a working BLE proof-of-concept demonstrating connectivity between the ESP32S3 and STM32. The proof-of-concept will serve as the foundation for the kart’s communication features, such as streaming IMU/flex sensor data or sending control commands. Documentation of the configuration steps, code, and test results will also be included as part of upcoming deliverables to ensure reproducibilty and staying on track with our schedule.

Caitlyn’s Status Report for 09/20

Accomplished

The high-level architecture of our project will involve the ESP32-S3 acting mainly as the data source and an STM32W series board acting as the data receiver. Both of these microcontrollers will need some sort of RTOS running to manage complexity and ensure the system is responsive and reliable

This week, I looked into how we would set up FreeRTOS on each microcontroller. We want to use FreeRTOS since it is a small and open-source real-time operating system that can simplify task management and scheduling for both of our MCUs.

I found that the development framework for ESP32-S3 is already built upon FreeRTOS, so it is possible to just use features like tasks, queues, and semaphores in our code development. FreeRTOS also already supports use on certain development boards such as STM32s, so I watched a video on how we would begin writing tasks and handle scheduling on STM32 after some setup on STM32CubeIDE, which is an IDE for STM boards.
Here is the link for the tutorial for next steps.

Progress / Schedule

My progress is on schedule, as we wanted to spend this week investigating FreeRTOS compatibility and setup on the microcontrollers. This will end up extending into next week of actually setting up our development environments and FreeRTOS on the hardware.

Deliverables / Next Steps

Next week, I will:

  • follow the tutorial to setup FreeRTOS for an STM32 board that we have readily available such as the STM32F401xE.
  • outline and plan what types of tasks we will need on the TX and RX MCUs. This will include identifying what initialization and run will look like for each task, as well as task priority.
  • set up a Git repository for the team so that we can begin collaborative development.