Alex Li’s status report for 11/7/2020

This week I have finished writing the NFC reader code and the host card emulation code. Both work well, and the reader can retrieve a simple token from the phone, which I designated as “1234321” (registering a phone ID is not implemented yet). The reader code basically does 3 things: (1) set up the connection with the pn532 chip using the i2c ports, (2) send and receive information between the pn532 and an Android phone, and (3) send this information to an AWS server using a web socket connection. The sending and receiving of information on the pn532 works by sending a packet called APDU to the phone, which the phone will the use to find what type of request it is, and send back a response APDU to acknowledge or respond with data. Because we only have one type of data (just the phone ID), we decided to just have one exchange (select application->phone ID), but this will be changed later. The response is therefore just the phone ID. A typical smart card reader execution will send a first APDU to select the application (phone responds with success), then another APDU to retrieve any type of data from the phone (phone responds with data). This will be fully implemented today or tomorrow.

To clarify, for our MVP, we simply request a phone ID from the raspberry pi, and send this ID to the server for authentication. The raspberry pi will request the server to authenticate this ID. If the server has this ID in the database, then it will respond with yes, otherwise no. This is a simple implementation, but obviously more layers of security will be added in the coming weeks.

The web socket is done in C. Originally, Michael had code written in Python, but that would mean I would need to start 2 processes and have some sort of inter process communication using a file or stdout. This is not ideal, so I decided to rewrite the client side program in C, which does a simple socket connection and send and receive commands with the APDU response from the phone. The client server code is not completely finished yet, but it should be done by today or tomorrow.

This week is mainly on schedule if I can finish the client server code by today or tomorrow. The only missing work is to implement more security, but I expect to combine that work with the work I had planned for next week (UI development, which should not take long).

Alex Xu’s status report for 11/7/2020

This week I made significant progress on the locking mechanism. I finished the code part that actually causes the motor to turn the lock open, which means we’ll have a visual representation of the iDoorlock process going from phone tap to motor activation (which will represent the lock unlocking during our demo). I also talked to Jiaqi about the motor strength issue, and with the stronger motor coming in yesterday I was able to do a quick test and determine that the new motors are indeed strong enough to turn the locking mechanism. We have made precautions, though, and I’ve sent in an order request for a servo shield should the Raspberry Pi by itself not supply enough current for the mechanism.

Open issues: prepping demo and an actual adhesive mechanism for the lock mechanism. Demo is almost ready, we’ll probably need to run a few tests to make sure everything is in order though. As for the lock and motor, I’ll need to look into how I can actually connect the two together. I have a few ideas at the moment, some of which involve sanding down part of the lock so it’s flat enough to superglue a motor horn onto, but I’d like to come up with something more practical.

Next week will be about figuring out these two open issues. I’ll most likely communicate with TechSpark independently to see if they have scroll saws/belt grinders.

Media: testing lock mechanism (video was too large so only testbench shown), naive test mechanism with stronger motor that opened lock (temporarily held in place by wiring)

Team status report for 10/31/2020

This week, we were able to work more on each of our individual parts. Michael researched security involving AWS communications, Alex Li worked on receiving NFC signals with the Raspberry Pi, and Alex began to troubleshoot the motor and lock combo. We also met in person to discuss future workloads and plans.

One critique of our design that was brought up was the unintended additional latency and redundancy of the Arduino Uno in our design. This week, we made significant process in detecting an NFC test card and an NFC chip in an Android device with the NFC Shield module and Raspberry Pi alone. This discovery has allowed us to cut the Arduino Uno from our design, which will hopefully help us better meet latency requirements and keep our final housing design small and lightweight. It also puts us closer to a potential MVP, involving receiving an NFC signal from the Shield, routing it to AWS with the Raspberry Pi, and then requesting it back from AWS.

Next week, we plan to finish the remaining parts of the MVP, which would involve finishing up the code connecting the Raspberry Pi to AWS and from the Raspberry Pi to the locking mechanism. We will also try to find a locking mechanism solution that will work for our current situation.

Alex Li’s Status Report for 10/31/2020

This week I wrote the Host Card Emulation portion for the phone app. Because the HCE is designed to work no matter what application is open, the HCE is implemented as a Service that runs when APDU (Application Protocol Data Unit) is detected (basically detect when reader is trying to talk with the phone). To register the Service class, the application Manifest (ApplicationManifest.xml, XML file containing various information about the application and its context) needs to be updated with the Service and its NFC permissions. An Intent Filter is added in the manifest so the phone knows to run the service when APDU detected from reader. Also, a new XML file containing APDU specific information is added, and the Service is updated to route to this new XML file, dubbed apduservice.xml. The most important information in this file is the AID filter (Application ID), which is basically information that the reader must send and the app must have to know what to run when communicating. Finally, a class extending the HostApduService class made specifically for APDU was created. This class defines functions to process APDUs, which is basically a byte stream decoder. To process an APDU, I needed to look at sets of bytes in the APDU, which has various data fields. The format for APDU is defined, so I just needed to check indices of the APDU, which is a byte[] (byte array) as exposed by the HostApduService interface. Finally, another byte[] is returned from this function as a response, but I have not yet implemented what this byte [] will be. It should be secure and unique. UID (NFC) should not be used because another NFC tag could easily mimic the same UID. The security options should include some phone specific unique token, possible distributed by the server. I am looking into several security options, but this should be work for next week. For the near future (Sunday, Monday, and Tuesday), I am working on getting the NFC Reader code and this code to communicate correctly.

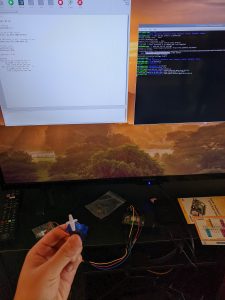
I also worked on wiring the Raspberry Pi and the NFC reader, which was work planned for next week. This portion was fairly straightforward, but required some time to debug some hardware specific components. I also tested the NFC reader with both a smart card and an Android phone using a downloaded tool that reads bytes from i2c pins. The NFC + RPi interface worked for both the smartcard and the Android.

I also started on writing the NFC reader code, which needs to precisely send the APDU to the phone, and respect the protocols needed (ISO…). There isn’t a lot of information about this online, so I am basically just testing by trial and error. For example, the mentioned AID filter needs to include a first byte that defines what type of AID it is. Online example use “registered” AIDs, instead of proprietary ones that don’t need registration. If they use registered AIDs, then won’t another application with the same AID be problematic because they are both defined to have the same AID filter on the Android phone? Thus I will probably need to define my own “proprietary” AID. I am still fairly confused about this, so I will work to understand and implement this portion of the reader tomorrow.

I believe by next week, I will have working reader and phone code, and I will implement the security for the reader/phone. The security should simply be some overhead for each component, so it should not take that long. After this work is finished, the following week will be working on the UI features for the phone app (HCE is more like a background service). This will include simple features like registering a lock (will probably work with Michael on that). This will not take more than a few days because I did sufficient learning on basic Android App Development in the previous week, and already have basic XML layouts. I will be done with my portion of the project then, so will help out on other portions or continue to improve my portion of the project.

Based on the Gantt Chart, I am on task. Some of the tasks are currently being done concurrently, so the schedule may be slightly off for some of the tasks. This is because I need to develop each component at the same time to get a better understanding of the tools and frameworks surrounding the whole system. Also, being able to test the components is necessary.


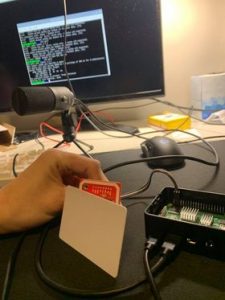
Sorry for the image quality. Here, a tool called nfc-poll is being used to detect NFC reader input. The NFC reader had to be registered in the Raspberry Pi config (I2C), then running this tool allowed for the UID, ATQA, and SAK to be read (NFC specific information). The text is blurry but I ran the tool twice to check if the smartcard had the same UID to make sure the NFC was working correctly. I also tested with the smartphone when we were working as a team earlier, but I forgot to take a photo.

Michael Chen’s status report for 10/31/2020

This week, I met up with Alex and Alex to go over the Raspberry Pi side of the locking mechanism. I also wrote up a short Python test script that connects to the WebSocket and sends some test messages to ensure that we can receive messages from the “server”. Since WebSocket requires a persistent connection, I’ll have to migrate the code later on once we get the other features up and running so that the WebSocket connection is properly maintained.

I also did some extra research on the security architecture of the system and was able to conclude that using IAM keys to authenticate the Raspberry Pi to the server was the best available solution, as AWS API Gateway does not support mutual TLS for WebSocket APIs. Many of the articles that I read such as this Heroku one (https://devcenter.heroku.com/articles/websocket-security) suggest having the user authenticate with secret information such as a username and password to retrieve a token that will authenticate all future requests. However, since the RPi is handling the server communication and the user is not able to directly interface with the RPi, we decided that we would need to use the IAM keys since the user would not have to enter them and the permissions on the associated IAM role would only allow any adversary to invoke the API if the keys were compromised.

There aren’t any major risks at the moment. My work has been pretty straightforward and standalone, so integrating with the other code should be simple. Next week, I plan to work with both Alex’s again to get all of the server communication set up on the RPi. I also plan to work with Alex Li to get the WebSocket communication up and running on the Android.